background image

21

DTV MENU

FAVOURITES

OFF
FAVOURITES 1
FAVOURITES 2

OK

Select

Delete

Enable

New

Edit

1.

Press the 

DTV MENU

 button in DTV mode. The DTV main menu appears.

2.

Use the   or   button to select the 

Favourites

, then press the 

ENTER (OK)

 button to enter the

Favourites menu.

3.

Use the   or   button to select a channel. (Press the 

CH/

PAGE 

 / 

 button to skip to previous/next page.)

Press the 

ENTER (OK)

 button to enable the channel as one

of your favourites.
Or press the 

RED/GREEN/YELLOW

 button to Delete/New/

Edit the favourite channel.

4.

Press the 

DTV MENU

 button to return to previous menu,

repeat step 3 to adjust other channels.

5.

To exit the DTV MENU and return to the normal screen,
press the 

EXIT

 button.

Delete:

Use the   or   button to select the Favourites you want to
delete, press the 

RED

 button.

New:

First you have to create a favourites list, then you can edit it.
Press the 

GREEN

 button to add a new Favourites list. Then

press the 

YELLOW

 button to edit the favourites.

Edit

:

1).Press the 

YELLOW

 button to enter the Favourites edit

menu. There are Service list on the left and Favourites
list on the right in the menu. Press the   or   button to
shift between the 2 lists.

2).In the Service list, use the   or   button to select the

channel no. you want to add to the Favourites, press the

ENTER (OK)

 button to add it to the Favourites.

3).In the Favourites list, press the 

RED/GREEN/YELLOW

button to Delete/Reorder/Rename Favourites.

FAVOURITES MENU

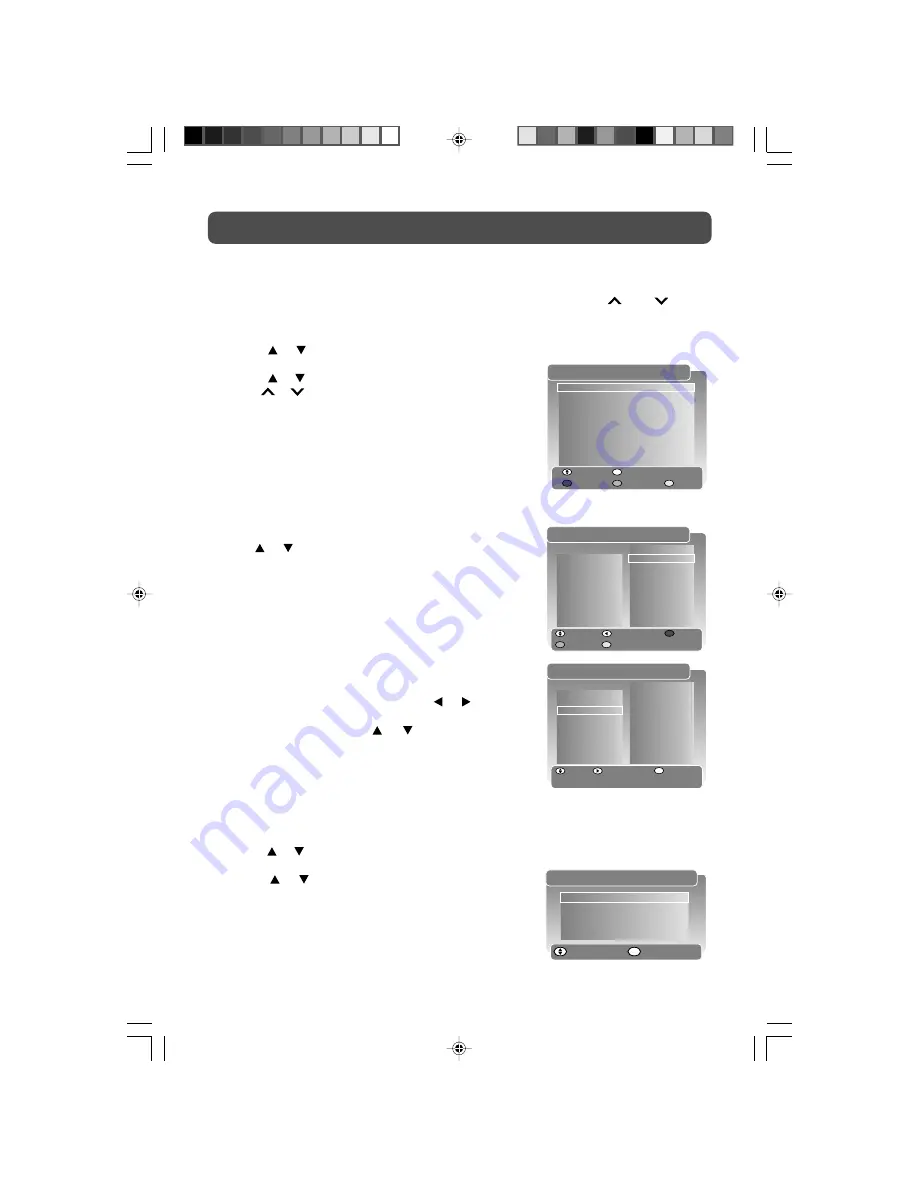
You can organise your favourite DTV channels in the Favourites menu by the following steps.
And you can press the 

FAV

 button to select favourite mode, and press 

CH

 / CH

 button

quickly select favourite channels from the selected favourite mode.

EDIT FAVOURITES

Select

Add to Fav

Favourite List

Name
XXX XXX
XXX XXX
XXXX
XXXXXX X
XXXX
XXXX
XXX XXXXX
XXX XXXX
XXXX

002
005
008
019

FAVOURITES 1

CN
001
002
003
004
005
006
007
008
009

XXX XXX
XXXX
XXX XXXX
XXXX XX

OK

Enter Menu

Select

Languages

TV Setup

Parental Control

Service Setup

SETUP MENU

OK

SETUP MENU

1.

Press the 

DTV MENU

 button in DTV mode. The DTV main menu appears.

2.

Use the   or   button to select the 

Setup

, then press the 

ENTER (OK)

 button to enter the Setup

menu.

3.

Use the   or   button to select an item (

Languages, TV

Setup, Parental Control, Service Setup

). Press the 

ENTER

(OK)

 button to enter the settings and follow the display to

adjust them.

4.

Press the 

DTV MENU

 button to return to previous menu,

repeat step 3 to adjust other channels.

5.

To exit the DTV MENU and return to the normal screen,
press the 

EXIT

 button.

EDIT FAVOURITES

Select

Delete

Service List

Reorder

Rename

Name
XXX XXX
XXX XXX
XXXX
XXXXXX X
XXXX
XXXX
XXX XXXXX
XXX XXXX
XXXX

002
005
008
019

FAVOURITES 1

CN
001
002
003
004
005
006
007
008
009

XXX XXX
XXXX
XXX XXXX
XXXX XX

20-22-1.pmd

17/09/2007, 14:24

21

Summary of Contents for LCD15DVDID-107

Page 1: ...PVS21159S2 IB Cover Size 148 X 210 MM LCD15DVDID 107 15 LCD TV DVD OWNER S MANUAL ...

Page 2: ...tely disconnect the power input the mains plug of apparatus shall be disconnected from the mains The mains plug of apparatus should not be obstructed OR should be easily accessed during intended use Leave a minimum of 200mm around the apparatus for ventilation and 200mm beside the DVD mechanism The ventilation openings should not be impeded by covering with items such as newspaper table cloths cur...

Page 3: ...eans that the unit is double insulated No connection to earth is necessary SAFE USE OF YOUR EQUIPMENT This equipment has been designed and manufactured to meet UK safety standards but like any electrical equipment care must be taken to obtain the best results from the equipment and assure your own safety Here are a few tips to help you do this READ this instruction manual before you attempt to use...

Page 4: ...PERATION 26 27 Playing a disc 26 Pausing playback still mode 26 Stopping playback 26 To skip to a different track 26 Fast forward fast reverse 26 Slow motion Play DVD 26 Skip Forward Reverse 27 Audio selection DVD 27 Subtitle selection DVD 27 Angle Selection DVD 27 SPECIAL FUNCTIONS 28 Display function DVD 28 Locating a specific title DVD 28 Locating a specific chapter track 28 Locating a specific...

Page 5: ...on them but some do not Notes on Unauthorized Discs You may not be able to play some DVD discs on this unit if they were purchased from outside your geographic area or made for business purposes JPG CD picture viewer DISC FUNCTION OR OPERATIONTHAT IS NOT AVAILABLE When the symbol appears on the screen it indicates that the function or operation attempted is not available at that time This occurs b...

Page 6: ...he base stand Be sure that no hard or sharp or anything that could scratch or damage the LCD display come in contact with it Do NOT place pressure on the front of the unit at any time because the screen could crack 1 Disconnect any cables or cords connected to the unit 2 Lay the unit down on a flat surface so the back side is facing up making sure to place a soft cushioned material such as a pillo...

Page 7: ...PLACEMENT When the batteries become weak the operating distance of the remote control will be greatly reduced and you will need to replace the batteries Note If the Remote Control is not going to be used for a long time remove the batteries to avoid damage caused by battery leakage corrosion Do not mix old and new batteries Do not mix ALKALINE standard CARBON ZINC or rechargeable NICKEL CADMIUM ba...

Page 8: ...ess to set the letters size of teletext on the screen 11 SUBTITLE button Press to select one of the subtitle languages or turn off subtitledisplayinDTVmode ifsubtitlelanguagesare broadcast Press to display the selectedTeletext page Press to select one of the subtitle languages programmed on a DVD 12 TITLE Button Press to select the title menu screen FAV button PresstodisplaytheFavouritesmenuinDTVm...

Page 9: ...ause playback and single frame advance 28 SLOW button Press to play a DVD in slow motion DTV MENU button PresstodisplaytheDTVmenu 29 AUDIO button Press to select one of the audio languages in DTV mode if multi audio languages are broadcast Press to select audio soundtracks of a DVD or change the output mode of a CD 30 DVD MENU button Press to enter the main menu of the disc you are watching 31 SET...

Page 10: ...turned ON 8 Remote Control Sensor Do not block this sensor or remote control will not work 9 Removable Stand 10 PLAY button Press to start or resume playback of a disc STOP button Stop playing a disc PAUSE button Pauseplaybackandframeadvance PREV button Press PREV button to go back to previous chapters tracks Press and hold to fast reverse playback NEXT button Press NEXT button to advance chapters...

Page 11: ...age 23 Satellite Cable or TV antenna cable to TV ANTENNA CABLE Terminal cable not included CONNECT THE POWER CORD Connect the AC power cord into a wall outlet Press theSTD BY ONbutton on the unit or remote control to turn on the unit Note Be sure the AC power cord is disconnected and the TV is switched off before making connections Make sure that all the components are connected correctly When you...

Page 12: ...Y INFORMATION The display information shown below on the TV screen depending on the operation status DISPLAY PICTURE menu SOUND menu SETUP menu TV SETTING menu TV Display Symbol 2 12 3WO 1 pmd 22 08 2007 17 00 12 ...

Page 13: ...ess the FUNCTION button or the TV DTV button to select DTV mode DTV Set up menu appears 3 Press the ENTER OK button to enter the Set up menu The system will automatically start to scan and preset all available DTV channels 4 After scanning finished the TV will display the first stored DTV channel UNIT OPERATION SELECTING TV MODE FOR THE FIRST TIME 1 Use the or button to select the Country you pref...

Page 14: ...the unit to Standby mode automatically Off 5 90 120 Country Select the country your prefer Teletext lang Select the teletext language from West East Russian Arabic Farsi Restore setting Reset the TV mode to the factory settings In PC mode Language Select the language your prefer Background Select the menu from translucent opaque on the screen Sleep timer Select the time to turn the unit to Standby...

Page 15: ... or to run Use Manual to re tune or Fine for slight adjustment if needed AFC Auto frequency control Skip ON Skip weak channels OFF No channel skip Channel edit 1 Press the TV MENU button 2 Use or button to select the TV setting menu then press button to enter the setting 3 Use or button to select Channel edit and press the button to enter channel edit menu Rename 1 Use the or button to select the ...

Page 16: ...nced Cold blue white Warm red white mode Preset Select from preset screen display settings to match the type of show you are watching Standard Personal Movie Dynamic Soft Note You can also select simply by pressing the PICTURE button In PC mode Use or button to select the options Brightness Contrast Frequency Phase H offset V offset Colour Temp Preset and adjust them using the or buttons The scree...

Page 17: ...creen press the EXIT button on remote control Experiment with different sound settings until you find the settings you prefer Balance Adjust the balance level toward the left or right speakers Bass Adjust the bass range Treble Adjust the treble range Preset Select from preset sound settings Personal Voice Music Theatre to match the type of show you are watching AVL AutoVolume Level Select On to re...

Page 18: ...ayed To move to the next page of text press the CH button To move to the previous page press the CH button To return to the index page enter the 100 by using the Numeric buttons TIME MIX To view a page of the text whilst watching a TV programme press the MIX button The text will be superimposed over the TV programme Press the MIX button again to return to the text page While watching a TV programm...

Page 19: ... you to read the page To stop the move to the next sub page press the HOLD button will appear on the top left corner of the screen To continue moving through the sub pages press the HOLD button again TO REVEAL INFORMATION Press the REVEAL button to reveal concealed information quiz answers etc Press the REVEAL button again to conceal the information again FASTEXT At the bottom of the teletext scre...

Page 20: ... delete press the RED button 2 Press the RED button again to confirm deleting the channel You must enter your PIN to complete this action the Default PIN is 0000 Reorder 1 Use the or button to select the channel no you want to move press the GREEN button 2 Use the or button to move the channel 3 Press the ENTER button to confirm moving the channel Rename 1 Use the or button to select the channel n...

Page 21: ...on to add it to the Favourites 3 In the Favourites list press the RED GREEN YELLOW button to Delete Reorder Rename Favourites FAVOURITES MENU You can organise your favourite DTV channels in the Favourites menu by the following steps And you can press the FAV button to select favourite mode and press CH CH button quickly select favourite channels from the selected favourite mode EDIT FAVOURITES Sel...

Page 22: ...ust them Full Scan Add New Services Perform DTV channels scan and add the scanned channels in to the service organiser while the existing services kept Full Scan Replace Existing Services Perform DTV channels scan and store them while the existing services removed Manual Scan Perform manual scan and fine tune Restore Setting And Full Scan Delete all DTV channels and personal settings then perform ...

Page 23: ...dio and video from the same VCR to the same input AV IN Note Please refer to the user manual for the VCR for more information Connect to a camcorder Connect the right red and left white audio output from the camcorder to the right red and left white input on this unit Audio cable not included Connect the video yellow output from the camcorder to the video input on this unit Video cable not include...

Page 24: ... computer to the 15 pin D SUB PC VGA input on this unit using a monitor cable not included Connect a stereo audio cable not included to the PC AUDIO IN jack on the bottom of this unit and the other end to the AUDIO OUT jack on your computer s sound card Note If the TV is cold there may be a small flicker when the set is switched on This is normal there is nothing wrong with your TV If possible use...

Page 25: ...adphones can cause hearing loss USING HEADPHONES DOLBY DIGITAL FOR DVD Dolby Digital is a sound system developed by Dolby Laboratories Inc This unit automatically recognizes DVDs that have been recorded with Dolby Digital Not all Dolby Digital sources are recorded with 6 channels Some sources marked Dolby Digital may be recorded in Dolby Surround a 2 channel system Look for this logo on your unit ...

Page 26: ...ss the PAUSE button To resume normal playback press the PLAY button Each time you press the PAUSE button the picture advances one frame STOPPING PLAYBACK Press the STOP button at the location where you want to interrupt playback To resume playback at the position where the disc was stopped press the PLAY button If you press the STOP button twice the unit s memory will be cleared and pressing the P...

Page 27: ...nues with the new subtitle selected The number of languages recorded differs depending on the disc If no button is pressed within a few seconds playback continues without changing the current subtitle This function can only be used for discs on which subtitles have been recorded in multiple languages On some DVDs subtitles are activated from the main menu of the DVD Press the DVD MENU button to ac...

Page 28: ...ontains title numbers you can locate a specific title by directly selecting a title number 1 In stop mode press the GOTO button 2 Press the or button to highlight a specific field and press the corresponding number button s for the title you want 3 Press the ENTER button to confirm The unit will start playback about 3 seconds later LOCATING A SPECIFIC TIME You can move to a specific location by en...

Page 29: ...epeat REPEATING A CHAPTER DVD You can play the same chapter repeatedly 1 While the disc is playing press the REPEAT DISC button until the indicator displays on the screen The current chapter is played repeatedly REPEATING A TITLE You can play the same title repeatedly 2 While the disc is playing press the REPEAT DISC button until the indicator displays on the screen The current title is played rep...

Page 30: ...RE FILE DISC 1 Press the PUSH OPEN button to open the disc door 2 Hold a picture file disc by its edge and gently push it onto the spindle with the label side facing up until you hear a click 3 Push the Disc Tray to close the disc door 4 The unit will load the disc and automatically display the contents of the disc on the screen while also beginning to play the picture file These files will then b...

Page 31: ...rbox mode black bands that appear at the top and bottom of the screen Letter Box When wide screen video is played in this mode on a conventional screen black bands appear at the top and bottom of the screen Wide screen This is the correct mode for playing wide screen videos on a wide screen Notes The displayable picture size is preset on the DVD disc Therefore the playback picture of some DVD disc...

Page 32: ...ch ON OFF the DVD LED light The parental lock levels are equivalent to the following ratings 1 KID SAFE 5 PG R 2 G 6 R 3 PG 7 NC 17 4 PG 13 8 ADULT Indicates Parental lock is NOT active The Parental lock is active If you forget the password you can erase your current password by pressing number button 8 on the remote four times then press the ENTER button to confirm the setting PASSWORD 8 8 8 8 PA...

Page 33: ... alcohol to clean the disc Do NOT use irregular shape discs example heart shaped octagonal etc They may cause malfunctions CLEANINGTHE UNIT Be sure to turn the unit off and disconnect the AC power cord before maintaining the unit Wipe the unit with a dry soft cloth If the surfaces are extremely dirty wipe clean with a cloth which has been dipped in a weak soap and water solution and wrung out thor...

Page 34: ...ions are correct This unit is too hot shut off the unit for 30 minutes to cool down The region number of the disc doesn t match the region number of this unit Clean the disc The disc is scratched The plugs and jacks are dirty Wipe them with a cloth slightly moistened with alcohol Clean the disc There is no disc inside No Disc appears on the screen Insert the disc correctly with the playback side f...

Page 35: ...le station trouble Make sure the antenna is connected properly Increase the volume Make sure the antenna or audio video source device is working properly Make sure all cables are connected firmly Check for local interference Make sure there are no unshielded electrical devices nearby that are causing interference Turn the TV off for 30 minutes then try it again Under the influence of electrostatic...

Page 36: ...your consumer rights Tesco Stores Ltd Cheshunt EN8 9SL U K TESCO 2007 UK Waste electrical products should not be disposed of with household waste Separate disposal facilities exist for your nearest facilities see www recycle more co uk or in store for details ROI Produced after 13th August 2005 Waste electrical products should not be disposed of with household waste Please recycle where facilities...

Reviews: