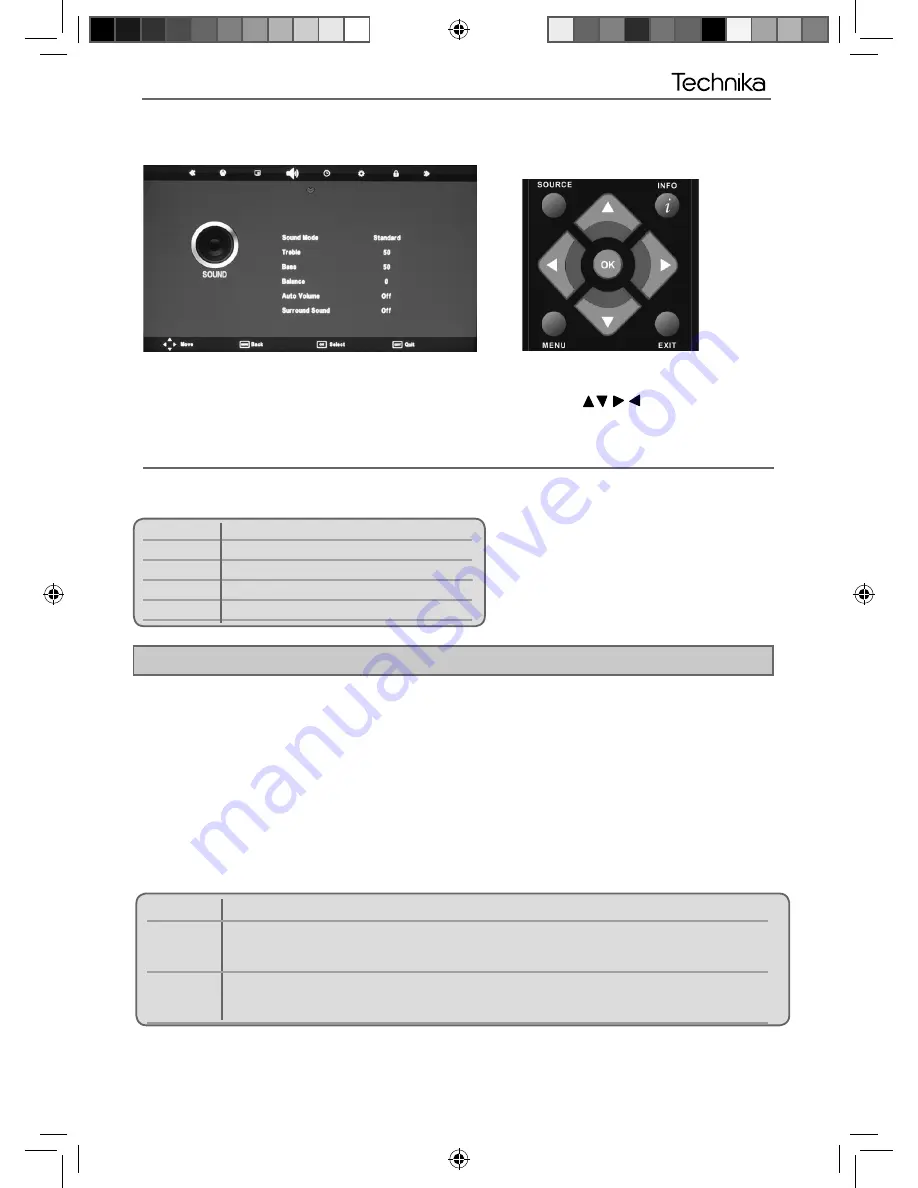
Technika LCD 32-270 User Manual Download Page 15

19

19

TV Menu Operation

SOUND MENU

Sound Mode

 - Choose from the following presets

User Default 

settings 

Music 

Emphasises music over voices 

Movie 

Provides live and full sound for movies

Personal 

Selects your personal sound settings 

Sports 

Emphasises sound for sports 

To access this menu, press [MENU] button on the remote control. To enter a menu press [OK]

If you wish to make changes to any of the default settings, use the scroll 

 buttons. To confi rm 

any settings press [OK] button.

To exit this menu at anytime, press [EXIT] button.

Tip: Treble and bass levels can only be adjusted when the sound mode ‘Personal’ is selected.

AV

Treble

 - To adjust the amount of high frequency within the sound

Bass

 - To adjust the amount of low frequency within the sound

Balance

 - To switch the sound between the left and right speakers

Auto Volume Level (AVL)

 - When ‘on’ is selected, the volume will stay at a constant level regardless of 

input/source 

Surround Sound

 - Allows you to turn surround sound ON or OFF

AD Volume

 - Increase or decrease the Audio Description volume

Audio Delay 

- Allows you to sync sound and picture on Digital source.

SPDIF Mode

 - This is the digital COAX Audio output. Choose from the following options:

Off Off 

Bitstream 

Select this option if you are connecting to a Dolby Digital 5.1 surround sounds amplifi er  


via coax cable (True digital signal) 

PCM 

Select this option if you are connecting to a Stereo Hi-fi  via coax cable (Pulse-code  


modulation (PCM) is a digital representation of an analogue signal) 

User Guide - Technika - 32, 40-270 manual ROI.indd   Sec1:19

User Guide - Technika - 32, 40-270 manual ROI.indd   Sec1:19

03-May-12   5:02:22 PM

03-May-12   5:02:22 PM

Summary of Contents for LCD 32-270

Page 1: ...le and cause a safety hazard Never place mobile phones speakers or any other device which may cause magnetic or radio interference with the television If interference is apparent move the device causi...

Page 2: ...e screen Time Displays Teletext Do not view a stationary page for long period of time TV DVD Menus e g Listings of DVD disk content Pause Mode Do not leave the TV in pause mode for long periods of tim...

Page 3: ...ontrol 13 Connections 14 15 TV Menu Operation 16 22 Channel Menu 16 Picture Menu 17 18 Sound Menu 19 Time Menu 20 Lock Menu 21 Option Menu 22 PC Operation 23 24 7 Day TV Guide 26 USB Mode Media Player...

Page 4: ...it s original box packaging WHAT IS INCLUDED IN THE BOX Accessories Included with this TV are the following accessories 1 x User Guide 1 x Quick Start Guide 2 x AAA Batteries 1 x TV 1 x RF Cable 1 x...

Page 5: ...tened 2 Use the assembly screws to fasten the stand neck Make sure that the screws are securely tightened 3 Insert the stand plate into the neck and turn to lock into palce 3 Insert the stand plate in...

Page 6: ...the TV These holes are indicated in the picture below Detaching the stand and wall mounting g 1 g 2 For optimum viewing if wall mounting the TV higher than eye level the TV should be tilted downwards...

Page 7: ...using the power on off switch Power on off As part of our ongoing development to reduce power consumption we have added an extra function to this Television called Ecohome you will see this during the...

Page 8: ...User Guide Technika 32 40 270 manual ROI indd Sec1 12 User Guide Technika 32 40 270 manual ROI indd Sec1 12 03 May 12 5 02 11 PM 03 May 12 5 02 11 PM...

Page 9: ...ll menus NUMBER BUTTONS 0 9 to select a TV channel directly To return to the previous channel viewed FAV To display favourites menu VOL To increase decrease the sound level SUBTITLE To switch the dial...

Page 10: ...Video input R L AUDIO Video Component audio input RF IN RF TV Aerial Input HEADPHONES 3 5mm Headphone output A B C D E F G H I J K N M Connecting a DVD Player Recorder Video Recorder or Cable Satelli...

Page 11: ...Option 2 via Component cable If you are supplied with a cable from the device which has RED GREEN BLUE RED WHITE connectors you must connect via Component for picture and by phono cable for sound TV S...

Page 12: ...per view services require a smartcard to be inserted into the TV If you subscribe to a pay per view service the provider will issue you with a CAM and a smartcard The CAM can then be inserted into th...

Page 13: ...d white Brightness Increase or decrease the brightness of the picture Colour Increases the colour from black and white Sharpness Increase or decrease the sharpness of the picture Tint Lets you increas...

Page 14: ...e is the correct proportion but zoomed in to ll the screen Will display the picture from the broadcaster without any change Panorama Aspect Ratio Within the UK the picture format varies depending on t...

Page 15: ...uency within the sound Balance To switch the sound between the left and right speakers Auto Volume Level AVL When on is selected the volume will stay at a constant level regardless of input source Sur...

Page 16: ...or your TV to turn on the channel it will then display the source it will be on and also the volume This function can then be toggled to repeat every day or a certain day Sleep Timer Lets you set the...

Page 17: ...rtain channels Parental Guidance Turns the parental guidance function on and off To access this menu press MENU button on the remote control To enter a menu press OK If you wish to make changes to any...

Page 18: ...ing Blue Screen Changes the background when there is no input between clear and a blue background Only available on some sources Country Allows you the change the Reset Factory default Reset Menu Syst...

Page 19: ...rtz if you experience picture noise or ickering select 50 hertz or 70 hertz 7 Click on Apply then click Yes and the settings will be saved 8 Now switch off your computer and connect the television as...

Page 20: ...the horizontal position of the picture V Offset Changes the vertical position of the picture Size increase picture size Phase To adjust delay time of phase in order to reduce the noise of picture Posi...

Page 21: ...25 25 User Guide Technika 32 40 270 manual ROI indd Sec1 25 User Guide Technika 32 40 270 manual ROI indd Sec1 25 03 May 12 5 02 28 PM 03 May 12 5 02 28 PM...

Page 22: ...for the next 7 days and set reminders 1 Press TV GUIDE The following 7 Day TV Guide will appear 2 Navigate through the menu using You can now Set a reminder by pressing GREEN View a previous day by p...

Page 23: ...Press OK to view 4 While viewing you control the item using or by pressing i and using and OK USB mode offers playback of various different types of content that you have saved on your USB Memory Stic...

Page 24: ...28 User Guide Technika 32 40 270 manual ROI indd Sec1 28 User Guide Technika 32 40 270 manual ROI indd Sec1 28 03 May 12 5 02 36 PM 03 May 12 5 02 36 PM...

Page 25: ...the manual of how to do this VCR DVD Recorder I have connected the TV to my VCR or DVD Recorder via SCART but it is not recording In addition to connecting via SCART you should connect the aerial cab...

Page 26: ...comode max in standby less than 0 5W Dimensions including stand mm 792W x 566H x 200D mm 987W x 672H x 292D mm Net weight Kgs 11 5kg 17kg General Information Compatible les in USB Mode Media File Ext...

Page 27: ...tion PC 24 Language 22 Manual Search 16 Noise Reduction 17 Operating the TV with a universal or Sky BSKYB remote control 28 Phase PC 24 Picture Mode 17 Remote control 13 Reset to default 22 Sharpness...

Page 28: ...TEC MAN 0028 User Guide Technika 32 40 270 manual ROI indd Sec1 34 User Guide Technika 32 40 270 manual ROI indd Sec1 34 03 May 12 5 02 37 PM 03 May 12 5 02 37 PM...

Reviews: