Technika 42-502 Owner'S Manual Download Page 12

E-11

 CONNECTIONS

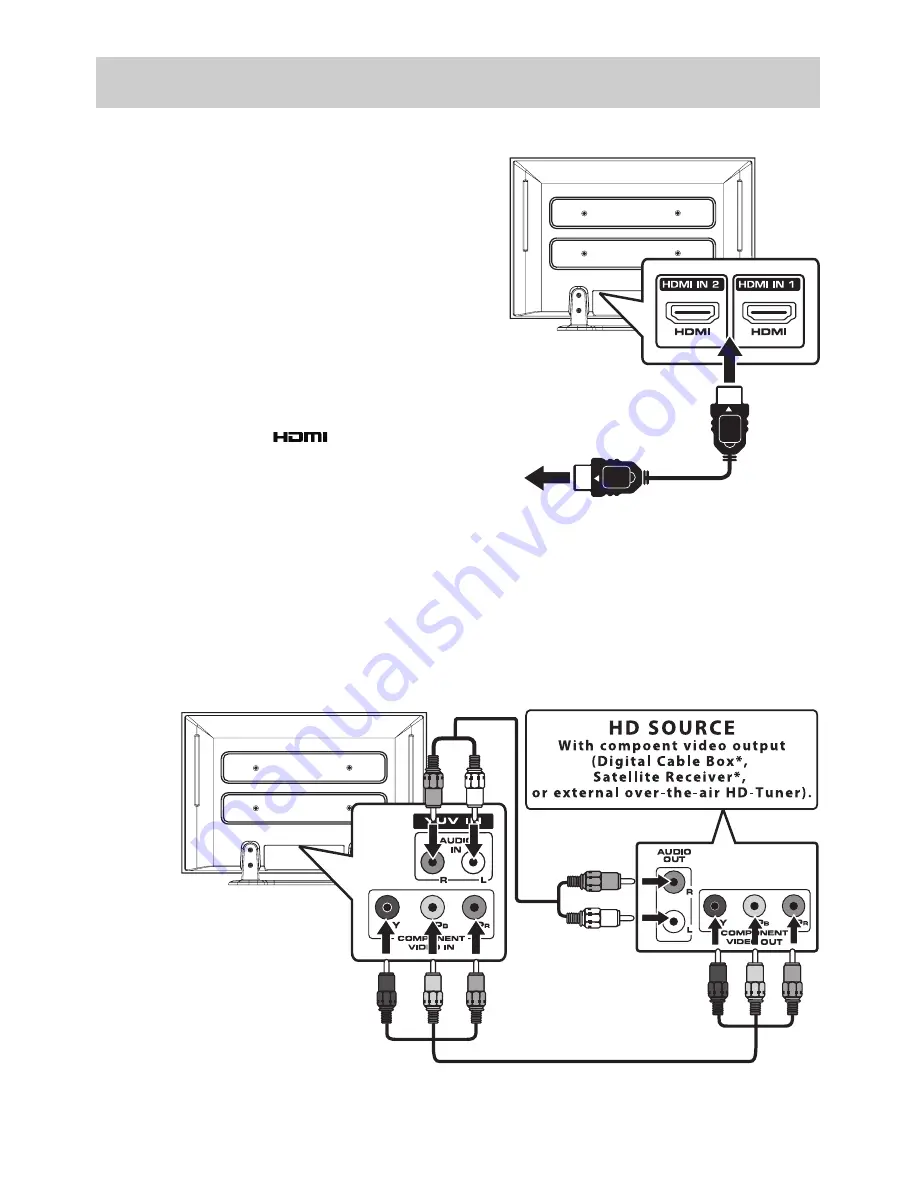
CONNECTING A HIGH-DEFINITION (HD) SOURCE USING HDMI CONNECTION

HDMI (High Definition Multimedia Interface) supports both 

video and audio on a single digital connection for use with 

DVD players, DTV, set-top boxes and other digital AV devices. 

HDMI was developed to provide the technologies of High 

Bandwidth Digital Content Protection (HDCP) as well as 

Digital Visual Interface (DVI) in one specification. HDCP is 

used to protect digital content transmitted and received by 

DVI-compliant or HDMI-compliant displays.

HDMI has the capability to support standard, enhanced 

or high-definition video plus standard to multi-channel 

surround-sound audio. HDMI features include uncompressed 

digital video, a bandwidth of up to 2.2 gigabytes per second 

(with HDTV signals), one connector (instead of several cables 

and connectors), and communication between the AV source 

and AV devices such as DTVs.

HDMI,  the  HDMI  logo 

  and  High-Definition


Multimedia Interface are trademarks or registered trademarks 

of HDMI licensing LLC.

Connect the HDMI cable (not included) as shown:

Make sure you connect the cable from the source equipment (

HDMI OUT

) to this unit (

HDMI IN

).

To match the video source output quality, press the 

FUNCTION

 button, then choose the HDMI1/HDMI2 

mode.

To HDMI

OUT jack

To HDMI

IN jack

CONNECTING A HIGH-DEFINITION (HD) SOURCE USING COMPONENT CONNECTION

High-Definition (HD) Devices with component video output must be connected to the YUV input.

Connect the component video cable and audio cable (not included) as shown.

Make sure you connect the component video cable and audio cable from the other equipment (

COMPONENT 

VIDEO OUT

 and 

AUDIO OUT

) to this unit (

COMPONENT VIDEO IN 

and 

AUDIO IN - YUV IN

).

To  operate  the  connected  device 

and play the source, first press the 

FUNCTION

  button  to  select  the 

YUV mode.

*  May  require  a  subscription  for 

receiving HD channels. Check with 

your cable/satellite service provider 

for details.

NOTE:

When connecting a DVD player to the television, the picture resolution is solely dependent upon the resolution 

supported by the DVD player attached. DVD player resolutions vary from 576i to 1080i, and this unit can support 

DVD players up to a maximum resolution of 1080i.

To COMPONENT

VIDEO IN jacks 

To COMPONENT

VIDEO OUT jacks

To AUDIO IN jacks 

 (YUV IN)

Summary of Contents for 42-502

Page 1: ......

Page 2: ...ETY INFORMATION When connecting or disconnecting the AC power cord grip the plug and not the cord itself Pulling the cord may damage it and create a hazard When you are not going to use the unit for a...

Page 3: ...ning this could result in fatal electric shock ALWAYS disconnect the AC adaptor when you are not going to use the unit for a long period time ENSURE that all electrical connections including the mains...

Page 4: ...2 Lay the unit down on a flat surface so the back side is facing up making sure to place a soft cushioned material such as a blanket or thick piece of foam beneath the screen 3 Put the stand into the...

Page 5: ...t be disposed of with household waste Please refer to the retailer from whom you purchased this item for disposal instructions BATTERY REPLACEMENT When the batteries become weak the operating distance...

Page 6: ...e channel information in DTV mode 8 GUIDE Button Press to display the PROGRAMME Guide in DTV mode 9 TIME Button Press to display the current time information from DTV 10 VOL VOL Buttons Press to adjus...

Page 7: ...or backward the page of Programme Edit Favourite inTV DTV mode 26 CURSOR Buttons Presstohighlightselectionsonamenuscreenandadjust certain settings ENTER OK Button Press to confirm selections on a menu...

Page 8: ...Enters the on screen TV menu 3 FUNCTION Button Selects DTV TV AV1 S VIDEO AV2 SCART YUV HDMI1 HDMI2 and PC 4 CH CH Buttons Changes the TV channels 5 VOL VOL Controls Adjusts the volume level 6 Remova...

Page 9: ...13 MONITOR VGA Jack PC IN 14 SCART Jack AV IN 2 15 AUDIO IN Left Right Jacks AV IN1 16 VIDEO IN Jack AV IN 1 17 AUDIO OUT Left Right Jack 18 AUDIO IN Left Right Jacks YUV IN 19 COMMON INTERFACE Slot 2...

Page 10: ...with a CI slot The CI slot allows you to insert a CAM Conditional Access Module with an appropriate subscription card for some pay for view services It is required to subscribe to a pay channel compa...

Page 11: ...ent such as a VCR camcorder satellite system or cable etc Connecting to a VCR Camcorder Satellite System Cable Connect the AUDIO and S VIDEO cable not included as shown Make sure you connect the cable...

Page 12: ...able not included as shown Make sure you connect the cable from the source equipment HDMI OUT to this unit HDMI IN To match the video source output quality press the FUNCTION button then choose the HD...

Page 13: ...T To AUDIO OUT jacks To AUDIO IN jacks To PC AUDIO OUT jack To PC Connector CONNECTING A PC Connect the 15 pin D SUB PC VGA connector from your computer to the 15 pin D SUB PC VGA input on this unit u...

Page 14: ...l to turn on the unit NOTES Be sure the AC power cord is disconnected and the TV is switched off before making connections Make sure that all components are connected correctly When you are not going...

Page 15: ...4 Use the button to move to Start Press the ENTER OK button to confirm Start The system will automatically start to scan and preset all available programmes 5 After scanning has finished the TV will...

Page 16: ...R OK button to watch the selected channel Press the EXIT button to exit the PROGRAMME GUIDE menu Note Guide information display may be different according to the DTV programmes Use the or button to se...

Page 17: ...the or button to select a channel Press the PAGE CH button to skip to previous next page 2 Press the RED GREEN YELLOW BLUE button or the FAV button to edit the channel DELETE Press the RED button to d...

Page 18: ...icher in darkness and the white become brighter Brightness Adjust the brightness of the picture Colour Adjust the colour of the picture Sharpness Adjust the sharpness level to improve detail in the pi...

Page 19: ...the options Sound Mode Treble Bass Balance or AVL then adjust them using the or button Only when Sound Mode is set as Personal can the Treble and Bass options be activated 4 Press the TV MENU button t...

Page 20: ...version for your choice Restore Setting Press the ENTER OK button to restore the system settings to the factory default Gamma Middle Restore Setting Restore Setting Power Level 1 ISM Method Standard S...

Page 21: ...o the normal screen press the EXIT button Lock System Select to lock or unlock the programmes Change Password If you change the password remember your password Block Programme In the Block Programme m...

Page 22: ...button The text will be superimposed over the TV programme Press the MIX button again to return to the text page Page search whilst watching TV In Text mode press the CANCEL button Enter the page numb...

Page 23: ...e watching is broadcast in colour and not black white Make sure the unit is plugged in and turned on Make sure that TV mode is selected Try a new channel to check for possible station trouble Make sur...

Page 24: ...in no way affects your consumer rights UK Waste electrical products should not be disposed of with household waste Separate disposal facilities exist for your nearest facilities see www recycle more...

Reviews: