background image

English   

- 22 -

 First Time Installation 

 The user can use this item to load default settings, 
which were loaded to the receiver at the factory.
To install factory settings, highlight “First Time 
Installation” menu item and press  

OK

  button, then 

you will be asked whether or not to delete the settings. 
Selecting “Yes” by pressing  

OK

  button while the “Yes” 

is highlighted will delete the existing channel table.
Then you will be asked to con

fi

 rm for deleting all 

channels and settings: 


 By selecting Yes and pressing the  

OK

  button, the 

existing channel table will be deleted.
After factory settings are loaded, “First Time 
Installation” menu will be displayed.
The menu which is displayed for language selection 
appears on the screen at 

fi

 rst. By using  “ ” or “ ” 

buttons, select the desired language option, and press 
OK button to activate. 
 After then, “First time installation” On Screen Display 
(OSD) will appear on the screen. By pressing “ ” or 
“ ” buttons, select the  

Country

  you want to set and 

press  

OK

  button (* only for EU countries).

- Next, active antenna mode selection On Screen 

Display (OSD) will appear on the screen.Use “ ” or 
“ ” to set and press OK to continue.See the section, 
“Initial Settings” for more information.

After active antenna mode option is selected, a 
message asking for automatic search appears on 
the screen:


 Press the  OK  button to start installation. After search 
is completed for digital channels, a message asking 
whether to search for analogue channels appears 
on the screen:  This process is same as described in 
Automatic Search section.

  Media Browser 

 • To display Media Browser window, press either “ 

M

 ” 

button on the remote control and then select Media 
Browser by pressing “ ” or “ ” button. Press  

OK


button to continue. Media Browser menu contents 
(depending on the contents of your USB drive) will 
be displayed. 

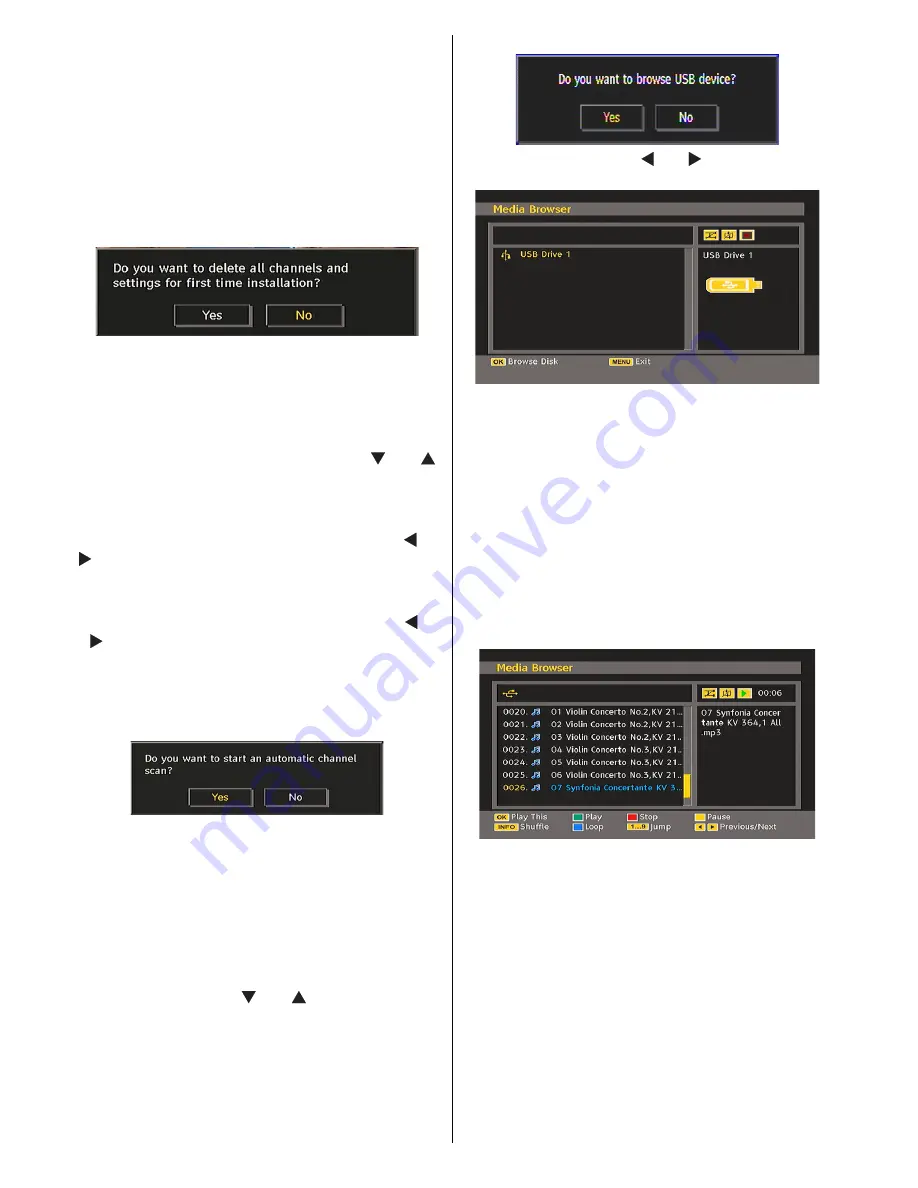
• Also, when you plug a USB device, the following 

screen will be displayed:

Select YES by pressing “ ” or “ ” button and press 
OK button. Media browser will be displayed.


 • You can play music, picture and video 

fi

 les from a 

USB memory stick. 


Note

 : If you plug USB stick while in analogue mode, 

the TV will automatically switch to digital TV mode.
  

Note

 : Some USB compliant devices may not be 

supported.
 

Note

 : If the USB stick is not recognized after power 

off/on or First Time Installation, 

fi

 rst, plug the USB  

device out and power off/on the TV set. Plug the USB  
device in again. 

 Playing MP3 Files 


 Play This (OK button) : Plays the selected 

fi

 le.

Play (Green button) : Plays all media 

fi

 les in the folder 

starting with the selected one.
Pause (Yellow button) : Pause playing 

fi

 le.

Stop (Red button) : Stop the playing 

fi

 le.

Previous/Next (Left/Right buttons) : Jumps to previous 
or next 

fi

 le to play.

Shuf

fl

 e (INFO button) : Plays the 

fi

 les randomly. If 

shuf

fl

 e mode is enabled, previous/next function will 

also jump to the tracks randomly.
Loop (Blue button) : Plays the selected file 
repeatedly. 

Summary of Contents for 42-2020

Page 1: ...COLOUR TELEVISION WITH REMOTE CONTROL OPERATING INSTRUCTIONS For assistance please call our Tesco Electrical Helpline on 0845 4566767 42 2020 ...

Page 2: ...On Off 12 To Switch the TV On 12 To Switch the TV Off 12 Input Selection 12 Basic Operations 12 Operation with the Buttons on the TV 12 Operation with the Remote Control 12 Initial Settings 13 General Operation 14 Information Banner 14 Electronic Programme Guide EPG 14 Displaying Subtitles 14 Digital Teletext for UK only 15 Analogue Teletext 15 Widescreen 15 IDTV Menu System 15 Channel List 15 Tim...

Page 3: ...cted after 5 minutes the TV switches itself automatically to standby mode PLL Frequency Search PC input Plug Play for Windows 98 ME 2000 XP Windows 7 Vista Audio line out Game Mode optional Active antenna power optional Accessories SUBTITLE SLEEP F IN O P ES T R E RETURN V P 1 4 7 2 5 8 3 6 9 JKL STU DEF MNO VWX PQR YZ M OK GHI SOURCE ABC EPG 0 SCREEN LANG FAV TV DTV S AP W Remote Controller Batte...

Page 4: ...placed near to open flames and sources of intense heat such as an electric heater Ensure that no open flame sources such as lighted candles are placed on top of the TV Batteries should not be exposed to excessive heat such as sunshine fire or the like Lightning In case of storm and lightning or when going on holiday disconnect the power cord from the wall outlet Replacement Parts When replacement ...

Page 5: ...een or red point Please note that this does not affect the performance of your product Warning Do not leave your TV in standby or operating mode when you leave your house Connection to a Television Distribution System Cable TV etc from Tuner Device connected to the protective earthing of the building installation through the mains connection or through other apparatus with a connection to protecti...

Page 6: ...in Power Save Mode When the TV is not in use please switch off or disconnect the TV from the mains plug This will also reduce energy consumption Disconnect power when going away for longer time Note that annually using the TV set in Power Save Mode has more power efficiency than disconnecting the TV from the mains plug instead of keeping stand by mode Therefore disconnect the TV from the mains plu...

Page 7: ...ource selection 12 Info Reveal in TXT mode 13 Return Exit in DTV mode Index page 14 in TXT mode Cursor up Page up in TXT mode 15 Cursor right 16 OK Select Freeze picture Hold 17 in TXT mode Cursor down Page down in TXT mode 18 Menu on off 19 Cursor left Subpage in TXT mode 20 Previous Programme Swap 21 Picture mode selection 22 Programme down Page up in DTV mode 23 Mute 24 Volume down 25 Favourite...

Page 8: ...he currently watched source Use a digital optic cable to transfer audio signals to a device that has S PDIF input 2 Subwoofer Out is for connecting an external active subwoofer to the set to give a much deeper bass effect Use an appropriate RCA cable to connect the set to a subwoofer unit Audio Line Outs 3 output audio signals to an external device such as an optional sound system To connect the e...

Page 9: ...ts are used for connecting audio signals of a PC or a device that connects to the TV via YPbPr Connect the PC audio cable between the AUDIO INPUTS on the TV and audio output of your PC to enable PC audio Connect the audio cable between AUDIO INPUTS on the TV and audio outputs of your device to enable component audio 8 S PDIF Coaxial Out outputs digital audio signals of the currently watched source...

Page 10: ...ket on the TV and the VIDEO OUT jack on your device Audio Inputs are used for connecting audio signals of external devices 5 Connect the audio cable between the AUDIO INPUTS on the TV and the AUDIO OUTPUT jacks on your device Note If you connect a device to the TV via the VIDEO INPUT you should also connect your device with an audio cable to the AUDIO INPUTS of the TV to enable audio Aerial Connec...

Page 11: ...aking any connections Use 15 pin D sub display cable to connect a PC to the LCD TV When the connection is made switch to PC source See Input selection section Settheresolutionthatsuitsyourviewingrequirements Resolution information can be found in the appendix parts PC audio cable not supplied to AUDIO INPUTS on the TV PC RGB cable not supplied to PC input Audio Inputs PC Input Connecting to a DVD ...

Page 12: ...fer to your speaker set s manual for further queries For connecting a to a device that has SPDIF support use an appropriate SPDIF cable to enable sound connection External Speakers A device that supports SPDIF signal Connecting Other Equipment via Scart Most devices support SCART connection You can connect a DVD recorder a VCR or a decoder to your LCD TV by using the SCART sockets Note that cables...

Page 13: ... both the remote control and onset buttons Operation with the Buttons on the TV Volume Setting Press button to decrease volume or button to increase volume so a volume level scale slider will be displayed on the screen Programme Selection Press P CH button to select the next programme or P CH button to select the previous programme Viewing Main Menu Press buttons at the same time to view main menu...

Page 14: ...u in the following sections for more information Press OK button on the remote control to continue and the following message will be displayed on the screen To select the Yes or No option highlight the item by using or buttons and press the OK button The IDTV will automatically tune to the UHF or VHF for EU countries transmission channels searching for digital terrestrial TV broadcasts and display...

Page 15: ...e to get Information of the channel programs weekly by means of 7 DAY EPG All programs of channels are displayed On the bottom of the screen info bar showing all the available commands will be displayed RED button Shrink makes the info boxes smaller GREEN button Expand makes the info boxes larger YELLOW button Prev Day displays the programmes of previous day BLUE button Next day displays the progr...

Page 16: ...eing transmitted programmes can be viewed in a number of formats Press the SCREEN button repeatedly to select between to change zoom mode When Auto is selected the format being displayed is determined by the picture being broadcast PLEASE NOTE Menu size changes depending on the chosen image size IDTV Menu System The IDTV menu can only be viewed when watching digital terrestrial broadcasting Press ...

Page 17: ... moves to the previous next character Pressing or button toggles the current character i e b character becomes a by and c by Pressing the numeric buttons 0 9 replaces the highlighted character with the characters printed above the button one by one as the button is pressed Press the M button to cancel the editing or OK button to save the new name Adding Locks to Channels Channel locking provides a...

Page 18: ...nd Ending time is entered via the Left Right or the numeric buttons Duration Duration between Start and End time Repeat You can set a timer to be repeated as Once Daily or Weekly Change Delete permits or prohibits any modifications for other users You can save the adjustments by pressing the GREEN key or cancel the process by pressing the RED button You can edit the list via GREEN key and delete w...

Page 19: ...If the channel that you are watching supports Dolby Digital you can turn this setting on Hard of Hearing for EU countries only Use or button to select Hard of Hearing and then press or button to set this setting as On or Off If the broadcaster enables any special signal concerning the audio you can set this setting as On to receive such signals Favourite Mode Use this function to enable or disable...

Page 20: ...ntal Control Use or buttons to go to Parental Lock option Press OK button to enter the menu A dialog box asking for the lock key will be displayed The key is set to 0000 initially Enter PIN If it is incorrect Wrong Pin On Screen Display OSD will be displayed If it is correct the Parental Control menu will be displayed Maturity Lock If you set Country option as UK in the first time installation Mat...

Page 21: ... level can be increased or decrased relatively according to the general volume Standby Search This setting is visible only when the Country option is set to Denmark Sweden Norway or Finland Use or button to select Standby Search and then press or button to set this setting as On or Off If you change Standby Search to Off this function will be unavailable To use Standby search please make sure that...

Page 22: ... channels appears on the screen Press the OK button to search for analogue channels The following menu appears on the screen for analogue channel search Select your Country Language and Text language by using or and or buttons Press OK or RED button to continue To cancel press BLUE button The following menu will be displayed during the automatic tuning AfterAPS is finalized the programme table wil...

Page 23: ...rt installation After search is completed for digital channels a message asking whether to search for analogue channels appears on the screen This process is same as described in Automatic Search section Media Browser To display Media Browser window press either M button on the remote control and then select Media Browser by pressing or button Press OK button to continue Media Browser menu content...

Page 24: ...rations bar Video Playback Play Red button Starts the video playback Stop Blue button Stops the video playback Pause OK button Pause the video playback Rewind Cursor Left Goes backward Forward Cursor Right Goes forward Menu M button Sets subtitle Audio You can set subtitles by using OK button before starting the playback or by using M button during the playback Press RETURN Exit button to switch b...

Page 25: ...hile Game Mode is on If the TV is switched to PIP PAP mode Game Mode setting will be disabled and be removed from the Picture menu Picture Zoom Select Picture Zoom by pressing or button Use or buttons to change picture zoom to Auto 16 9 4 3 Panoramic 14 9 Cinema Subtitle or Zoom Reset Press or button to select Reset Press or or OK button to reset the picture modes to factory default settings Store...

Page 26: ...programmes For instance volume level of advertisements tend to be louder than programmes Press or button to select AVL Press or button to set the AVL as On or Off Spdif Out Press or button to select Spdif Out Press or button to set the Spdif Out as On or Off Note If Spdif Out is set to On headphone will be disabled Store Press or button to select Store Press or OK button to store the settings Stor...

Page 27: ... can set Default Zoom to Panoramic 16 9 4 3 or 14 9 by pressing or button Blue Background If the signal is weak or absent the TV will automatically change to a blue screen To enable this set Blue Background to On By pressing or button select Blue Background Press or button to set Blue Background as On or Off Menu Background Press or button to select Menu Background You can set menu background leve...

Page 28: ...button to select Fine Tune Press or button to adjust the tuning Search Press or button to select Search Use or button to start programme searching You can also enter the desired frequency using the numeric buttons while Search item is highlighted Store Press or button to select Store Press or OK button to store the settings Stored will be displayed on the screen Install Menu in AV Modes The follow...

Page 29: ...button for starting automatic tuning all stored programmes will be erased and the TV will search for available channels During the search the following On Screen Display OSD will be displayed Whenever you press the BLUE button APS function stops and Program Table appears on the screen If you wait until the end of APS Program Table will be displayed with the programmes found and located Source Menu...

Page 30: ...ngs manually Sound Feature and Source settings are identical to the settings explained in Analog TV menu system Displaying TV Information Programme Number Programme Name Sound Indicator and Zoom Mode information is displayed on the screen when a new programme is entered or INFO button is pressed Mute Function Press button to disable sound Mute indicator will be displayed in the upper side of the s...

Page 31: ...iginal size Panoramic This stretches the left and right sides of a normal picture 4 3 aspect ratio to fill the screen without making the picture appear unnatural The top and bottom of the picture are slightly cut off 14 9 This zooms up the wide picture 14 9 aspect ratio to the upper and lower limits of the screen Cinema This zooms up the wide picture 16 9 aspect ratio to the full screen Subtitle T...

Page 32: ...this do not leave the screen in still picture for extended periods No Power If your TV system has no power please check the main power cable and connection to the mains socket outlet Poor Picture Have you selected the correct TV system Is your TV set or house aerial located too close to a non earthed audio equipment or neon lights etc Mountains or high buildings can cause double pictures or ghost ...

Page 33: ...64 75 67 5 VESA 25 1152 864 85 77 1 VESA 26 1152 870 75 68 9 MAC 27 1280 768 60 47 7 VESA 28 1360 768 60 47 7 29 1280 768 75 60 2 VESA 30 1280 960 60 60 0 VESA 31 1280 960 75 75 0 VESA 32 1280 960 85 85 9 VESA 33 1280 1024 60 64 0 VESA 34 1280 1024 75 80 0 VESA 35 1280 1024 85 91 1 VESA 36 1400 1050 60 65 3 37 1400 1050 75 82 3 38 1440 900 60 55 9 39 1440 900 75 70 6 40 1600 1200 60 75 0 VESA 41 1...

Page 34: ...GB 9 RGB 9 9 9 9 Scart2 8 9 9 RGB 8 8 9 9 9 9 FAV 8 9 9 RGB 8 8 9 9 9 9 HDMI1 9 9 9 9 9 8 8 9 9 HDMI2 9 9 9 9 9 8 8 9 9 YPbPr 9 9 9 9 9 9 9 8 9 PC VGA 9 9 9 9 9 9 9 9 8 RGB This indicates that selection is possible only if Scart 1 has a RGB signal Restrictions Scart 1 source must have RGB signal to perform PIP PAP with sources TV Scart 2 FAV If these sources are set to main window and Scart 1 does...

Page 35: ...444 440 422 420 Grayscale gif GIF WxH 14592x12288 Up to 179 Mega pixel bmp bit map WxH 14592x12288 Up to 179 Mega pixel External Subtitles srt Support Text File Format but do not support Picture File Format smi sub Note Necessary bitrates for some video types are higher than USB limits For this reason some video types cannot be played Products Battery Information for Users on Disposal of Old Equip...

Page 36: ...EU models Transmission standard DVB T MPEG 2 Demodulation COFDM with 2K 8K FFT mode FEC all DVB modes Video MP ML PAL 4 3 16 9 Audio MPEG Layer I II 32 44 148kHz NUMBER OF PRESET CHANNELS 200 CHANNEL INDICATOR On Screen Display RF AERIAL INPUT 75 Ohm unbalanced OPERATING VOLTAGE 220 240V AC 50 Hz AUDIO German Nicam Stereo AUDIO OUTPUT POWER WRMS 10 THD 2 x 8 POWER CONSUMPTION W 210 W max 1 W Stand...

Page 37: ...green or green and yellow The wire which is coloured blue or black must be connected to the terminal which is marked with the letter N or coloured Black The wire which is coloured brown or red must be connected to the terminal which is marked with the letter L or coloured Red For continued protection against risk of fire replace only with same type and rating of fuse ASTA approved 5A 250VAC fuse C...

Page 38: ...50174934 ...

Reviews: