33
RQT6866
Timer operations and convenient functions
32
RQT6866
Timer operations and convenient functions
B
A
F
PLAY/
F
REC
CLOCK/
TIMER
SLEEP
SLEEP
DIGITAL
S.WOOFER
AV EFFECT
Í
SLEEP
CH SELECT
3D AI
PROGRAM
1
2
3
4
5
6
7
8
9
0
CANCEL
DISC
VCR/AUX/
6CH INPUT
TAPE/
DECK 1/2
SUPER
SOUND EQ
TUNER/
BAND
2
/
;
1
∫
MUTING
4
5
j
VOLUME
i
EQ
Î
PRO LOGIC SUPER SRND
TEST
SLEEP
CD
DISPLAY
X
s
ALBUM
W
S
10/-/--
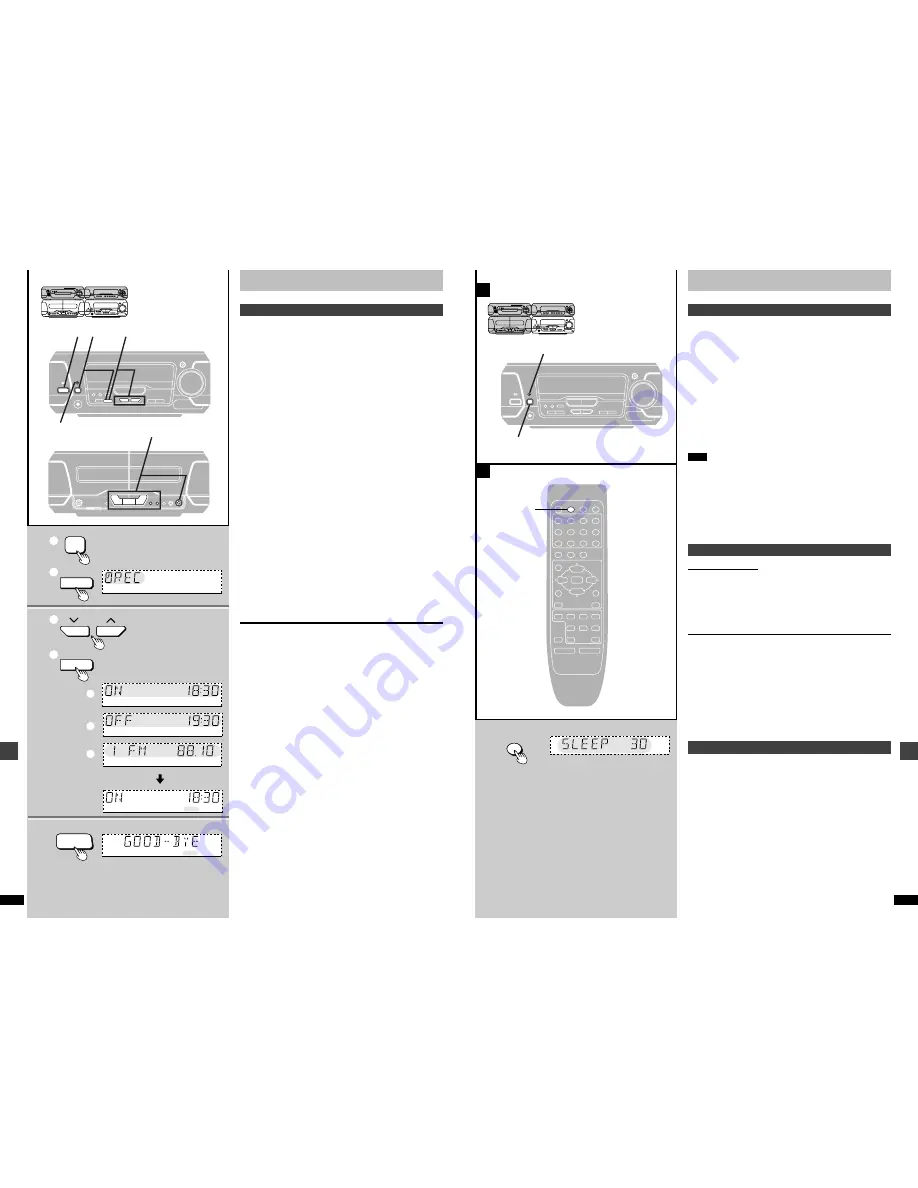
Using the timers
ª
A The play and record timers
Turning the timers on and off
The timers come on at the set times if the
F
PLAY/
F
REC indicator is on.
They can be turned on and off by pressing [
F
PLAY/
F
REC].
Checking the timers
Press [CLOCK/TIMER] to select “
F
PLAY” (or “
F
REC”).
The timer conditions are shown in the following order:
Play timer:
Start time
>
Finish time
>
Source
>
Volume
Record timer:
Start time
>
Finish time
>
Selected radio station
The timers can be checked even if the unit is off.
Playing the unit after the timers are set
The unit can be used after the timers are set. Make sure the unit is off before
the set start time.
Note
≥
If you turn the unit off and on again while a timer is functioning, the finish
time setting will not be activated.
≥
If the unit is on, the timer will not function. The system must be in the
standby mode.
≥
This system retains the ON/OFF time settings until you make a new
setting. If you make a new ON time setting, you must make a new OFF
time setting.
≥
Do not turn DEMO on after setting a timer. The timers will not work while
DEMO is on.
ª
B The sleep timer
Remote control only
This timer turns the unit off after a set time.
While playing a source
Press [SLEEP] to select the time (minutes).
Each time you press the button:
SLEEP 30
---------)
SLEEP 60
---------)
SLEEP 90
^-----
SLEEP OFF
(---
SLEEP 120
(---}
To cancel the sleep timer
Press [SLEEP] to select “SLEEP OFF”.
“SLEEP” goes out.
To confirm the remaining time
(While the timer is functioning)
Press [SLEEP].
The remaining time is shown for about 5 seconds.
To change the setting
Press [SLEEP] to display the remaining time, then press again to select the
required time.
Using the timers together
Any of the timers can be used together, but ensure the unit is off before the
start time for the record and play timers.
1
2
4
2
4
3
F
PLAY/
F
REC
1
1
2
1
2
F
REC
MHz
F
REC
F
REC
F
REC
F
REC
CH
CLOCK/
TIMER
SET
SET
Í
/I
a
b
c
F
REC
TUNING
Using the timers
The record timer
This timer records the radio at the set time.
The example shows settings for recording preset channel 1 from 18:30
to 19:30.
Preparation:
Turn the unit on, set the time (
➡
page 12), preset radio
stations (
➡
page 18).
1
1
Press [CLOCK/TIMER] to select “
F
REC”.
Each time you press the button:
CLOCK
>
F
PLAY
>
F
REC
>
Original display
^-----------------------------------------------------------}
2
Press [SET] within 3 seconds.
2
Follow these steps to set items
a
,
b
and
c
.
1
Press [TUNING (
X
or
W
)] to select the condi-
tion required and
2
Press [SET].
a
Start time
b
Finish time
c
Preset channel
The record timer is now on standby. The display shows each condi-
tion again then restores the original display.
3
Prepare for recording.
1
Insert a tape into deck 2.
2
Select the Dolby NR mode.
3
Select the reverse mode.
4
Select the tape direction.
4
Press [
Í
/I] to turn the unit off.
F
PLAY/
F
REC indicator remains illuminated to show the record (or
play) timer is on.
Recording starts 30 seconds before the set time with the volume muted
during the set time.
To cancel the timer
Press [
F
PLAY/
F
REC] so “
F
REC” goes out.
Each time you press the button:
F
PLAY
>
F
REC
>
F
PLAY
F
REC
>
Light off (OFF)
^---------------------------------------------------------------}
The record timer will be canceled, but the settings stay in the
memory.


