Technaxx TX-185 User Manual Download Page 10

10 

Model: TX-185 Article No. 4986, 04/2022 
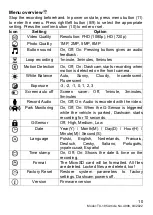
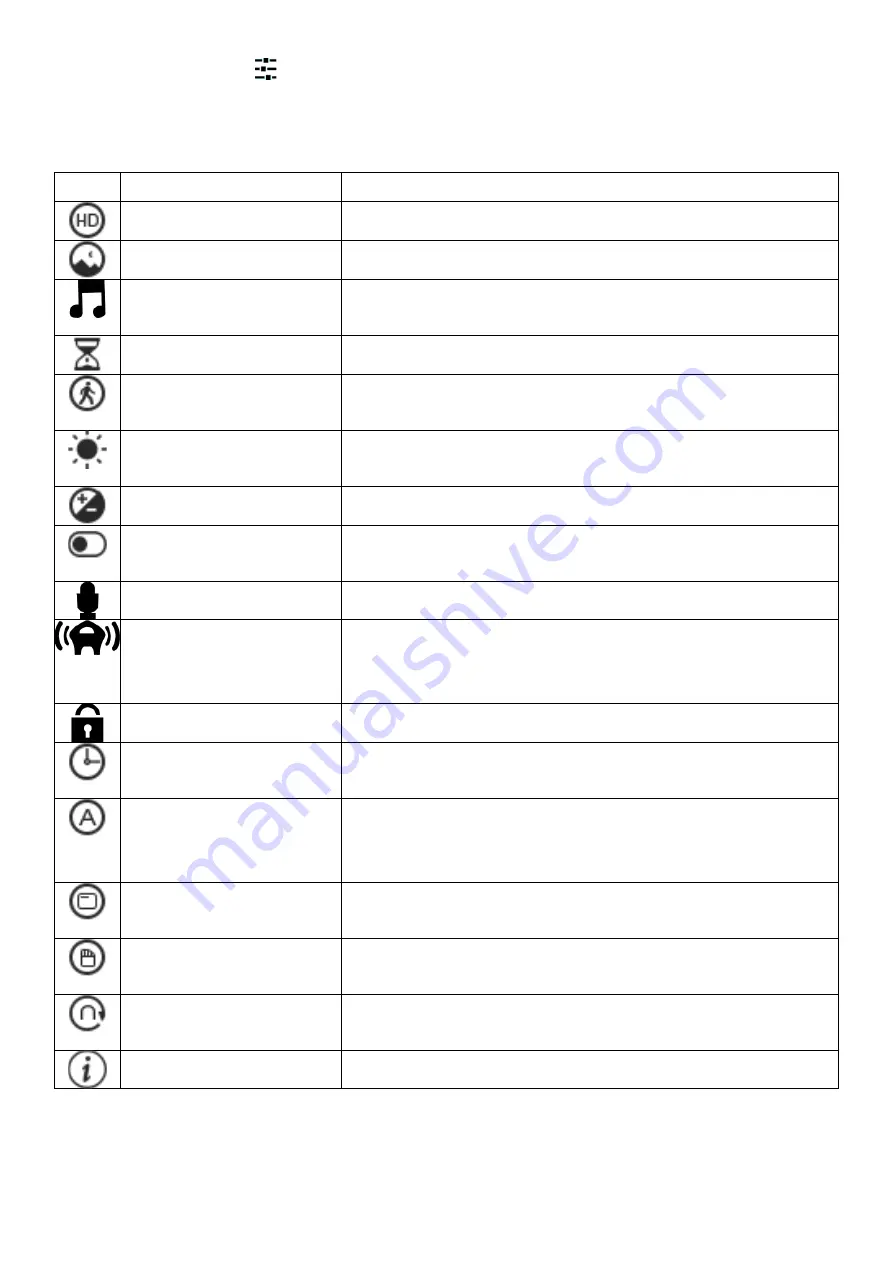
Menu overview   

Stop the recording beforehand. In power on state, press menu button (11) 
to  enter  the  menu.  Press  right/left  button  (8/9)  to  select  the  appropriate 
setting. Press the confirm button (10) to enter or set. 

Icon 

Setting 

Option 


Video Quality 

Resolution: FHD (1080p), HD (720p) 


Photo Quality 

1MP, 2MP, 5MP, 8MP 


Button sound 

On, Off; On: Pressing buttons gives an audio 
feedback. 


Loop recording 

1minute, 3minutes, 5minutes 


Motion Detection 

On, Off; On: Dashcam  starts recording when 
motion is detected on the front camera. 


White Balance 

Auto, 

Sunny, 

Cloudy, 

Incandescent, 

Fluorescent 


Exposure 

-3, -2, -1, 0, 1, 2, 3 


Screen auto off 

Screen  saver:  Off,  1minute,  3minutes, 
5minutes 


Record Audio 

On, Off; On: Audio is recorded with the video. 


Park Monitoring 

On, Off; On: When the G-Sensor is triggered 
while  the  vehicle  is  parked,  Dashcam  starts 
recording for 10 seconds. 


G-Sensor 

Off, High, Medium, Low 


Date 

Year(Y)  /  Month(M)  /  Day(D)  /  Hour(H)  / 
Minute(M) / Second(S) 


Language 

Polski, 

English, 

Nederlands, 

Francais, 

Deutsch, 

Cesky, 

Italiano, 

Português, 

український, Español 


Time stamp 

On,  Off;  On:  Shows  the  date  &  time  on  the 
recording. 


Format 

The  MicroSD  card  will  be  formatted.  All  files 
are deleted. Locked files are deleted, too! 


Factory Reset 

Restore  system  parameters  to  factory 
settings. Dashcam powers off. 


Version 

Firmware version 


Summary of Contents for TX-185

Page 1: ...ns lacking in experience or knowledge unless they are supervised or instructed on the use of this device by a person responsible for their safety Children should be supervised to ensure they do not pl...

Page 2: ...lay the cable in a way that the danger of stumbling is avoided Never hold or carry the device by the power cable Do not clamp or damage the power cable Ensure that the power adapter does not come int...

Page 3: ...t any objects into the openings of the unit as current flows in some places and contact may cause fire or electric shock Unplug the power cord from the cigarette outlet for cleaning Do not use liquid...

Page 4: ...c areas of the windshield It is the owner s responsibility to mount the dashcam in compliance with local laws Error messages may appear depending on the environment it is used in Technaxx Deutschland...

Page 5: ...on cup mount 9 Left button up 2 Power supply port MiniUSB 10 Power button Confirm button 3 Reset 11 Menu button 4 Bracket plate 12 Mode button 5 Front camera 13 Indicator light 6 Infrared LED LUX sens...

Page 6: ...button Long press for 3 seconds to power off Short press to power on confirm start recording 11 Menu button Short press in recording state for manual locking the file in power on state to open the set...

Page 7: ...t 31MB 3min about 231MB 32GB can save up to 90min front and 90min interior camera video footage Note Pay attention to the direction of the MicroSD card when inserting it If dashcam and MicroSD card ar...

Page 8: ...uction cup is connected to the dashcam and its bracket and the host are fixed together When finding the best mounting position on the windshield Place it firmly on the windshield and lock into place C...

Page 9: ...press the mode button 12 When you are finished confirm your settings by pressing the confirm button 10 4 Either go further through the menu by using right left button 8 9 to get the dashcam personali...

Page 10: ...White Balance Auto Sunny Cloudy Incandescent Fluorescent Exposure 3 2 1 0 1 2 3 Screen auto off Screen saver Off 1minute 3minutes 5minutes Record Audio On Off On Audio is recorded with the video Park...

Page 11: ...ce is recording To stop recording press the confirm button 10 the recording time disappears indicating that the recording has stopped If you want to protect the current recording then press the menu b...

Page 12: ...a photo If you need to switch back to the video mode short press the mode button 12 twice Note Taking a photo means getting a photo of the front and the interior camera at the same time Collision sens...

Page 13: ...e for the front camera The interior camera does not support motion detection but is recorded as well Park monitoring Prerequisite The cigarette lighter socket is switched off with the ignition The par...

Page 14: ...ideo data it is possible that the read and write speed of the memory card cannot keep up Use high speed MicroSD card such as Class10 high speed card It may also be caused by the fact that the G Sensor...

Page 15: ...amera 1MP 1280x960 2MP 1920x1080 interpolated 5MP 2592x1944 interpolated 8MP 3264x2448 interpolated 0 3MP 640x480 Picture saving format JPG Loop recording 1min 3min 5min Microphone Speaker Built in Sp...

Page 16: ...ation of Conformity The EU Declaration of Conformity can be requested at the following address www technaxx de in the lower bar Declaration of Conformity Disposal Disposal of the packaging Sort packag...

Page 17: ...substances or not at a collection point in your community city or with a retailer to ensure that the batteries can be disposed of in an environmentally friendly manner marked with Cd cadmium Hg mercu...

Reviews: