


note: The edId mode table
1. #1 submenu edId mode table
Number
EDID Description
1
1080i, 2CH AUDIO
2
1080i, DOLBY/DTS 5.1
3
1080i, HD AUDIO
4
1080p, 2CH AUDIO
5
1080p, DOLBY/DTS 5.1
6
1080p, HD AUDIO
7
3D,1080p, 2CH AUDIO
8
3D, 1080p,DOLBY/DTS 5.1
9
3D,1080p, HD AUDIO
10
4k*2k, 2CH AUDIO
11
4k*2k, DOLBY/DTS 5.1
12
4k*2k, HD AUDIO
13
DVI 1024x768
14
DVI 1920X1080
15
DVI 1920X1200
16
Copy from HDMI OUTPUT A
17
Copy from HDMI OUTPUT B
18
Copy from HDMI OUTPUT C
19
Copy from HDMI OUTPUT D
20
Copy from HDMI OUTPUT E
21
Copy from HDMI OUTPUT F
22
Copy from HDMI OUTPUT G
23
Copy from HDMI OUTPUT H
2. #2 submenu Input ports selection
Number
Input port Description
1
Input 1
2
Input 2
3
Input 3
4
Input 4
5
Input 5
6
Input 6
7
Input 7
8
Input 8
9
Input ALL
EDiD. What is it and what is it used for?
Under normal circumstances, a source device (digital and analog) will require
information about a connected device/display to assess what resolutions
and features are available. The source can then cater its output to send
only resolutions and features that are compatible with the attached device/
display. This information is called EDID (Extended Display Information Data)
And a source device can only accept and read one EDID from a connected
device/display. Likewise, the source can only output one resolution for use by
a connected device/display.
Why is EDiD so important with the HDMi Matrix ?
The Matrix is complex piece of technology that replicates and switches
between multiple inputs and outputs. Each connected source device will
require one EDID to read. EDID management is carefully handled by HDMI
Matrix to provide a single EDID for each source to read.
What options do i have to manage the EDiD in the HDMi Matrix ?
First, it is important to note that each source device can only output one
video/audio signal type. This includes resolutions and timings. When multiple
devices/displays are used, such as with the HDMI Matrix, it is important to use
devices/displays that have similar or compatible resolutions/features. This
will ensure that the single video/audio signal produced by the source device
is accepted by all of the connected output devices/displays. The user has the
option, through the EDID management window, to choose how the unit will
manage the EDID from multiple HDMI devices/displays. Therefore the user
has some control over the resolutions/features that the source devices will
output. The HDMI Matrix for has a multiple EDID management modes that
will control how the EDID information from multiple devices/displays are
combined, ignored, and routed.
how to operate the hdMI Matrix?
1. How to select Output and Input Port?
Q. OUTPUT-X select INPUT-Y:
a. Press OUTPUT-X (X means 1 to 8 of outputs, including ALL)
Press INPUT-Y (Y means 1 to 8 of inputs)
2. How to change INPUT-Y EDID
Q. Fixed EDID to INPUT-Y/ALL:
a. Press MENU button to enter EDID set mode.
Press UP/DOWN button to select the EDID you want.
Press ENTER button ensure and enter Input port submenu.
Press UP/DOWN button to select Input port you want.
Press ENTER button ensure and save the setting.
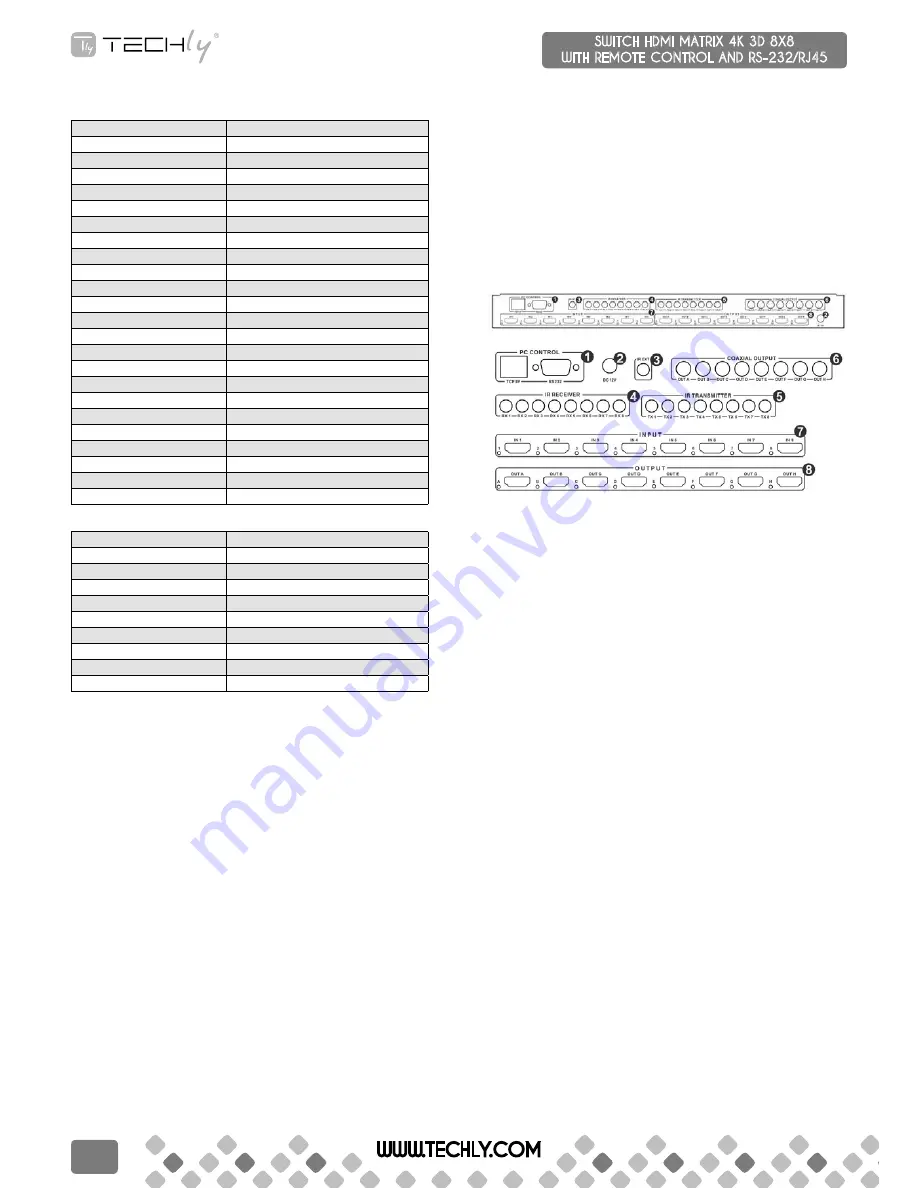
5.2 rear panel
1. pC ConTrol Show the status of input-output selection, EDID info and so
on.
TCp/Ip: This port is the link for TCP/IP controls, connect to an active
Ethernet link with an RJ45 terminated cable.
rs232: Connect to a PC or control system with D-Sub 9-pin cable for the
transmission of RS-232 commands.
2. power port Use included DC adaptor to power the matrix switcher.
3. Ir eXT: This port is local IR receiver for extending the IR signal. Connect
with Wideband IR Rx.
4. Ir reCeIVer: These ports are IR Matrix input ports. Connect with Wideband
IR Rx.
5. Ir TransMITTer: These ports are IR Matrix output ports. Connect with
Wideband IR Tx.
6. CoaXIal ouTpuT: Audio output area, each ports are come from HDMI
output port. For example: the audio signal of coaxial out A is come from
HDMI output A.
7. hdMI InpuT area Connect HDMI sources. LED 1-8 illuminate when the
HDMI signal plug in corresponding input port with HDMI cable.
8. hdMI ouTpuT area Output for displays, AVR etc. LED A-H illuminate
when the displays plug in corresponding output port with HDMI cable.
Ir BlasTer (TX)
To control the source: Plug IR Blaster into IR TX port of transmitter unit; place
blaster in front of the IR eye of the source.
To control the display: Plug IR Blaster into IR TX port of receiver unit; place
blaster in front of the IR eye of the display.
Ir reCeIVer (rX)
To control the source: Plug IR Receiver into IR RX port of receiver unit; place
receiver at or near display.
To control the display: Plug IR Receiver into IR RX port of transmitter unit;
place receiver in position where it is able to receive remote signals.
WWW.TECHLY.COM
6
SWITCH HDMI MATRIX 4K 3D 8X8
WITH REMOTE CONTROL AND RS-232/RJ45
QUICK INSTALL GUIDE


