Techlogix Share-Me User Manual Download Page 15


14 

TL-SM-HDVDP User Manual


www.tlnetworx.com 


WEB GUI Introduction 

The WEB GUI contains three sub-menu: Status, Configuration and Advanced. 
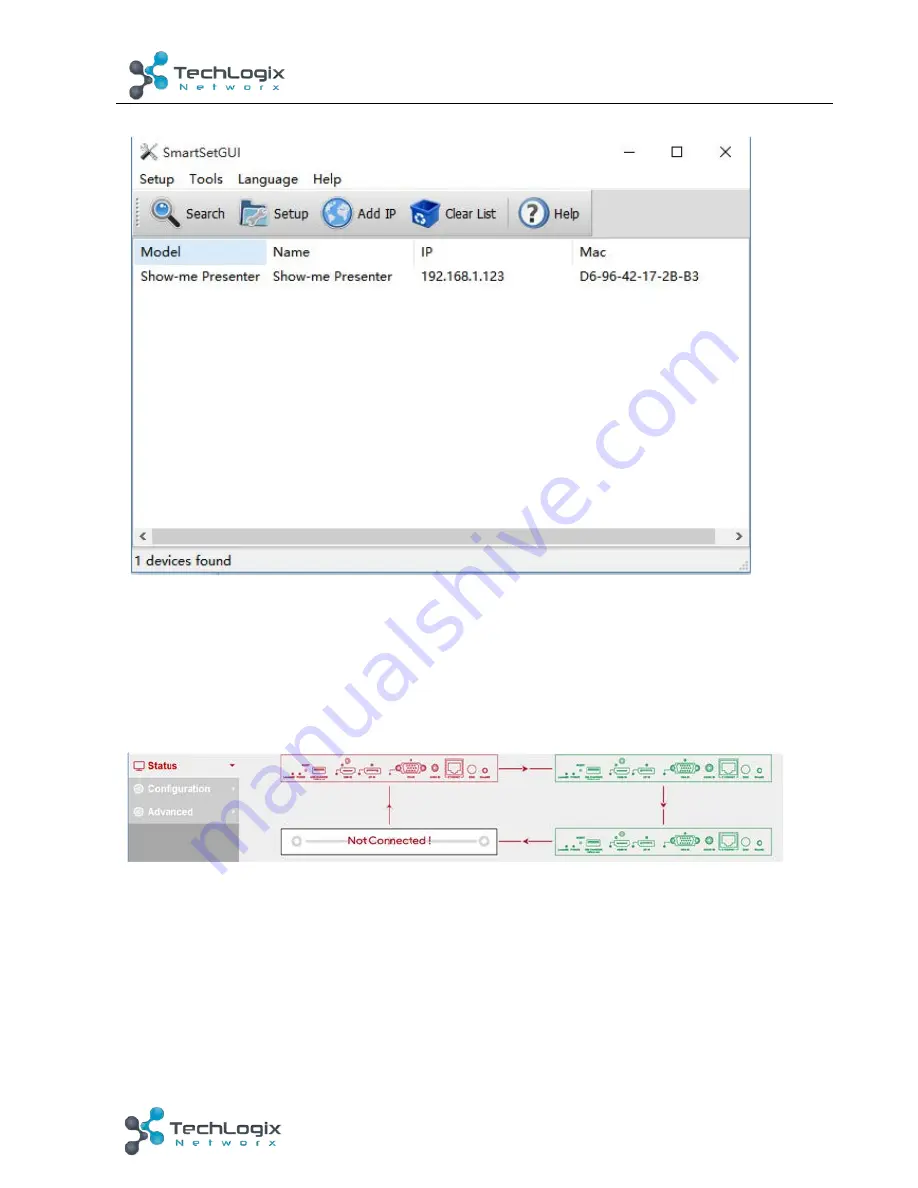
Status 

This sub-menu displays the current status of TL-SM-HDVDP. 


Device in red represents TL-SM-HDVDP working in Show Me mode. 
Device  in  green  represents  TL-SM-HDVDP  connecting  in  the  chain  but  not  working  in 
Show Me mode. 
Device in black represents not connecting in the chain.   


Click  the  device  icon,  it  displays  the  alias  name,  IP  address,  sequence,  mode  and  input 
source of the TL-SM-HDVDP. 

Summary of Contents for Share-Me

Page 1: ...User Manual TL SM HDVDP Share Me Presenter for HDMI VGA DP All Rights Reserved Version TL SM HDVDP_170609 ...

Page 2: ...ipment generates uses and can radiate radio frequency energy and if not installed and used in accordance with the instructions may cause harmful interference to radio communications It has been tested and found to comply with the limits for a Class B digital device pursuant to part 15 of the FCC Rules These limits are designed to provide reasonable protection against harmful interference in a comm...

Page 3: ... shock hazard do not expose the unit to rain moisture or install this product near water l Do not put any heavy items on the extension cable in case of damage l Do not remove the housing of the device as opening or removing housing may expose you to dangerous voltage or other hazards l Install the device in a place with proper ventilation to avoid damage caused by overheat l Keep the module away f...

Page 4: ...d Contact Closure to switch sources and a rotary switch for EDID management TL SM HDVDP offers a future ready Ultra HD A V switching and distribution solution and cutting edge HDMI 2 0 and HDCP 2 2 compatibility With user friendly WEB GUI and Telnet API to configure advanced functionality including a CEC controller RS232 controller and Daisy chain Grouping it is perfectly suitable for collaboratio...

Page 5: ...D management l Advanced signal re locking and cable equalization for multiple daisy chains 1 2 Package List ü 1 x SM HDVDP ü 2 x Mounting ears ü 2 x 3 5mm Phoenix Male Connector 2Pin ü 1 x Power Adapter DC 12V 3A ü 2 x 3 5mm Phoenix Male Connector 3Pin ü 1 x User manual ü 2 x 3 5mm Phoenix Male Connector 4Pin Check whether all the items listed above are included in your package If not contact your...

Page 6: ...vice 9 VGA IN LED This LED is on if VGA IN is selected as input 10 VGA IN Connects to VGA source device 11 AUDIO IN VGA analog stereo audio input 12 ETHERNET Connects to a LAN device such as Laptop for LAN access or WEB control 13 EDID Rotary switch is provided to offer EDID management 14 Show Me Button Press this button to switch the input source in turn or activate remote device when an active s...

Page 7: ... HDMI DP or VGA source directly Pin 1 represents HDMI IN Pin 2 represents DP IN Pin3 represents VGA IN Pin G represents Ground 6 LED Connects to a controller such as a keypad to indicate current selected input channel Pin 1 represents HDMI IN Pin 2 represents DP IN Pin3 represents VGA IN Pin G represents Ground 7 HDMI OUT Connects to a HDMI display device 8 AUDIO OUT Connects to audio system such ...

Page 8: ...ce 2 are used as transmitter to connect source while Device M and Device Z are dedicated receivers to connect multiple displays Application 2 Chain type Connection with Local Monitor In Application 2 each TL SM HDVDP in the chain has their local HDMI Out connected with local monitor so as to show upstream or local source once it s selected in the chain Please note only downstream devices can displ...

Page 9: ...ng Mode In Application 4 Device 1 and Device 2 work in Group 1 while Device M and Device Z work in a separate Group Z Devices in different groups can not select or display sources from other groups Grouping mode is simply activated by Telnet API or clicking the Daisy chain Grouping option on the first device of different groups in WEB GUI For example set Device 3 in grouping mode to make Device 1 ...

Page 10: ...tal quantity of devices cascaded within Daisy chain Sequence and then click Start Sequence For more details please check Page 17 Daisy Chain Sequence 4 Connect the HDBT OUT of the last device to the HDBT IN of the first device log into the WEB GUI of the first device to click Start Sequence again then Ring type connection will be set up correctly If any TL SM HDVDP is reset removed replaced or new...

Page 11: ...DP or Contact Closure based keypad to the ShowME KEY LED ports to control Circuit diagram of Contact Closure ports including SHOW ME KEY and LED without any resistors as shown 5 Power on all devices Use the ShowMe button Contact Closure WEB GUI or Telnet API command to operate the TL SM HDVDP Note Quality CAT cables are highly recommended such as Cat6 AWG 23 or better S FTP cable Please check http...

Page 12: ...11 TL SM HDVDP User Manual www tlnetworx com 5 System Connection The figure below illustrates a typical connection that can be utilized with TL SM HDVDP Chain type Connection ...

Page 13: ... com Ring type Connection 1 System should be installed in a clean environment with proper temperature and humidity 2 All of the power switches plugs sockets and power cords should be insulated 3 All devices should be connected before power on ...

Page 14: ...121 make sure the computer s IP address is 192 168 1 X such as 192 168 1 100 Step 2 Type the IP address into a web browser as seen below A login screen will appear The default password is admin Note If the IP address of TL SM HDVDP has been changed a user can search the new IP using SmartSetGUI tool or press the reset button to reset the TL SM HDVDP Run the SmartSetGUI tool to obtain the IP addres...

Page 15: ...splays the current status of TL SM HDVDP Device in red represents TL SM HDVDP working in Show Me mode Device in green represents TL SM HDVDP connecting in the chain but not working in Show Me mode Device in black represents not connecting in the chain Click the device icon it displays the alias name IP address sequence mode and input source of the TL SM HDVDP ...

Page 16: ...15 TL SM HDVDP User Manual www tlnetworx com Note Mode False represents the TL SM HDVDP not working in group mode Mode True represents TL SM HDVDP working in group mode ...

Page 17: ...nd Control 6 1 1 Device This sub menu is used to perform the following tasks Locate ME Alias Name Daisy chain Sequence Daisy chain Grouping Network Locate Me When you click the LocateME button the LocateME LED of TL SM HDVDP will be on so the user can locate which TL SM HDVDP s WEB GUI is controlling ...

Page 18: ... recommended to input the total quantity of devices cascaded in the chain by logging into the WEB GUI of the first device and then clicking the Start Sequence button When any TL SM HDVDP is removed or added into a cascaded connection please log in the first device s WEB GUI in the chain to reconfigure This function allows the TL SM HDVDP to find out its sequence in the daisy chain automatically an...

Page 19: ...y each group will only have their local sources available for display and can t be shared to other groups Daisy Chain Grouping is simply activated using the Telnet API or clicking the option on the first device of different groups After applying the selected TL SM HDVDP and downstream devices can not select or display upstream sources A cascaded chain can support multiple groups It s set up in the...

Page 20: ...t the IP address to access the TL SM HDVDP is Static The user must configure the IP address of each device before the installation to avoid IP conflicts when multiple devices are connected 6 1 2 Video This sub menu is used to perform the following tasks Auto Switch HDCP EDID Auto Switch Users can enable or disable the Auto Switch function in this column ...

Page 21: ...OW means the source is allowed to output encrypted video OFF means the source can only output un encrypted video Note This function is only applied to the specified source This function is useful to force laptops to output unencrypted content If your system connects to a video conferencing codec for video capture it is recommended to set the inputs to HDCP OFF EDID To set the EDID by WEB GUI first...

Page 22: ...troller and is able to turn on off the display by sending CEC commands to display via the HDMI output port automatically Note This function is only effective for CEC supported and enabled displays CEC Auto control Enable disable CEC Auto control Delay Timing Set the delay time of turn on off display after receiving CEC command The range is 0 30 minutes CEC Manual Control Turn on off display by CEC...

Page 23: ... Standby Command of connected display and click Save button Baud Rate Set the Baud Rate of connected display Parity Bits Set the Parity Bits of connected display Data Bits Set the Data Bits of connected display Stop Bits Set the Stop Bits of connected display Hex String Check this option represents the command is Hexadecimal format End Flag Choose the end flag of command The command could be end w...

Page 24: ...Advanced This sub menu is used to perform the following tasks Welcome Menu Password System Version 6 1 4 Welcome Menu User can change the WEB GUI logo if they need click Browse button to browse the Logo file and then click Upload button Note Image must be png format 6 1 5 Password Input a new login password click Apply button to save the change Note Password must be 4 to 16 characters in length al...

Page 25: ...L SM HDVDP User Manual www tlnetworx com 6 1 6 System Factory Default click this button to reset the TL SM HDVDP to factory default settings Reboot click this button to reboot the TL SM HDVDP 6 1 7 Version ...

Page 26: ...25 TL SM HDVDP User Manual www tlnetworx com Update MCU Step 1 click Update button Step 2 Browse for the update file ...

Page 27: ...26 TL SM HDVDP User Manual www tlnetworx com Step 3 Upload File OK click Next button Step 4 It takes about one minute to update Please restart the device ...

Page 28: ...27 TL SM HDVDP User Manual www tlnetworx com Update ARM Step 1 click Update button Step 2 Browse for the update file ...

Page 29: ...28 TL SM HDVDP User Manual www tlnetworx com Step 3 Upload File OK click Next button Step 4 Complete Close this window ...

Page 30: ... www tlnetworx com Device List Window This window displays the name and IP address of current devices Click on the device it will forward the user to the WEB GUI of the selected device Click the triangle icon to hide this window ...

Page 31: ...D does not meet the installation requirements The EDID mode has several options available to encourage device communication Set it to the appropriate position based on the preferred timing of connected display DIP Switch EDID Description 0 HDMI DP 3840 x 2160 60Hz 2CH VGA 1920 x 1200 60Hz 2CH 1 1920 x 1200 60Hz 2CH 2 1920 x 1080 60Hz 2CH 3 1680 x 1050 60Hz 2CH 4 1600 x 900 60Hz 2CH 5 1440 x 900 60...

Page 32: ...60 24 25 30 50 60Hz 1080p 24 25 30 50 60Hz 1080i 50 60Hz 720p 50 60Hz 576p 50Hz 480p 60Hz 1920 x 1200 60Hz 1680 x 1050 60Hz 1600 x 1200 60Hz 1600 x 900 60Hz 1440 x 900 60Hz 1400 x 1050 60Hz 1366 x 768 60Hz 1360 x 768 60Hz 1280 x 1024 60H 1280 x 960 60Hz 1280 x 800 60Hz 1280 x 768 60Hz 1024 x 768 60Hz 800 x 600 60Hz DisplayPort 800x600 60Hz 1024x768 60Hz 1280x768 60Hz 1280x800 60Hz 1280x960 60Hz 12...

Page 33: ...0 60Hz 1280x720P 50Hz 1280x720P 60Hz 1920x1080P 50Hz 1920x1080P 60Hz Input Video Level 0 5 1 2 V p p Input DDC Level 5 volts p p TTL Output 1 x HDMI OUT 1x HDBaseT OUT 1 x HDMI audio de embedded Stereo Output Signal Type HDMI 1 4 w HDCP 2 2 HDBaseT Output Resolution Support HDMI 4096 x 2160 24 25 30 50 60Hz 3840 x 2160 24 25 30 50 60Hz 1080p 24 25 30 50 60Hz 1080i 50 60Hz 720p 50 60Hz 576p 50Hz 48...

Page 34: ...60Hz 1280x720P 50Hz 1280x720P 60Hz 1920x1080P 50Hz 1920x1080P 60Hz 3840x2160 50Hz 3840x2160 60Hz 4096x2160 50Hz 4096x2160 60Hz VGA 800x600 60 Hz 1024x768 60Hz 1280x768 60Hz 1280x800 60Hz 1280x960 60Hz 1280x1024 60Hz 1360x768 60Hz 1366x768 60Hz 1440 x900 60Hz 1600 x900 60Hz 1600 x1200 60Hz 1680 x1050 60Hz 1920 x1080 60Hz 1920 x1200 60Hz 1280x720P 50Hz 1280x720P 60Hz 1920x1080P 50Hz 1920x1080P 60Hz ...

Page 35: ... to 70 C 4 F to 158 F Humidity 10 to 90 non condensing ESD Protection Human body Model 8kV Air gap discharge 4kV Contact discharge Power Supply DC 12V 3A Power Consumption 20 52W Maximum Device Dimension W x H x D 223mm x 27mm x 124 2mm 8 78 x 1 06 x 4 89 Product Weight 0 8kg Certification CE FCC RoHS Use quality HDMI cable to connect the devices to ensure preferred transmission effect ...

Page 36: ... is off operations don t work No power Power up the unit Poor contact of power port Make sure power adapter is properly seated No output on the display Source Display is off Turn on the source display Poor contact of HDMI ports Check the HDMI ports one by one to make sure they re properly seated If your problem persists after following the above troubleshooting steps seek further help from authori...

Page 37: ... by l Normal wear and tear l Use of supplies or parts not meeting our specifications l No certificate or invoice as the proof of warranty l The product model showed on the warranty card does not match with the model of the product for repairing or had been altered l Damage caused by force majeure l Non authorized service l Other causes which does not relate to a product defect l Delivery installat...

Reviews: