8
17.
Insert o-ring (10) into outlet block (11).
18.
Re-install outlet block (11) to fluid housing (6).
19.
Lubricate o-ring (17) with Bimba HT-99, or equivalent.
20.
Thread the air cylinder/spool assembly into fluid housing/outlet block
assembly. Make sure not to cross thread both parts.
7.2
Cleaning and seal replacement for air cylinder:
1.
Hold the fluid housing (6) and rotate the air cylinder (18) counterclockwise.
When completely un-threaded, pull the two valve segments straight apart to
separate.
2.
Remove end cap (19) by rotating it in counterclockwise direction.
3.
Using the snap ring pliers, remove the retaining ring (2).
4.
Pull the spool assembly (5) straight out from the air cylinder (18).
5.
Remove the compression spring (4).
6.
Using the snap ring pliers, remove the retaining ring (7).
7.
Remove the nylon washer (15) from the air cylinder.
8.
Using o-ring removal tool, remove o-ring (16).
9.
Replace all o-rings if necessary.
10.
Lubricate all o-rings with Bimba HT-99, or equivalent.
11.
Re-install o-ring (16).
12.
Re-install nylon washer (15) and secure with retaining ring (7) Re-install
compression spring (4) into air cylinder (18).
13.
Thread the air cylinder into fluid housing/outlet block assembly making sure
not to cross thread both parts.
14.
Re-install spool assembly (5) and secure with retaining ring (2).
15.
Re-install end cap (19).
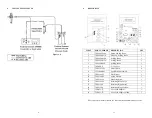
13
12
19
18
17
16
15
1
2
3
5
4
6
8
7
9
10
11
14
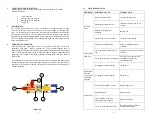
Figure 5.0
9
8.
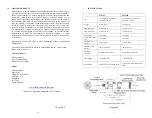
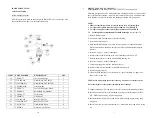
SPARE PARTS
Valve Rear Section
ITEM PART
NUMBER DESCRIPTION
QTY
1 TSD1120-2
Retaining
Ring,
Small
1
2 TSD1109-45
Nylon
Washer
1
3 TD1400-006A O-Ring,
Buna
1
4 TSD1400-013A O-Ring,
Buna
1
5 TSD1150-5
Spring
1
6 5322-000-001 Spool/Piston
Assembly
1
7 TSD1400-208A Piston
O-Ring,
Buna
1
8 TSD1120-15
Retaining
Ring,
Large
1
9
TSD1400-017A
End Cap O-Ring, Buna
1
10 5520-000-007 End
Cap
1
11
TSD1002-37
Air Fitting, 4mm
1
12
A0100478
Air Hose/Connector Assembly, 4mm
1
13 5520-000-001 Air
Cylinder
1
14 918-000-048
Mounting
Bracket
1
15 TSD1106-36
Mounting
Screw
1
Recommended lubricant:
All o-rings & seals must be
lubricated with Bimba HT-99,
or equivalent.

