background image

2-16

EM18-33010A

2. MAJOR UNIT REPLACEMENT

Fig. 2-27

(Revision Date Sep. 29, ’95)

2.10 REPLACING THE PINCH ROLLER SHAFT ASS’Y

2.11 CORRECTING SKEW PRINTING

If media still skews after adjusting the pinch roller shaft ass’y with the jig, follow the procedure below
to correct the skew problem.

1.

Check if the media skews right or left.

2.

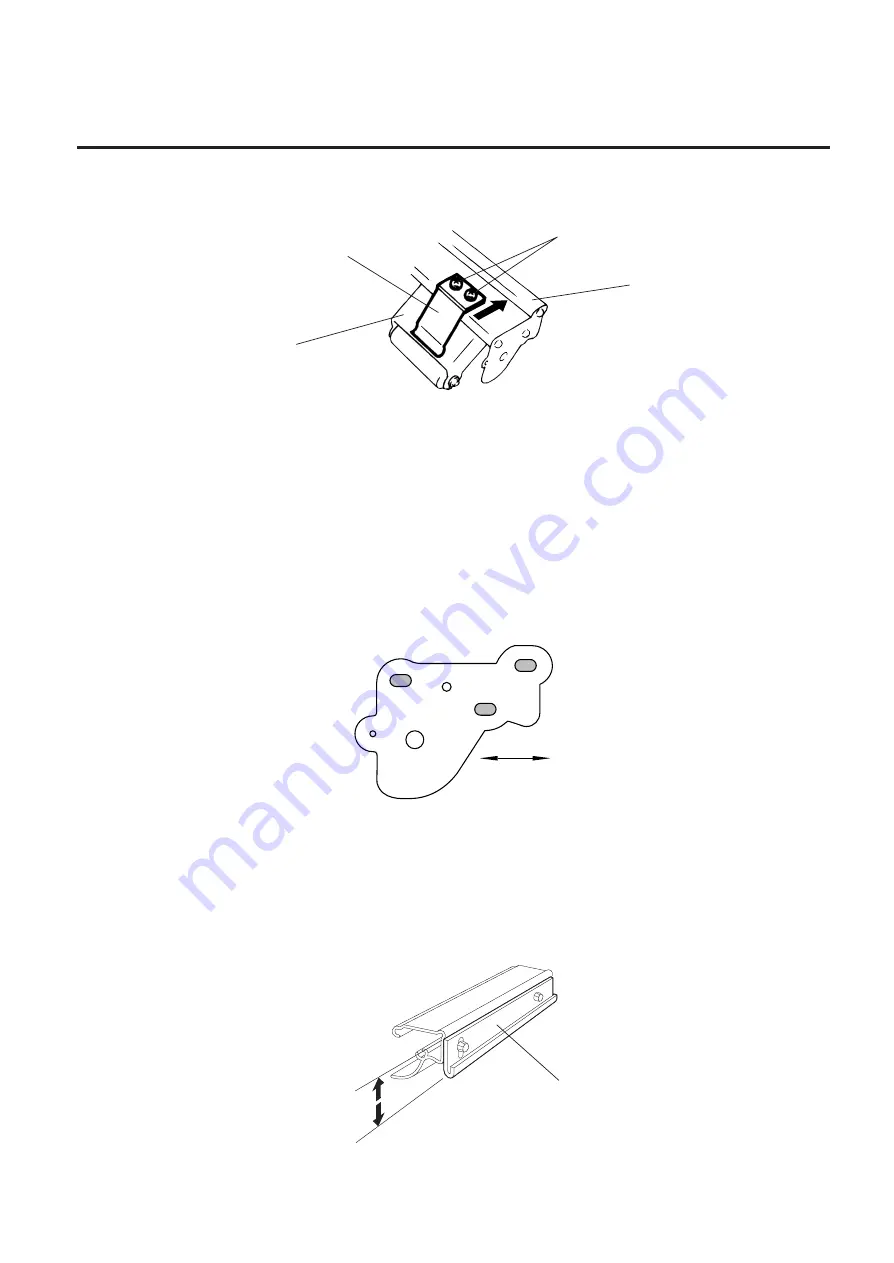
Loosen the B-4x12 screw to move the pinch roller cover to the front or rear of the printer depending
on the skew direction.

3.

Turn the head lever clockwise to lock the pinch roller shaft ass’y.  Attach the spring plate to the pinch
roller frame with the two SM-4x8B screws, pushing the spring plate toward the rear of the printer.

NOTE: Check that the pinch roller shaft  ass’y  moves up and down smoothly when turning the head

lever clockwise and counterclockwise.

4.

Install the media guide plate to the printer so there is a 1.5 to 2.5 mm gap between the media guide
plate and the printer block base.

When the media skews right, move the pinch roller cover to the front.

When the media skews left, move the pinch roller cover to the rear.

If a paper skew problem should occur when using rolls would with labels facing outside after
completing the modification, adjust the paper guide as follows.

*

In case the label skews to the right side of the print head, move the guide downward.

*

In case the label skews to the left side of the print head, move the guide upward.

Fig. 2-28

Fig. 2-26

Front

Rear

SM-4x8B

Pinch Roller Frame

Pinch Roller Shaft Ass’y

Spring Plate

Guide Plate

Summary of Contents for B-570 SERIES

Page 1: ...TEC Thermal Printer B 570 SERIES Original Nov 1993 Revision Apr 1994 PRINTED IN JAPAN Maintenance Manual Document No EM18 33010A ...

Page 2: ...es and to insure proper performance and operation 2 Failure to follow manual instructions or any unauthorized modification substitution or change to this product will void the limited product warranty WARNING Follow all manual instructions Failure to do so could create safety hazards such as fire or electrocution ...

Page 3: ... HIGH SPEED PC INTERFACE BOARD B 4800 PC QM 3 1 3 2 CUTTER MODULE B 4205 QM 3 3 3 3 MEMORY MODULE 3 5 3 4 FANFOLD PAPER GUIDE MODULE B 4905 FF QM 3 7 4 MECHANISM DESCRIPTIONS 4 1 4 1 CUTTER DRIVE CUT MODE 4 1 4 2 HARNESS WIRING 4 2 5 TROUBLESHOOTING 5 1 6 DIAG TEST OPERATION 6 1 7 PROGRAM DOWN LOAD 7 1 7 1 FLOPPY DISK 7 1 7 2 SETUP 7 1 7 3 DOWN LOAD PROCEDURE 7 2 7 4 ERROR CODE 7 3 Revision Date F...

Page 4: ... transport Carton Thermal Printer Side Pad L Power Cord Owner s Manual Side Pad R Fig 1 1 1 UNPACKING 1 1 PROCEDURE 1 Open the carton 2 Unpack the accessories from the carton 3 Unpack the side pad L R and the printer from the carton 4 Place the printer on a level surface Revision Date Sep 14 95 1 1 Procedure Supply Holder Head Cleaner Unpacking Procedure Rewinder Guide Plate Rear Pad ...

Page 5: ...ENT Fig 2 1 2 MAJOR UNIT REPLACEMENT CAUTION 1 NEVER separate the ribbon motors from the attaching plate bracket because doing so will change their adjustment See Fig 2 8 2 NEVER remove the two screws painted red on the side of the print block See Fig 2 13 3 NEVER remove the four screws on the side of the print block See Fig 2 13 4 NEVER remove the four screws painted red fixing the right plate an...

Page 6: ...re 1 Remove the three FL 4x6 screws and disconnect the two connectors to detach the PS unit 2 Remove the FL 3x5 screw and the four locking supports to remove the I F PC board Fig 2 2 5 Replace the PS unit I F PC board and CPU PC board Insert the connectors correctly and install in the reverse order of removal above Do not mount the left side cover and top cover Fig 2 3 PS Unit Screw FL 4x6 Screw F...

Page 7: ...o that the ribbon end sensor can detect the ribbon Turn the power on 2 Turn the VR2 so that the voltage between Pin 1 GND and Pin 7 of CN10 is 3 0 0 2 V with an oscilloscope 3 Turn the power off and mount the left side cover and top cover 7 Adjust the black mark sensor As the black mark sensor is adjusted by key entries in system mode refer to page 6 39 for the adjustment procedure 8 Adjust the fe...

Page 8: ...erse order of removal Fig 2 6 2 2 REPLACING THE STEPPING MOTOR 2 2 REPLACING THE STEPPING MOTOR 1 Remove the two black screws to detach the front plate remove the two FL 4x6 screws to detach the belt cover 2 Unclamp and disconnect the connector from CN14 on the CPU PC board 3 Remove the two SM 4x8B screws loosen the two belts from the pinion gear and remove the stepping motor Fig 2 7 Black Screw F...

Page 9: ... 9 Fig 2 8 2 3 REPLACING THE RIBBON MORTORS 2 3 REPLACING THE RIBBON MOTORS CAUTION NEVER separate the ribbon motors from the attaching plate because doing so will change their adjustment 1 Disconnect the connector and remove the two SM 3x5B screws to detach the ribbon motors CAUTION NEVER separate the take up motor from the bracket because doing so will change the adjustment 4 Replace the take up...

Page 10: ... Remove the ribbon stopper from the ribbon shaft on which the ribbon is wound 2 Remove the two SM 4x8B screws disconnect the connector CN1 on the RSV PC board to detach the solenoid unit 3 RemovethetwoSM 3x5BscrewsanddisconnecttheCN2connectorontheRSVPCboardtodetach the solenoid Fig 2 11 Ribbon Shaft Ribbon Stopper Print Block RSV PC Board CN2 2 pin Connector CN1 3 pin Solenoid Attaching Plate Scre...

Page 11: ...fect the print quality 4 Replace the solenoid and attach it to the solenoid attaching plate 5 Assemble the solenoid unit so that the head up link engages the spring pin Fig 2 12 CAUTION Take care to orient the screws so that they are vertically aligned with the solenoid attaching plate 6 Reassemble in the reverse order of removal Head Up Link Spring Pin Solenoid ...

Page 12: ...of the position when reassembling NOTE Thefollowingprocedurecanbeemployedwithoutremovingthetopcoverandtheleftsidecover 2 6 1 Old type print head 1 Turn the head lever clockwise to lower the print head Remove the two SM 4x8B screws 2 Turn the head lever counter clockwise and disconnect the two connectors to detach the print head from the print block 3 Replace the print head connect the connectors a...

Page 13: ...laten and strip shaft 2 Press the jig at an angle of 45 until it is sung against the print head Then secure the print head 3 Remove the jig 4 Refer to page 6 43 and clear the maintenance counter 5 Refer to page 6 31 and perform test print NOTE Use caution to prevent damage to the element during adjustment of the print head Platen Ceramic Print Head Platen Strip Shaft Jig ...

Page 14: ...ad with the print head position adjusting pins provided in the print block and fit the print head into the print block 5 Turn the head lever clockwise and secure the print head with screws in the holes B Adjusting the print head position When print tone becomes light from using special paper with improper print head position please follow the procedure below and adjust the print head position NOTE...

Page 15: ...rd and then tighten the screws b and c Ensure that the print head is parallel to the platen If not print tone will be uneven 3 Make a test print and if necessary repeat Step 2 until the printer prints properly CAUTION 1 NEVER remove the four screws painted red fixing the right plate and reinforcing plate See Fig 2 16 2 The pinch roller belt assembled inside the printer does not need to be replaced...

Page 16: ...e feed roller belt to detach the feed roller 7 Remove both bearings from the platen or feed roller 8 Replace the platen and feed roller put on the belt and assemble it with the printer The longer belt is the platen belt 9 Attach the right plate 10 Hold down the stepping motor and secure it so that the belts have no slack or disengagement 11 Reassemble in the reverse order of removal Fig 2 18 Fig 2...

Page 17: ...ension block Fig 2 20 Fig 2 21 2 8 REPLACING THE PAPER SENSOR 2 8 REPLACING THE PAPER SENSOR NOTE Turn the knob until the paper sensor reaches full forward 1 Disconnent the connector for the strip sensor LED to remove right plate ass y See Figs 2 17 and 2 18 2 Disconnect the connectors for the paper sensor 3 Remove M1 5 E ring M3 washer and paper sensor unit 4 Remove M1 5 E ring turn the knob coun...

Page 18: ...4 Remove the six B 4x12 screws to detach the pinch roller cover 5 Remove the E 5 E ring to loosen the pinch roller belt and remove the pinch roller shaft ass y 6 After replacing the pinch roller shaft ass y make the following adjustment while you reassemble the pinch roller shaft ass y in the reverse order of removal Fig 2 22 Fig 2 23 B Media Sensor Black Screw HAA 0004001 B Media Guide Plate Prin...

Page 19: ... and the feed roller prior to attaching the jig 2 Attach the jig while the pinch roller frame is tentatively attached to the main frame with the B 4x12 screws Secure the pinch roller cover to the pinch roller frame with the three B 4x12 screws then tighten the other side of the screws 3 The flat top of the pinch roller frame must be installed in parallel to bosses on the printer frame Check 1 Chec...

Page 20: ... the printer NOTE Check that the pinch roller shaft ass y moves up and down smoothly when turning the head lever clockwise and counterclockwise 4 Install the media guide plate to the printer so there is a 1 5 to 2 5 mm gap between the media guide plate and the printer block base When the media skews right move the pinch roller cover to the front When the media skews left move the pinch roller cove...

Page 21: ...wo FL 3x5 screws to detach the blind plate 3 Pass the printer cable through the opening 4 Fasten the ground wire of the printer cable to the CPU PC board at the upper right with the SM 3x6B screw securing the CPU PC board 5 Attach the two locking supports to the main frame plate Install the BPE PC board aligning with the connector CN15 and locking supports Fig 3 1 Description BPE PC board BPC PC b...

Page 22: ...d install the data in the hard disk Since the installation procedure is different between MS DOS and Windows refer to each owner s manual 15 Perform a motion check Fig 3 2 3 1 HIGH SPEED PC INTERFACE BOARD B 4800 PC QM 6 Connect the printer cable to the connector CN1 on the BPE PC board 7 Put the cable strain relief of the printer cable in the notch of the cable support plate Secure the cable stra...

Page 23: ...he B 4205 QM is not used but the take up harness connected to CN2 on the PWM PC board 1 Remove the top cover and left side cover See Fig 2 1 2 Remove the I F PC board See Fig 2 2 3 Remove the front plate See Fig 2 6 4 Remove the screw SM 4x8B and two connectors to detach the operation panel Description Q ty Unit Description Q ty Unit Cutter Unit 1 Cutter Attaching Screw 2 Cutter Cover 1 Screw FL 4...

Page 24: ...ke sure that the cutter guide is not in contact with the platen If it is print failure or noise may be caused 8 Remove the motor cover See Fig 2 9 9 Disconnect the connector from CN2 on the PWM PC board Clamp and pass the cable through the opening and connect it to the CN1 on the Cutter I F PC board Clamp CPU PC Board Connector CN2 PWM PC Board Opening Cable Cut I F PC Board Cutter Unit Connector ...

Page 25: ...cover and top cover in order 12 After reassembly is complete perform a test print to confirm that the cutter works properly After printing a print sample at a speed of 8 sec feed the media about 33 mm and check that the swing cutter works without error After cutting the media feed the media about 33 mm in the reverse direction and check that it correctly stops at the print start position NOTES 1 I...

Page 26: ...equence IC19 IC20 IC21 IC22 IC23 and IC24 Fig 3 9 Revision Date Feb 10 2000 3 3 MEMORY MODULE 3 Reassemble the left side cover in the reverse order of removal Expansion memory and drawing size The size for the tag paper is 138 0x997 0 RAM Capacity 1MB 1 5MB 2MB 2 5MB 3MB 3 5MB 4MB IC No IC17 18 IC17 19 IC17 20 IC17 21 IC17 22 IC17 23 IC17 24 Remarks Standard Option Option Option Option Option Opti...

Page 27: ...support Fig 3 10 D RAM PC Board CN16 CPU PC Board Expansion memory and drawing size NOTES 1 The size for the tag paper is 79 68 x 997 0 2 Addition of the D RAM and the DRAM PC board can expand the memory up to 4MB of the old CPU PC board and the new CPU PC board respectively RAM Capacity 2MB 4MB 138 0 x 640 0 138 0 x 995 0 NOTE 1 Max drawing size normal W x H mm Batch Strip Auto cut 138 0 x 320 0 ...

Page 28: ...FANFOLD PAPER GUIDE MODULE B 4905 FF QM 3 4 FANFOLD PAPER GUIDE MODULE B 4905 FF QM 1 Open the top cover 2 Remove the T 4x8 screws to detach the paper guide ass y at the center of the printer and attach the fanfold paper guide front with these same screws Description Fanfold Paper Guide rear Fanfood Paper Guide front Q ty Unit 1 1 Fig 3 11 Fig 3 12 Screw T 4x8 Fanfold Paper Guide front Screw FL 4x...

Page 29: ...4 1 CUTTER DRIVE CUTTER MODE The printer supplies DC 27 V to the cutter motor to rotate the cutter motor and clutch counter clockwise The arm swings like a pendulum and moves the fixed slide cutter up and down to make a cut 4 1 CUTTER DRIVE CUTTER MODE Timing chart Open 27 Close Open MOTOR CHOME Micro Switch Cutting one cycle Slide Cutter Micro Switch Cutter Motor Cutter Motor Clutch Slide Cutter ...

Page 30: ...Clamp Cable Band Do not bind the strip sensor stepping motor and Solenoid Harness Clamp Cutter Harness Take up Harness Solenoid Harness Sensor Harness CPU PC Board Ass y I F PC Board Ass y LCD Harness LED Harness HP Harness Inlet Ass y PS Unit PS Harness Stepping Motor Clamp LCD Harness Cable Band Clamp HS Harness LED Harness TH Sensor ...

Page 31: ...he printer is not within the rated voltage Check by CN1 on the PS unit 2 Output voltage from the printer is not within the rated voltage Check that the voltage between Pin 4 and Pin 6 GND of CN2 on the PS unit is 27 V AndcheckthevoltagebetweenPin1 and Pin 3 GND is 5 V 3 CPU PC board is not applied with voltage Check the voltage between Pin 1 and Pin 3 GND of the CN17 on the CPU PC board is 27 V 4 ...

Page 32: ...t missing Blurred print Ribbon wrinkle Ribbon end error Label feed failure Communication error Problems Cause Solution 1 Broken element of print head 2 Broken wires of print head cable 3 Failure of the CPU PC board 1 Poor quality of media 2 Dust is attached to the media 1 Poor quality of the ribbon 2 Ribbon is not rewound or fed smoothly 1 Poor quality of the ribbon 2 Impropervoltageappliedtotheri...

Page 33: ...6 24 6 3 6 Character Code Selection 6 25 6 3 7 Font Zero Selection 6 26 6 3 8 Control Code Selection 6 27 6 3 9 Ribbon Type Selection 6 29 6 3 10 Ribbon Motor Drive Voltage Fine Adjustment 6 30 6 3 11 Strip Wait Status Setting 6 31 6 3 12 Stacker Selection 6 32 6 3 13 Threshold Manual Fine Adjustment for the Black Mark Sensor 6 33 6 3 14 Threshold Manual Fine Adjustment for the Feed Gap Sensor 6 3...

Page 34: ... available in this mode Test Print Mode See page 6 41 Print condition and test print type slant line characters and bar code are selectable Sensor Setting Mode See page 6 48 A thermistor check and the setting of the black mark and feed gap sensors are available in this mode A transmission check is made to both a print head thermistor and an environmental temperature thermistor RAM Clear Mode See p...

Page 35: ...feed length fine adjustment or cut strip position fine adjustment can be changed while the printer is on line or printing Pressing the PAUSE key causes the printer to enter parameter setting mode Reset mode is provided for this procedure to cancel the steps which follow the PAUSE key without turning the power off O N L I N E P A S E 5 U 1 R E S E T 2 P A R A M E T E R S E T Power on Indicates the ...

Page 36: ...lay 1 DIAGNOSTIC V1 0A Printing is not automatically resumed after the error is cleared 2 Both label and tag paper can be used for printing 1 D I A G N O S T I C V 1 0 A R I B O N T R A N S M I S S I V E B M A N T E N A N C E C O U N T E R I C H C K I N G P R I N T I N G E Power off Turn on the power while holding down the FEED key and PAUSE key Press the PAUSE key Select the ribbon type from thos...

Page 37: ...eration and back feed See NOTE 2 Counted while printing Feeding and issuing media and ribbon saving operation are not counted See NOTE 2 Counts every cut See NOTE 3 Counts every up and down of the print head using the solenoid for ribbon save operation Up Down 1 count See NOTE 3 Counts when the ribbon motor drives to feed print and issue the media The driving time is not counted during ribbon savi...

Page 38: ...pported by QQ QP models Euro font code setting Stacker not supported by QQ QP models Transmission Control Mode Reset selection when the INPUT PRIME signal is ON Contents PC 850 PC 850 PC 8 PC 8 0 No slash used Ø Slash used AUTO Automatic selection ESC LF NUL ESC LF NUL mode Mainframe mode 1B 1C 1D Manual mode TRANS Transmissive ribbon NON TRANS Non transmissive ribbon 50 0 mm to 50 0 mm 50 0 mm to...

Page 39: ...A G N O S T I C V 1 0 A Power off C H C K I N G P R I N T I N G E A U O M A T I C D I A G N O S T I C T R I B O N T R A N S M I S S I V E B Select the ribbon type from those at the right by pressing the FEED key or RESTART key Press the PAUSE key Press the FEED key Press the PAUSE key The printer is checking or printing the status The result of the self test is printed After printing the initial d...

Page 40: ...sum KANJI OUTLINE ROM1 Checksum 0000 0000 0000 0000 0000 0000 NOTES 1 Checksum varies according to the software version 2 When the KANJI ROM or KANJI OUTLINE ROM is not installed the checksum becomes 0000 3 The last two digits of the checksum are not 0 Fig 6 2 6 2 SELF TEST MODE 1 PROGRAM MASK ROM Check NOTES 1 Software version No part No of ROM and checksum vary according to the software version ...

Page 41: ...ead written DRAM 1024KB Readable writable area DRAM Image buffer memory or work memory CARD OK Flash memory card Format check OK Formatted NG Formatted improperly or no flash memory card is inserted NOTE If an error is detected during DRAM check the display od readable writable area will stop when the error occurs 5 Flash Memory Card Check 6 2 SELF TEST MODE 3 EEPROM Check 4 DRAM Check ...

Page 42: ...0 Normal 1 Excess Strip sensor status 0 Without label 1 With label Ribbon end sensor status 0 Transmissive with ribbon 1 Non transmissive ribbon end 0 The detecting point is positioned outside the slit 1 The detecting point is positioned inside the slit Slit sensor 2 ribbon feed status 0 The detecting point is positioned outside the slit 1 The detecting point is positioned inside the slit 0 0 0 0 ...

Page 43: ... position or not Indicates whether the media is wound to peak capacity on the built in take up spool or not Controls ribbon motor rotation by detecting the slit on the ribbon rewind motor and the ribbon feed motor Indicates the position of the slit sensor Indicates the existence of label in strip mode When no label is detected 0 the subsequent label is issued when a label is detected 1 thesubseque...

Page 44: ... OK The circuit has no problem NG The circuit has a problem or loopback jig is not attached OK Connector FCN 781P024 G P Fig 6 3 For the loopback test connect jig as shown below and check HIGH output HIGH input and LOW output LOW input Revision Date Jan 13 95 6 2 SELF TEST MODE 8 DIP SW Check NOTE The DIP switch 1 7 is to be set to 0 OFF OPEN regardless of setting item 9 EXP I O Check 1 2 3 4 5 7 ...

Page 45: ... Date Jul 03 97 6 2 SELF TEST MODE 6 2 3 Head Broken Element Check The printer automatically performs the head broken element check The result of the head broken element check is indicated in the display 1 D I A G N O S T I C V 1 0 A Power off C H C K I N G E N O M A L E N D R H E D E R R O R A T H R M A L H E A D C H E C K E Press the FEED key twice Press the PAUSE key Head broken element check t...

Page 46: ...C O D E P C 8 5 0 N R I B O N A D J F W S 0 B R I B O N A D J B A K 0 B Power off T O E A D J U S T T 0 N S T C K E R S Y S T E M O F F A T H E S H O L D R 1 0 V R T H E S H O L D T 1 4 V R K A J I C O D E T Y P E 1 N D T R T S D T R R Press the PAUSE key I N U T P R I M E O N P Press the PAUSE key Turn on the power while holding down the FEED key and PAUSE key Press the FEED key Press the PAUSE k...

Page 47: ... print tone is fine adjusted The longer the print pulse width the darker the print tone becomes The shorter the lighter the print tone becomes The character code either PC 850 or PC 8 is selected The font zero either 0 or ø is selected The command code out of AUTO ESC LF NUL or is selected Ribbon type either transmissive or non transmissive is selected Using this parameter the torque of the ribbon...

Page 48: ...lue 50 0 mm PC fine adjust ment value 50 0 mm When the value reaches the maximum the value remains unchanged even if the subsequent fine adjustment is performed 3 A change feed value is stored in memory by pressing the PAUSE key 1 D I A G N O S T I C V 1 0 A 2 P A R A M E T E R S E T Power off F E D A D J U S T 0 0 m m E Turn on the power while holding down the FEED key and PAUSE key Press the FEE...

Page 49: ...tment value using the expression provided on page 6 19 FEED key Pressing the FEED key one time is a 0 5 mm change up to 50 0 mm See NOTE 2 RESTART key Pressing the RESTART key one time is a 0 5 mm change up to 50 0 mm See NOTE 2 Revision Date Jan 13 95 6 3 PARAMETER SETTING MODE 6 3 2 Cut Strip Position Fine Adjustment 1 D I A G N O S T I C V 1 0 A 2 P A R A M E T E R S E T C U A D J U S T 0 0 m m...

Page 50: ...y Pressing the FEED key one time is a 0 5 mm change up to 9 5 mm See NOTE 2 RESTART key Pressing the RESTART key one time is a 0 5 mm change up to 9 5 mm See NOTE 2 6 3 PARAMETER SETTING MODE 6 3 3 Back Feed Length Fine Adjustment 1 D I A G N O S T I C V 1 0 A 2 P A R A M E T E R S E T B A K F E E D A D J 0 0 m m C Power off Press the FEED key Press the PAUSE key three times Press the FEED or REST...

Page 51: ...ne Adjustment Example Cut Position Fine Adjustment Example A A A A A A A A A A A A 0 0 mm Feed Direction 10 0 mm 10 0 mm 10 mm 10 mm Fig 6 4 Fig 6 5 Fig 6 6 0 0 mm Feed Direction 12 0 mm 12 0 mm Black Mark Cut Position Print Head Tag Paper Platen 12 mm 12 mm Fig 6 7 Fig 6 8 Fig 6 9 ...

Page 52: ...kfeed to the home position 7 Head lowered Case 2 Generally the minimum label length which is available in cut mode is 38 0 mm When using a label with a length of less than 38 mm the edge of the label may be caught on the print head during back feed to the print start position after cutting the label gap causing a improper print start position In this case set the cut position fine adjustment value...

Page 53: ...ting 2 mm from the label pitch that is set the gap length to 2 mm If the print format hangs over the gap as a result correct the print start position If the print stop position is improper refer to Section 6 3 2 and make a fine adjustment Fig 6 14 Revision Date Jul 28 94 6 3 PARAMETER SETTING MODE Strip Position Fine Adjustment Example 3 0 mm 3 0 mm 3 0 mm 3 0 mm 0 0 mm Label Backing Paper Strip S...

Page 54: ...10A 6 DIAG TEST OPERATION 6 3 PARAMETER SETTING MODE Back Feed Length Fine Adjustment Example A A A A A A A A A A A A 0 0 mm Feed Direction 3 0 mm 3 0 mm 3 0 mm 3 0 mm Print start position Fig 6 15 Fig 6 16 Fig 6 17 ...

Page 55: ...a 0 5mmchange upto 99 5 mm See NOTE 2 RESTART key Pressing the RESTART key one time is a 0 5 mm change up to 99 5 mm See NOTE 2 6 3 PARAMETER SETTING MODE 6 3 4 X Axis Fine Adjustment Power off 1 D I A G N O S T I C V 1 0 A 2 P A R A M E T E R S E T X D J U S T 0 0 m m A Turn on the power while holding down the FEED key and PAUSE key Press the FEED key Press the PAUSE key four times Press the FEED...

Page 56: ...the value reaches the coordinate 0 the value remains unchanged even if the subsequent fine adjustment is performed in the negative direction 3 X axis fine adjustment cannot be used in self test mode or test printing Fig 6 18 Fig 6 19 Fig 6 20 6 3 PARAMETER SETTING MODE X Axis Fine Adjustment Example ABC ABC ABC Y X Y Bottom first printing 0 0 mm 50 0 mm 50 0 mm 50 0 mm 50 0 mm Top first printing X...

Page 57: ... key one time is a 1 step change up to 10 steps See NOTE 2 FEED key Pressing the FEED key one time is a 1 step change up to 10 steps See NOTE 2 RESTART key Pressing the RESTART key one time is a 1 step change up to 10 steps See NOTE 2 Thermal transfer printing fine adjustment Thermal direct printing fine adjustment Revision Date Jan 14 99 6 3 PARAMETER SETTING MODE 6 3 5 Print Tone Fine Adjustment...

Page 58: ...NG MODE 6 3 6 Character Code Selection Power off Turn on the power while holding down the FEED key and PAUSE key Press the FEED key Press the PAUSE key seven times Select either character code with the FEED key or RESTART key See NOTE 1 Press the FEED key and RESTART key at the same time Press the PAUSE key Continued on Section 6 3 7 Font zero selection 1 D I A G N O S T I C V 1 O A 2 P A R A M E ...

Page 59: ... PARAMETER SETTING MODE 6 3 7 Font Zero Selection Power off Turn on the power while holding down the FEED key and PAUSE key Press the FEED key Press the PAUSE key eight times Select either zero font with the FEED key or RESTART key See NOTE 1 Press the FEED key and RESTART key at the same time Press the PAUSE key Continued on Section 6 3 8 Control code selection 1 D I A G N O S T I C V 1 O A 2 P A...

Page 60: ...lection of MANUAL SVO8A1002 Jan 19 98 6 3 PARAMETER SETTING MODE 6 3 8 Control Code Selection Power off Turn on the power while holding down the FEED key and PAUSE key Press the FEED key Press the PAUSE key nine times Select control code with the FEED key or RESTART key See NOTE 1 Press the FEED key and RESTART key at the same time Press the PAUSE key Continued on Section 6 3 9 Ribbon type selecti...

Page 61: ... control code 1 equivalent to ESC Set the control code 2 equivalent to LF Set the control code 3 equivalent to NUL Press the PAUSE key Press the PAUSE key Press the PAUSE key C O T R O L C O D E 1 0 0 N C O T R O L C O D E 1 1 A N C O T R O L C O D E 1 1 C N C O T R O L C O D E 1 F F N C O T R O L C O D E 1 1 B N FEED FEED FEED FEED RESTART FEED RESTART RESTART RESTART RESTART NOTES Refer to the f...

Page 62: ...issive Ribbon end Non Transmissive ribbon Transmissive Ribbon end Non transmissive With ribbon Revision Date Jun 28 96 6 3 PARAMETER SETTING MODE 6 3 9 Ribbon Type Selection Power off Turn on the power while holding down the FEED key and PAUSE key Press the FEED key Press the PAUSE key ten times Select either ribbon type with the FEED key or RESTART key See NOTE 1 and 2 Press the RESTART key See N...

Page 63: ...ment FEED key Pressing the FEED key one time is a 1 step change up to 15 steps See NOTE 2 RESTART key Pressingthe RESTART keyonetime is a 1 step change up to 15 steps See NOTE 2 FEED key Pressing the FEED key one time is a 1 step change up to 15 steps See NOTE 2 RESTART key Pressingthe RESTART keyonetime is a 1 step change up to 15 steps See NOTE 2 Ribbonrewindmotorvoltagefineadjustment Power off ...

Page 64: ...eding or all printing finished If the status request command is sent during printing the printer will always send 05H regardless of the setting FEED key Status type 2 A strip wait status is sent RESTART key Status type 1 A strip wait status is not sent Power off Turn on the power while holding down the FEED key and PAUSE key Press the FEED key Press the PAUSE key thirteen times 1 D I A G N O S T I...

Page 65: ... used Power off Turn on the power while holding down the FEED key and PAUSE key Press the PAUSE key Press the PAUSE key fourteen times 1 D I A G N O S T I C V 1 O A 2 P A R A M E T E R S E T T S T C K E R S Y S E M O F F A Press the FEED key or RESTART key to select ON or OFF to the stacker Press the FEED key and RESTART key at the same time Press the PAUSE key Continued on Section 6 3 13 Threshol...

Page 66: ... 0 1V change up to 0 0V RESTART key Pressing the RESTART key onetime is a 0 1V change up to 4 0V Power off Turn on the power while holding down the FEED key and PAUSE key Press the PAUSE key Press the PAUSE key fifteen times 1 D I A G N O S T I C V 1 O A 2 P A R A M E T E R S E T T H E S H O L D R 1 0 V R Press the FEED key or RESTART key to fine adjust the black mark sensor manual threshold Press...

Page 67: ...D key onetime is a 0 1V change up to 0 0V RESTART key Pressing the RESTART key onetime is a 0 1V change up to 4 0V Power off Turn on the power while holding down the FEED key and PAUSE key Press the PAUSE key Press the PAUSE key sixteen times 1 D I A G N O S T I C V 1 O A 2 P A R A M E T E R S E T T H E S H O L D T 1 4 V R Press the FEED key or RESTART key to fine adjust the feed gap sensor manual...

Page 68: ...the backing paper since the reflectance of backing paper is low In such case more than 5mm long gap is regarded as the no paper And trying to print or feed the label when the sensor stops at the gap results in a NO PAPER error This problem tends to occur when using labels with thin backing paper Case 3 If the reflective sensor s output voltage when detecting no paper is 1 5V or more the sensor doe...

Page 69: ...ge When using labels transmissive sensor Threshold Max voltage at the backing paper Voltage at the print area 0 7V e g 2 0V 4 2V 1 5V 0 7V When using perforated labels transmissive sensor Threshold Max voltage at the backing paper Min voltage at the backing paper Max voltage at the backing paper e g 2 2V 4 4V 2 8V 2 1 6V 2 When using labels with black marks reflective sensor Threshold Min voltage ...

Page 70: ...d in memory by pressing the PAUSE key Windows code Original code Power off Turn on the power while holding down the FEED key and PAUSE key Press the PAUSE key Press the PAUSE key 17 times 1 D I A G N O S T I C V 1 O A 2 P A R A M E T E R S E T T K A J I C O D E Y P E 1 N Select either code with the FEED key or RESTART key Press the FEED key and RESTART key at the same time Press the PAUSE key Cont...

Page 71: ... memory by pressing the PAUSE key Power off Turn on the power while holding down the FEED key and PAUSE key Press the PAUSE key Press the PAUSE key 18 times 1 D I A G N O S T I C V 1 O A 2 P A R A M E T E R S E T E U O C O D E B O H R Select the Euro font code with the FEED key or RESTART key Press the PAUSE key Continued on Section 6 3 17 Transmission Control Mode Selection Press the PAUSE key an...

Page 72: ...y Power off Turn on the power while holding down the FEED key and PAUSE key Press the FEED key Press the PAUSE key 19 times Select the Transmission Control Mode with the FEED key or RESTART key Press the FEED key and RESTART key at the same time DTR READY BUSY DTR protocol DTR DSR RTS READY BUSY RTS protocol RTS CTS 1 D I A G N I C V 1 O A O S T 2 P A R A M R S E T E T E D T R T S R D T R Press th...

Page 73: ...ON OFF when the INPUT PRIME signal is ON is stored in memory by pressing the PAUSE key Power off Turn on the power while holding down the FEED key and PAUSE key Press the FEED key Press the PAUSE key 20 times Select the Reset ON OFF when the INPUT PRIME signal is ON with the FEED key or RESTART key Press the PAUSE key ON The printer will restore to the initial status OFF The printer will not resto...

Page 74: ...ABEL LENGTH 76 mm PAPER FEED Feed Operating procedure for the test mode is provided below Power off Turn on the power while holding down the FEED key and PAUSE key Press the FEED key twice Press the PAUSE key Press the FEED key and RESTART key at the same time Set the print count Select Print Condition by pressing the PAUSE key Press the FEED key or RESTART key See NOTE 1 Press the RESTART key Con...

Page 75: ... n c h s I S E S O R T R A N S M I S S I V E N From B of the preceding page To C of the preceding page Press the FEED key and RESTART key at the same time To C of the preceding page Press the FEED key and RESTART key at the same time Press the FEED key and RESTART key at the same time To C of the preceding page To C of the preceding page To be continued on B of the next page Set the sensor type R ...

Page 76: ... NOTE 2 Press the FEED key and RESTART key at the same time T Y E S N O C U T T I N G P L A E L L E N G T H 7 6 m m B P A E R F E E D P From B of the preceding page Set the label length Set the media feed S Standard mode Batch printing without cut 999 Label length 999 mm PAPER FEED PAPER NO FEED 998 Label length 998 mm 997 Label length 997 mm 7 Label length 7 mm 6 Label length 6 mm 5 Label length ...

Page 77: ...ED key changes the label length 1 mm pressing the RESTART key changes 1 mm 8 When an error occurs during a test print the error message is displayed and printing is stopped The error is cleared by pressing the PAUSE key and the display shows 3 TEST PRINT Printing is not automatically resumed after the error is cleared Revision Date Feb 07 97 6 4 TEST PRINT MODE 3 T E S T P R I N T 3 T E S T P R I ...

Page 78: ...so 20 mm or more the printer automatically enters ribbon saving print mode 10 When AUTO PRINT is selected 5 pcs of the 3 dot slant line labels bar code labels and character labels are printed respectively after one label is fed Test Print Sample Slant line 1 dot Slant line 3 dot Characters Bar code Fig 6 21 Fig 6 22 Fig 6 23 Fig 6 24 Factory Test Pattern Fig 6 25 ...

Page 79: ...76 mm PRINT TONE FINE ADJUSTMENT VALUE 0 Operating procedure for the test mode is provided below Revision Date Jan 13 95 6 4 TEST PRINT MODE Power off Turn on the power while holding down the FEED key and PAUSE key Press the FEED key twice Press the PAUSE key Press the RESTART key Press the PAUSE key Bar codes are printed on 5 labels After feeding one label slant lines 3 dots are printed on 5 labe...

Page 80: ...Press the FEED key and RESTART key at the same time After feeding one label slant lines 3 dots are printed on 5 labels Press the PAUSE key Press the PAUSE key Press the PAUSE key Characters are printed on 5 labels Characters are printed on 5 labels Bar code are printed on 5 labels From A of the preceding page To C of the preceding page Press the FEED key and RESTART key at the same time To C of th...

Page 81: ...elf test mode 6 5 1 Thermistor Check Thermistor check should be performed to check the environmental temperature and print head temperature after the excess head temp error occurs or batch printing is performed for a long time Power off Turn on the power while holding down the FEED key and PAUSE key Press the FEED key three times Press the FEED key and RESTART key at the same time HEAD Print head ...

Page 82: ... A 4 S E N S O R A D J U S T M E N R F L E C T I V E 2 8 V T E R F L E C T I V E 3 8 V E NOTES 1 Make sure to adjust the black mark sensor using the white part of the tag paper as a criterion Though an adjustment can be performed with the black mark it may cause a paper jam error 2 Pressing the PAUSE key validates the sensor adjustment The value of the sensor is displayed up to 5 0 V Revision Date...

Page 83: ...rror occurs Label Backing Paper Feed Gap Sensor Power off Turn on the power while holding down the FEED key and PAUSE key Press the FEED key three times Set the label so that the feed gap sensor can detect the backing paper no label See NOTE 1 Holding the FEED key or RESTART key down until an asterisk is displayed More than 3 seconds Ex The former value is displayed Indicates adjustment complete P...

Page 84: ...own the FEED key and PAUSE key Press the FEED key three times Remove any paper from the sensor detecting area Holding the FEED key or RESTART key down until an asterisk is displayed More than 3 seconds Ex The former value is displayed Indicates setting complete Press the PAUSE key four times 1 D I A G N O S T I C V 1 O A 4 S E N S O R A D J U S T M E N P L E V E L R 4 3 V T E P L E V E L R 4 3 V E...

Page 85: ... the power while holding down the FEED key and PAUSE key Press the FEED key three times Remove any paper from the sensor detecting area Holding the FEED key or RESTART key down until an asterisk is displayed More than 3 seconds Ex The former value is displayed Indicates setting complete Press the FEED key and RESTART key at the same time Press the PAUSE key five times 1 D I A G N O S T I C V 1 O A...

Page 86: ...u o h 0 t n u o c r o r r e e r a w d r a h C 2 3 2 S R s e m i t 0 t n u o c r o r r e m e t s y S s e m i t 0 t n u o c e r u l i a f r e w o p y r a t n e m o M s e m i t 0 6 6 RAM CLEAR MODE In RAM clear mode various data written on the EEP ROM can be initialized There are two clear functions Maintenance counter clear and parameter clear in the parameter setting mode After referring to the fol...

Page 87: ...e Name PARAMETER CLEAR Item Print tone fine adjustment Thermal direct KEY X axis fine adjustment Character code selection Font zero selection Control code selection Ribbon type selection Ribbon motor drive voltage fine adjustment PC Ribbon motor drive voltage fine adjustment KEY Strip wait status setting Stacker Status response Threshold manual fine adjustment for the black mark sensor Threshold m...

Page 88: ...hile holding down the FEED key and PAUSE key Press the FEED key four times Press the FEED key or press the RESTART key twice Press the PAUSE key Press the PAUSE key Turn off the power See NOTE Press the PAUSE key Press the FEED key and RESTART key at the same time 1 D I A G N O S T I C V 1 O A 5 R A M C L E A R N O R A M C L E A R C O P L E T E M M A N T E C O U N T E R C L E A I R ...

Page 89: ...ile holding down the FEED key and PAUSE key Press the FEED key four times Press the FEED key twice or press the RESTART key Press the PAUSE key Press the PAUSE key Turn off the power See NOTE Press the PAUSE key Press the FEED key and RESTART key at the same time 1 D I A G N O S T I C V 1 O A 5 R A M C L E A R N O R A M C L E A R C O P L E T E M P A A M E T E R C L E A R R ...

Page 90: ...ontrol Code Selection 1 Program down load with RS 232C interface Connect the PC to the printer with an RS 232C cable Set the DIP SW2 on the CPU PC board of the printer as follows Install the BPC and BPE PC boards in the PC and printers respectively and connect both boards to each other with the special printer cable after referring to the Maintenance Manual Section 3 1 Refer to the Owner s Manual ...

Page 91: ...am is being transmitted the following message is displayed in line in the message a running count from 0 through 128 is shown indicating the number of KB transferred Now transmitting 128KB 10 When the transmission is successfully completed the following message is displayed in line End of Transmission Continue Y N To continue 1 Turn the printer power off and exchange the printer with another one 2...

Page 92: ... and the main program version and checksum is printed on the label 7 4 ERROR CODE Error Code 06 07 50 51 57 81 82 88 89 90 92 93 94 95 97 98 99 Error Communication error Error is detected during command analysis Communication error Parity error overrun error or framing error occurred during communication with RS 232C Write error occurred during formatting of the flash ROM Delete error occurred whi...

Reviews: