background image

Aerial Connection 

Before pressing the transmit key, a suitable aerial must be connected. The
PL259 plug of the aerial cable (coax) is connected to the SO239 socket (15 on
the rear panel. Make sure, that all plugs are firmly tightened and properly sol-
dered. Insufficient connections can damage the radio and will reduce the range
of operation. 
The antenna should be configured with the radio, otherwise a part of the transmit
power will be reflected at the antenna and will not be radiated. This reduces the
range of operation. The configuration of an antenna to a radio, is performed by a
length adjustment of the antenna’s radial for a minimal SWR ratio which can be
measured by a SWR meter, e.g. TEAM SWR 1180P. 
After the measurement the SWR meter should be removed from the antenna line.

Installation in the car

When you want to install the radio in your vehicle, use either the included under-
dash or radio compartment mounting kit. Always mount the transceiver in a location
where the buttons are easily accessible. Other important points to consider for a
correct mounting position are: 

> roadworthiness, 
> good access to the controls of the car, 
> sufficient air circulation to prevent overheating of the radio in transmit mode.
Please consider your point of view onto the display while driving. Starting
xtensive solar irradiation can also affect the readability of the diXsplay. So it is
recommended to check the best position before the final installation. 

Microphone 

Included in the scope of delivery is the VOX microphone DM-6006. The VOX fea-
ture offers voice operated signal transmission which is useful in the application of
communication while driving a vehicle. It allows to switch between the operation
modes VOX and PTT which stands for push-to-talk. 

The DM-6006 is equipped with the following elements: 

PTT

[M]

[

]

[

]

Elements

PTT Operation

VOX Operation

PTT

for tx press PTT key

M

]

press long to activate/deactivate 
VOX mode 

]

channel UP

short press for setting sensitivity

]

channel DOWN

short press for setting delay

VOX-Sensitivity

The required signal strength to trigger automatic transmission is set with VOX
sensitivity. 
There are four levels available.  

long push

of the key [

] ( 17 ) activates the set mode for VOX-Sensitivity. It

is confirmed by a long tone and blinking of the LED.  

short push

of the key selects the next level. The four different levels are distin-

guished by the number of tones that are emitted. For the greatest sensitivity select
the level 1 (one tone is emitted). 
A confirmation of the setting is not required. 

VOX-Delay

The gap between the signal end and the end of the transmission can be
changed with the setting  VOX-Delay. There are four levels available.  

long push

of the key [

] ( 18 ) activates the set mode for VOX-Delay. It is

confirmed by a long tone and blinking of the LED.  

short push

of the key selects the next level. The four different levels are distin-

guished by the number of tones that are emitted. For the greatest sensitivity select
the level 1 (one tone is emitted).
A confirmation of the setting is not required. 

Plug the microphone plug (20) into the 6pin socket (15), located on the front
panel, and thighten the union nut. Pay attention to proper placement. No trans-
mission nor reception is possible without the microphone.

Power source 

Before connecting the unit to a suitable power source via the fused DC power
cable, the device must be switched off by turning the volume control (1) [ 

VOL

]

counterclockwise to the very end, beyond the threshold, until you hear a click. 
Then, connect the two naked leads at the end of the cable with the supply vol-
tage of the vehicle’s battery. The unit is designed to operate with 12 V or 24 V
and a negative ground electrical system. Lay the cable as far as possible away
from aggregates which can cause interference. Watch for the correct polarity
during the connection. 

BLACK connect to - MINUS / ground of the car battery.
RED

connect to the + PLUS of the vehicle’s battery. 

After proper connection of the aerial and the power source, radio operation can
be started. 

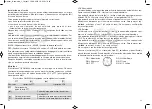
15

14

PIN 4 Up/Down
PIN 5 Ground
PIN 6 +12 Volt

PIN 1 Modulation
PIN 2 Loudspeaker
PIN 3 PTT

manual_fx-cbmobile_1_Layout 1  14.06.2019  16:02  Seite 14

Summary of Contents for FX-CBmobile

Page 1: ...ale d istruzioni Mode d emploi Handleiding Full Multi Norm DE PL EC EI UK CB Mobilfunkgerät CB Mobile Radio Transmisor móvil CB Cb émetteur récepteur Ricetrasmettitori CB mobile zender 12 24 Volt Freisprechgarnitur manual_fx cbmobile_1_Layout 1 14 06 2019 16 02 Seite 1 ...

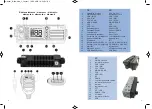
Page 2: ...tsprecher external Speaker Jack 15 Antennenanschluss Antenna Jack 16 Sendetaste PTT 17 Kanalw Hoch VOX Empf CH UP VOX Sensitivity 18 Kanalw VOX Verzögerung CH DOWN VOX Delay 19 Mikrofon Microphone 20 Mikrofon Stecker Microphone Cable Jack 21 VOX Modus Schalter VOX Mode ES 1 On Off volumen 2 toma de micrófono 3 VOX LOCK 4 COL DIM 5 9 19 SCAN 6 MODE BAND 7 LCD 8 ASQ SQ 9 UP 10 DOWN 11 conector de al...

Page 3: ...ückseite verbunden Für eine einwandfreie Verbin dung muss der Überwurf des Steckers gut festgedreht werden Ebenso ist auf eine ordentliche Verbindung des Antennenkabels mit dem An tennenfuß zu achten Nicht einwandfreie Verbindungen können zu einem Defekt des Gerätes führen und die Funkreichweite erheblich verringern Die Antennen anlage nicht im Lieferumfang enthalten sollte sehr gut an das Funkger...

Page 4: ...s Gerätes in Ihrem Fahrzeug sind auch folgenden Kriterien zu berücksichtigen keine Beeinträchtigung der Verkehrssicherheit gute Erreichbarkeit der Bedienelemente ausreichende Luftzirkulation um eine Überhitzung des Gerätes im Sendefall zu verhindern Darüber hinaus sollten Sie auch sicherstellen dass die LCD Kanalanzeige 7 gut ablesbar ist Bei direkter Sonneneinstrahlung kann die Lesbarkeit der An ...

Page 5: ...nt das Symbol SC und alle Kanäle des gewählten Frequenz bandes werden solange durchsucht bis ein besetzer Kanal gefunden wird Zum Ausschalten des Kanalsuchlaufes bitte die Taste lange gedrückt halten FUNKBETRIEB Einschalten VOL Zum Ein bzw Ausschalten den Lautstärkeregler 1 Vol nach rechts bzw nach links drehen Kanalwahl UP DN Für die Kanalwahl stehen die Kanalwahltasten 17 und 18 am Mikrofon und ...

Page 6: ...ulationsarten MODE Das FX CBmobile arbeitet in den Modulationsarten AM und FM In der Norm EC steht nur die Betriebsart FM zur Verfügung Falls das Gerät auf dem aktuellen Kanal auch die Betriebsart AM akzeptiert können Sie durch kurzes Drücken der Taste 6 MODE zwischen AM und FM umschalten Die UK Norm verwendet eine dreifach Umschaltung für die FM Frequenzbänder EU und UK und dem AM Frequenzbank in...

Page 7: ... without having to drill a hole into the bodywork of your car e g mounting the antenna with a an tenna holder onto the gutter or the trunk Magnetic mount antennas with an magnetic base or windshield antennas which are glued onto the glass are also alternatives Please don t mount the CB antenna nearby a radio or TV antenna to prevent interference of radio or TV reception DANGER Keep an eye on power...

Page 8: ...ort press for setting delay VOX Sensitivity The required signal strength to trigger automatic transmission is set with VOX sensitivity There are four levels available A long push of the key 17 activates the set mode for VOX Sensitivity It is confirmed by a long tone and blinking of the LED A short push of the key selects the next level The four different levels are distin guished by the number of ...

Page 9: ...and 18 at the microphone or at the radio 9 10 for channel selection The actual channel number is displayed on the LCD 7 Transmitting For signal transmission press and hold the PTT key at the microphone The TX symbol appears in the LCD For best quality speak normally at a distance of 2 4 in ches Speaking too loudly will cause distortion and makes the signal difficult to under stand While the set is...

Page 10: ...ation selection MODE For the FX CBmobile Full Multi Norm the modulation modes AM and FM are available The selected modulation type is indicated by the AM FM symbol To toggle between the modes press the mode key 6 MODE Please note that the frequency norm EC operates on FM only With the frequency norm UK a triple switch is used You toggle between the CEPT band AM FM and the UK band FM The display wi...

Page 11: ...Asegúrese que el cable de la antena no esté muy doblado ni ha ciendo demasiados ángulos Cuanto más grande sea el tamaño físico de la antena mayor será el rendimiento del equipo Al instalar la antena móvil por favor siga los siguientes consejos Fijar la antena en el centro de la parte más grande de la carrocería Colocar la bobina de carga de la antena lo más cerca posible a la superficie metálica c...

Page 12: ...sionar para hablar El micrófono DM 6006 está equipado con los siguientes elementos PTT M Elementos Operación PTT Operación VOX PTT Para transmitir pulse la tecla PTT M Pulsación larga para activar desactivar el modo VOX Para bajar de canal Pulsación corta para ajustar la sensibilidad Para subir de canal Pulsación corta para ajustar el retardo VOX Sensibilidad La intensidad de señal requerida para ...

Page 13: ... W DE 80 FM 26 565 27 405 MHz 4 W 40 AM 26 965 27 405 MHz 4W In 27 FM 26 965 27 275 MHz 4 W 40 AM 26 965 27 275 MHz 4 W Funcionamiento del TEAM FX CBmobile Encendido VOL Para encender la radio gire el control de volumen hacia la derecha Para apagar la radio gire el control de volumen a la izquierda Todos los ajustes que se hagan durante la operación del transmisor quedarán memorizados des pués de ...

Page 14: ...e producto químico Revisión No se puede abrir el aparato ni realizar reparaciones o ajustes posteriores ya que cada modificación o intervención no autorizada dará como resultado la can celación del permiso de explotación y la pérdida de garantía No utilizarlo si pa rece que no funciona bien En este caso desconectar inmediatamente el equipo de la fuente de alimentación DC En caso de encontrarse alg...

Page 15: ...ntenna deve essere a massa con la parte metallica dell auto mezzo Ci sono anche alcune alter possibilità per fissare l antenna sulla macchina senza la necessità di forare la carrozzeria per esempio montando l antenna sulla gronda montando l antenna su appositi supporti o usando un antenna con una base magnetica Tutti I cavi alimentazione collegati compreso il cavo antenna non devono essere di lung...

Page 16: ... volante La spina PL259 del cavo coassiale è collegato alla presa SO239 15 sul pannello posteriore Assicurarsi che tutti i connettori siano fer mamente chiusi e correttamente saldati Connessioni inadeguate possono dan neggiare la radio e ridurne di funzionamento L antenna deve essere collegata alla radio altrimenti una parte della trasmis sione di potenza si rifletterà sull antenna e non sarà irra...

Page 17: ...e in Modalità AM o FM Premendo il tasto 6 MODE puoi selezionare tra la modalità AM e FM La modalità AM e FM selezionata sarà indicata con il simbolo AM e FM Funzionamento dell apparato TEAM FX CBmobile Accensione VOL L apparato si accende ruotando il tasto controllo del volume 1 in senso orario verso il centro posizione La retroilluminazione LCD è accesa Selezione canale Tutti i canali possono ess...

Page 18: ...n modelli diversi con differenti ca nali tipi di modulazione e potenza di trasmissione EU 40 FM 26 965 27 405 MHz 4 W 40 AM 26 965 27 405 MHz 1 W EC 40 FM 26 965 27 405 MHz 4 W UK 40 FM 27 60125 27 99125 MHz 4 W 40AM FM 26 965 27 405 MHz 4 W PL 40 FM 26 960 27 400 MHz 4 W 40 AM 26 960 27 400 MHz 4 W Io 40 FM 26 965 27 405 MHz 4 W 40 AM 26 965 27 405 MHz 1 W I2 34 FM 26 965 27 265 MHz 4 W 34 AM 26 ...

Page 19: ...ontact le mieux possible à une surface bien conductible de la carrosserie En dehors de la montage fixe de l antenne mobile qui demande la perçage d un trou dans la carrosserie de votre voiture il y a des autres possibilités pour l installation par exemple l utilisation d une antenne de gouttière ou une antenne de fenêtre d auto la montage à un support sur le coffre ou la montage avec un pied magné...

Page 20: ...re L écrou à raccord doit être vissé à fond pour une bonne jonc tion Il faut également veiller au bon raccordement du câble coaxial à l antenne Un mauvais raccord peut entraîner des pertes et peut également endommager l appareil En outre l antenne doit être adaptée bien au émetteur récepteur sinon une part de la puissance d émission soit reflétée à l antenne et ne soit pas rayonnée Ça réduit aussi...

Page 21: ... vers la gauche Choix du canal Tous les canaux peuvent être choisis avec des boutons 17 et 18 au micro phone et sur la radio 9 10 La sélection de canaux n est pas possible en position émission Emettre Pour émettre on actionne durant toute la communication la touche d émission PTT du microphone L afficheur indique TX Vous parlez à voix normale à environ 5 à 10 cm du microphone Parler à voix plus fo...

Page 22: ...changer de règles s il vous plaît pessez la touche 6 BAND aproximative ment pour une seconde La norme selecte symbole LC apparaît brièvement à l écran sélectionnez la norme souhaitée avec les sélecteurs de canaux Concernant les permissions et les restrictions des différentes normes dans les divers pays européens vérifiez le passeport de radio qui est inclus dans la por tée de la livraison L utilis...

Page 23: ...oren Een bevestiging van de instelling is niet nodig Het opzetten van de TEAM FX CBmobile Installeren van een CB antenne De antenne is een van de meest belangrijke onderdelen van de installatie Het type antenne en de montageplaats heeft een groot effect op de afstand Volg de volgende criteria voor de beste locatie en installatie van uw antenne Verzeker u ervan dat de antenne voor de 27MHz is ontwo...

Page 24: ...ets ASQ ASQ 8 ASQ picto gram verschijnt op het display VOX vertraging De instelling VOX vertraging bepaald de vertragingstijd in de VOX mode na afloop van het zenden Er zijn 4 instellingen Lang indrukken van de toets 18 activeert de instelling van de VOX ver tragingstijd dit wordt bevestigd door een lange toon en een oplichtende led Kort indrukken van de toets verandert de lengte van de vertraging...

Page 25: ... 7 om een externe luidspreker van 4 8 ohm impedantie aan te sluiten Bij 4 ohm zal de belasting van de luidspreker 4watt bedragen TEAM TS 500 Wanneer de externe luidspreker is aangesloten zal de interne luidspreker worden uitge schakeld Handenvrij spreken met de headset VOX De FX CBmobile is met een interne handenvrij functie uitgerust die onafhan kelijk van de VOX microfoon functioneert Hierbij sl...

Page 26: ...205 21 27 215 22 27 225 23 27 255 24 27 235 25 27 245 26 27 265 27 27 275 28 27 285 29 27 295 30 27 305 31 27 315 32 27 325 33 27 335 34 27 345 35 27 355 36 27 365 37 27 375 38 27 385 39 27 395 40 27 405 41 26 565 42 26 575 43 26 585 44 26 595 45 26 605 46 26 615 47 26 625 48 26 635 49 26 645 50 26 655 51 26 665 52 26 675 53 26 685 54 26 695 55 26 705 56 26 715 57 26 725 58 26 735 59 26 745 60 26 ...

Page 27: ...65929 Frankfurt am Main GERMANY Tel 49 69 300 9 500 Fax 49 69 314382 team electronic t online de www team electronic de V1 0 06 2019 CB with VOX Microphone and internal VOX via earphone microphone manual_fx cbmobile_1_Layout 1 14 06 2019 16 02 Seite 52 ...

Reviews: