Summary of Contents for META.4
Page 1: ...From the Makers of TTG 617 8 ASSEMBLY INSTRUCTION MANUAL SOLAR ROBOT ...
Page 5: ...4 2 S o l a r M o d u l e A s s e m b l y 1 P9 P1 P8x2 A16 2 2 1 1 1 1 ...
Page 6: ...5 3 4 Completed ...
Page 7: ...6 G e a r B o x A s s e m b l y 1 B 7 B 12 B 9 2 2 1 P U S H Solar M od ule ...
Page 8: ...7 3 B 15 P U S H U se B 15 to assi st you i n routi ng the wi res as shown below ...
Page 10: ...9 7 8 B 6 B 9 B 12 P4 R ed 1 2 P4 R ed P7 P6 P3 Yellow P3 Yellow P3 Yellow ...
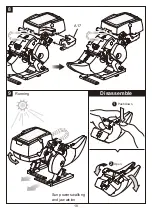
Page 11: ...10 9 10 12 11 Completed Disassemble B9 A7 A6 B9 B9 ...
Page 12: ...11 Drill Vehicle Assembly and Play 1 Red 2 1 GEAR BOX Black B15 Solar Module ...
Page 13: ...12 2 3 B9 B9 B10 B10 ...
Page 14: ...4 A19 A19x2 A19x2 A12 A19 13 ...
Page 15: ...5 6 R unni ng 14 Sun p owers d ri lli ng bi t and movi ng wheels ...
Page 16: ...15 T R e x A s s e m b l y a n d P l a y 1 3 A4 A13 A3 A2 2 ...
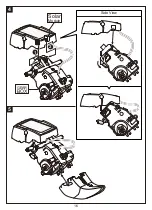
Page 17: ...16 4 5 G E AR B O X Si d e V i ew 2 1 Solar M od ule ...
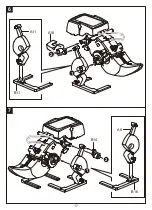
Page 18: ...17 6 7 2 2 1 1 A11 A18 B11 A8 B16 B14 ...
Page 20: ...19 Rhino Beetle Assembly and Play 2 1 A3 A2 A4 A13 ...
Page 21: ...20 Solar M od ule G E AR B O X 3 4 A5 B 15 2 3 1 1 2 Si d e V i ew ...
Page 22: ...21 5 6 2 2 1 Make sure to cut the plastic parts A20 correctly A10 A9 B10 A20 A20 ...
Page 23: ...22 7 9 8 B5 B1 B13 B8 B8 B8 ...
Page 24: ...23 Cut off burrs before assembly A19 10 11 A19x3 B13 ...
Page 25: ...Cut off burrs before assembly 12 13 14 B5 B1 A19x3 24 A19 B8 B8 B8 ...
Page 27: ...26 Robot Assembly and Play 2 1 B3 B4 B15 2 1 Black Red Solar Module ...
Page 28: ...27 3 A14 A15 A17 A18 L R ...
Page 29: ...28 Make sure to cut the plastic parts A20 correctly 4 5 B9 A20 A20 B2 A9 B10 ...
Page 30: ...29 Make sure to cut the plastic parts A20 correctly 6 7 B10 B2 B9 A20 A20 A10 ...
Page 32: ...31 Disassemble B9 B2 B2 B10 B9 B10 2 1 ...
Page 33: ...32 A11 A19 A19 A11 A19 A11 A8 A19 A19 A8 A19 A8 Stickers ...
Page 34: ...33 Rhino Beetle Stickers Robot ...
Page 36: ...43500061731 ...


