background image

3. Assembly 

Basic assembly of this system is very easy to do. 
Please connect all components only when they are switched off.  

Connect the SMR from backside audio outputs to your audio system by the 
supplied audio cable - or connect your headphone to the appropriate 

outputs at the left side of the SMR. 

Setup and connect your computer network, if required. 

Connect the SMR to the SMR power supply (DC connector). 

Before connections, check your mains power system to be appropriate to 

the WAP-4500 power supply.  

Connect the power adaptor to mains supply.

Switch on the main power switch at the right side of the SMR.

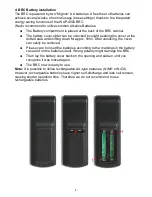
Insert the Batteries into the BRC  

(refer item 4). 

Switch on the BRC by short press the Power button (6). 

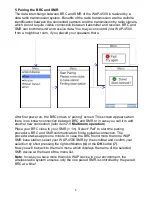
A  “Pairing“ screen appears. Select your SMR „WAP-4500“ and confirm by 

OK

 button 

(7)

. by this, BRC and SMR are linked together (refer item 5).

By another push on the Power button (6), the whole WAP-4500 system 

(BRC and SMR) is switched into standby.

Switching standby on/off as well as volume and all other control functions of your 

WAP-4500 system can be done by the buttons of the BRC. The LC display in the 
BRC does not only display the received commands but it can also receive contents 

from SMR such as music track playback data, cover pictures etc, all displayed in the 
remote control right in your hand!
Since WAP-4500 can playback audio files from LAN, WLAN, Internet Radio and 
connected USB storages, there are various settings possible. Please read the 

related chapters to setup your WAP-4500 correctly for best performance with all 
sources.

Tip:

 please visit 


www.teac.de


 to check for new firmware for your WAP-4500. New 

firmware contains latest corrections and often it adds essential new features into 
your device!

-- We do recommend, always to update for the latest firmware!  --

TEAC is always active to offer you the best possible features for your WAP4500!

7

Summary of Contents for WAP-4500

Page 1: ...WAP 4500 INSTRUCTION MANUAL...

Page 2: ...2...

Page 3: ...Radio contents 18 7 3 Import of Internet Stations by USB storage 19 8 Settings 20 8 1 Multiroom 20 8 2 Language 21 8 3 Screen 21 8 4 Autostart 21 8 5 NTP 21 8 6 Date 21 8 7 Time 21 8 8 Sleep 21 8 9 Ne...

Page 4: ...4...

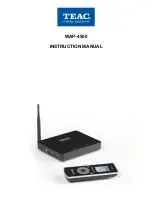
Page 5: ...g years your TEAC media systems team 1 After unpacking After unpacking you should first check that the contents are complete In addition to this printed manual there should be The WAP 4500 streaming m...

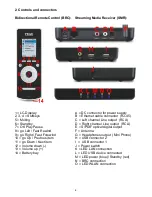
Page 6: ...dby D Right channel Line output RCA 7 OK Play Pause E S PDIF optical digital output 8 go Left Fast Rewind F Antenna 9 go Right Fast Forewind G Headphones output Mini Phono 10 go Up Previous item H USB...

Page 7: ...refer item 5 By another push on the Power button 6 the whole WAP 4500 system BRC and SMR is switched into standby Switching standby on off as well as volume and all other control functions of your WAP...

Page 8: ...e dotted area and shifting down for apprx 5mm After unlocking the cover can easily be removed Please care to insert the batteries according to the markings in the battery case and on the batteries its...

Page 9: ...known connection between BRC and SMR or in case you call it to add another new connection refer item 7 1 Multiroom operation Place your BRC close to your SMR 1m Select Pair to start the pairing proced...

Page 10: ...are 1 Audio Server to browse media server and choose tracks to listen 2 Internet Radio for listing and My Favorite Station management 3 USB Storage to browse USB disk content and choose tracks to lis...

Page 11: ...tracks playback and another for internet radio playback Music tracks playback softkeys Back Options Home same for Media Server and USB sources Back Step back to previous screen Options 1 Current Playl...

Page 12: ...iles stored on your computer connected to your network a media server software is required With WAP 4500 the Media Server software is provided on the installation CD When you play a track the Now Play...

Page 13: ...l directory where they store cover pictures separate from audiofiles but not in the audiofile s ID3 tags These pictures do not appear if you open the audiofile by other applications or WAP 4500 If you...

Page 14: ...entry as you have previously saved from internet radio playback screen Adding Internet Radio stations to the Favorite Stations list During internet radio playback you can open the options menu by pres...

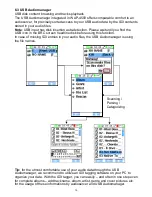
Page 15: ...screen headline disk before using this function In case of missing ID3 entries in your audio files the USB Audiomanager is using the file names Tip for the utmost comfortable use of your audio data t...

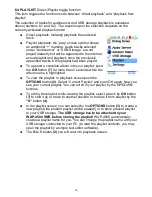
Page 16: ...conds while the album name is highlighted To view the playlist in playback screen push the OPTIONS button 3 Select Current Playlist and push OK again Now you see your current playlist You can scroll i...

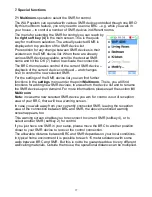
Page 17: ...d further functions in the settings menu under the point Multiroom There you will find functions for adding new SMR devices to erase from the device list and to rename the SMR devices upon demand For...

Page 18: ...ound in the root directory of your USB storage NOTE in case of reception interruptions during a recording session the actual file will be closed and the recording is continued in another file once the...

Page 19: ...oose Internet Radio under Streaming Media WinAmp lists all Internet radio stations at the right hand side panel Double click the station you want WinAmp plays the station and adds it to the PLAYLIST E...

Page 20: ...extended device selection and edit function select you can select the SMR device for control also from this entry Confirm your selection by the middle softkey OK 3 oder 7 erase one SMR entry an entry...

Page 21: ...l to your language and confirm your selection by pressing OK 7 again 8 3 Screen press OK 7 scroll the time and confirm by OK 7 again to select the waiting time for power saving display off 8 4 Autosta...

Page 22: ...ve the choice to setup your WLAN guided by the assistance of a wizard or setup the items manually By default most routers are set to DHCP Dynamic Host Configuration Protocol This means the router assi...

Page 23: ...dots To confirm input at the end of completed input move to the ENTER symbol in the screen and press OK 7 You can always check your settings under the Current Info item 8 9 5 Advanced WLAN settings Y...

Page 24: ...the file list You can check F W version and F W build by the center softbutton 3 Press OK on F W file Now the system will check if this file is OK to upgrade and then bring up a warning message Use LE...

Page 25: ...personnel PROBLEM THE WAP 4500 DOES NOT RESPOND TO THE BRC Short press any button and check the BRC connection indicator of the SMR To recover from power save mode and for certain functions the WAP 4...

Page 26: ...roperly assigned Wireless Check the signal strength is acceptable Check the WLAN security setting if enabled is correct Follow steps of static wired connection to confirm the IP address is properly co...

Page 27: ...acters are not supported yet 10 Advice on location care and safety To connect your WAP 4500 with power supply system please make sure to have a socket close to your sound system If the WAP 4500 is not...

Page 28: ...able UPnP and DLNA compatible client Gapless playback of seamless continuing track contents for audioserver and USB storage contents playback Internet Radio stations access by vTuner favorite list and...

Page 29: ...responsibility for any remaining incorrect information and its consequences All mentioned brand names and trademarks are property of their respective owners Contents designs and specifications may cha...

Page 30: ...14 Warranty request card 30...

Page 31: ...31...

Reviews: