32
Bluetooth function
Cannot show device name.
e
This unit does not support the display of symbols or double-
byte characters, including Japanese and Chinese.
Use only English letters and numbers for the names of Bluetooth
devices connected to this unit.
Cannot change connected Bluetooth device.
e
This unit cannot have Bluetooth connections to multiple
Bluetooth devices at the same time.
To change the device connected with this unit by Bluetooth,
end the connection with the currently connected Bluetooth
device before connecting to another Bluetooth device.
DAB tuner
“DAB Module Error”, “DAB Start Error” or “Scanning
Error” appears on the display.
e
Communication with the DAB Module was not possible.
Press the ENTER button to exit DAB mode and then press it
again to restart DAB mode.
If an error still occurs, press the remote control STANDBY/ON
button to put the unit into standby. Then, press the STANDBY/
ON button again to turn the unit on.
“No Station List” appears on the display.
e
If no broadcast services are found, this error message will be
displayed. Check that the antenna is correctly connected to
the unit.
A long time passes with “DAB STARTING…”,
“SCANNING…” or “RECEIVING…” shown on the display,
or the signal is interrupted intermittently.
e
Communication with the DAB Module was not possible.
Press the ENTER button to exit DAB mode and then press it
again to restart DAB mode.
If an error still occurs, press the remote control STANDBY/ON
button to put the unit into standby. Then, press the STANDBY/
ON button again to turn the unit on.
Since this unit uses a microcontroller, external noise and other inter-
ference can cause the unit to malfunction. If this occurs, unplug the
power cord, wait for a while, and then turn the unit on again and
restart operations.
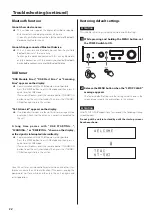
Restoring default settings
ATTENTION
This initializes all settings, including network and DAB settings.
1
While pressing and holding the MENU button, set
the POWER switch to ON.
2
Release the MENU button when the “SETUP CLEAR”
message appears.
The factory default settings are the setting values shown in the
screen images used in the explanations in this manual.
ATTENTION
After “SETUP CLEAR” appears for a few seconds, the following startup
screens appear.
Do not put the unit into standby until the startup screens
have been shown.
WELCOME
c
TEAC
NT-503
Troubleshooting (continued)
Summary of Contents for NT-503DAB
Page 99: ...99...

