background image

17

ENGLISH

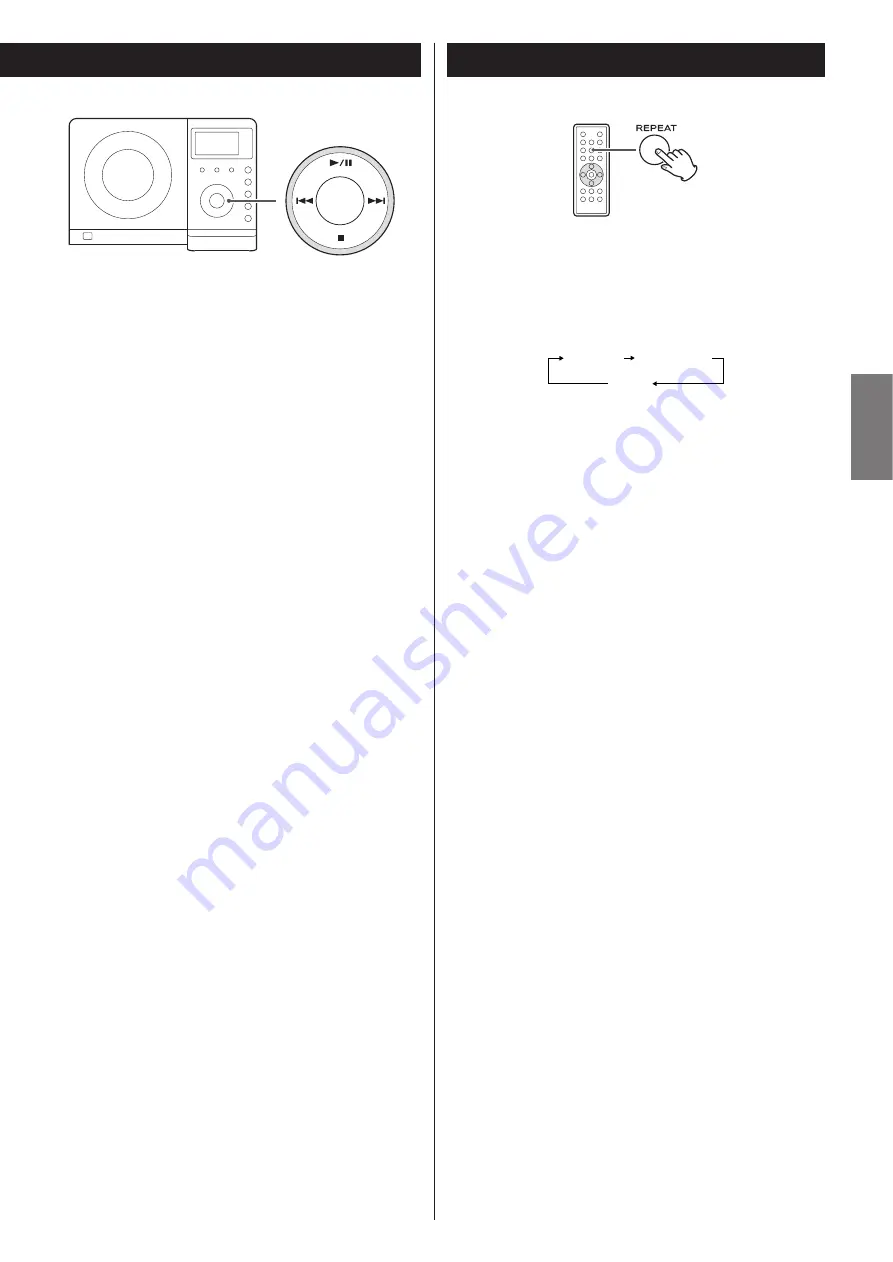
To suspend playback temporarily
(pause mode)

Press the Play/Pause button (

G

/

J

) during playback. Playback

stops at the current position. To resume playback, press the
Play/Pause button (

G

/

J

) again.

To stop playback

Press the Stop button (

H

) to stop playback.

To skip to the next or a previous track

During playback, press the skip button (

.

or

/

)

repeatedly until the desired track is found. The selected track
will be played from the beginning.

In the stop mode, press the skip button (

.

or

/

)

repeatedly until the track you want to listen to is found. Press
the Play/Pause button (

G

/

J

) to start playback from the

selected track.

<

When the 

.

button is pressed during playback, the track

being played will be played from the beginning. To return to
the beginning of the previous track, press the 

.

button

twice.

<

During programmed playback, the next or previous track in
the program is played.

Search for a part of a track

During playback, hold down the skip button (

.

or

/

) for

more than 2 seconds and release it when the part you want
to listen to is found.

Every time the REPEAT button is pressed, the mode is
changed as follows:

<

If one of the following buttons is pressed, repeat mode will
be canceled:

STOP, FUNCTION, FM/AM, OPEN/CLOSE, STANDBY/ON

Repeat one track

Press the REPEAT button once during playback. “REPEAT”
lights.
The track being played will be played repeatedly. If you press
the Skip button (

.

or

/

) and select another track, the

track you selected will be played repeatedly.

It is also possible to select a track to be repeated in the stop
mode. Press the REPEAT button, select a track using the Skip
button (

.

or

/

), and then press the Play/Pause button

(

G

/

J

) to start playback.

Repeat all the tracks

All the tracks will be played repeatedly.
Press the REPEAT button twice. “REPEAT ALL” lights.

During programmed playback, programmed tracks will be
played repeatedly.

REPEAT

REPEAT ALL

(off)

Repeat Playback

Summary of Contents for MC-DX32i

Page 1: ...isplay Adapters sold separately iPod with dock connector Comprend des adaptateurs pour iPod nano iPod avec vidéo iPod mini iPod avec molette sensitive Click Wheel iPod avec écran couleur Adaptateurs vendus séparément iPod avec connecteur pour dock Incluye adaptadores para iPod nano iPod con vídeo iPod mini iPod con rueda de clic iPod con pantalla en color Adaptadores no incluidos iPod con conector...

Page 2: ...ing If an outside antenna or cable system is connected to the product be sure the antenna or cable system is grounded so as to provide some protection against voltage surges and built up static charges Article 810 of the National Electrical Code ANSI NFPA 70 provides information with regard to proper grounding of the mast and supporting structure grounding of the lead in wire to an antenna dischar...

Page 3: ...ician for help CAUTION Changes or modifications to this equipments not expressly approved by TEAC CORPORATION for compliance will void the user s warranty For U S A Optical pickup Type SF P200Z Manufacturer SANYO Electric Co Ltd Laser output Less than 0 5 mW on the objective lens Wavelength 765 815 nm For U S A Rear panel of the Subwoofer CAUTION Do not expose this apparatus to drips or splashes D...

Page 4: ...t an electrician Choose the installation location of your unit carefully Avoid placing it in direct sunlight or close to a source of heat Avoid locations subject to vibrations and excessive dust heat cold or moisture Do not place the unit on any other electronic components Do not open the cabinet as this might result in damage to the circuitry or electrical shock If a foreign object should fall in...

Page 5: ...se the label side might be sticky or contain glue which will damage the unit Do not stick papers or protective sheets on the discs and do not use any protective coating spray Use a soft oil based felt tipped pen to write information on the label side of a disc Never use a ball point or hard tipped pen as this may cause damage to the recorded side of the disc Never use a stabilizer Using commercial...

Page 6: ...fore making connections Read instructions of each component you intend to use with this unit Be sure to insert each plug securely To prevent hum and noise do not bundle the connection cords with the power cord Speaker R Speaker L Side panel of the main unit Subwoofer TV monitor Rear panel of the main unit ...

Page 7: ...tputs video signal from iPod Use an RCA pin video cable to connect the Dock to the composite video connector of a television or monitor S VIDEO OUT terminal This terminal outputs video signal from iPod Use an S Video cable to connect the Dock to the S Video input of a suitably equipped television or monitor Use this connection in preference to a composite video connection J I H G F E AM loop anten...

Page 8: ... J K U Z V X Y B A S M C B A D E L N O P K W Note To simplify explanations instructions in this manual refer to the names of the buttons and controls on the front panel only Associated controls on the remote control will also operate similarly ...

Page 9: ...elect AM or FM FM MODE In FM TUNER mode use this button to select STEREO or MONO STOP H In CD mode use this button to stop playback This button doesn t work in iPod mode VOLUME Press the up or the down button to adjust the volume M L K J I H G F E D C B A Dock connector Before use insert an appropriate Dock adapter in the Dock see page 11 Insert an iPod mobile digital device into this dock CD door...

Page 10: ...re approximately 3 m Do not attempt to mount the speakers too far from the subwoofer Drill holes into solid wall support such as wooden frame or concrete wall TEAC supplies these brackets as a convenience to the product owner Consult your local building codes and exercise all necessary caution when mounting these brackets If you are unsure how to use the supplied brackets consult with a local trad...

Page 11: ...y 40GB 60GB 20GB U2 for iPod with Click Wheel 20 GB U2 Special Edition 40GB for iPod with Click Wheel 40 GB Use a commercially available adapter to play iPod with dock connector with four buttons under the display When you need to remove the adapter hold the left and right sides of the adapter and gently pull it up When you don t use the Dock use the supplied cover for the Dock to prevent dust fro...

Page 12: ... and the volume level If you press and hold the TIME SET button for 3 seconds in CD or TUNER mode the clock will be displayed for a few seconds Turn on the subwoofer 1 Rear panel of the subwoofer Press the STANDBY ON switch on the main unit 2 Play the source and adjust the volume using the VOLUME buttons 4 Select a source by pressing the FUNCTION button 3 ...

Page 13: ...SLEEP 00 The sleep timer is off If you want to check the remaining time press the SLEEP button once The remaining time will be displayed for a few seconds Sleep Timer You can set a sleep timer so the unit turns itself off after a specified time Press the SLEEP button repeatedly until desired time appears on the display 1 Press the BASS or TREBLE button To adjust the level of low frequency sound ra...

Page 14: ...headphones are plugged into the iPod sound comes from both the speakers of the MC DX32i and the headphones The Stop button H doesn t work in iPod mode To select iPod mode To suspend playback temporarily pause mode Press the Play Pause button G J during playback Playback stops at the current position To resume playback press the Play Pause button G J again To skip to the next or a previous track Du...

Page 15: ...to the menu item you want and then press the SELECT button To activate the repeat mode During playback press the REPEAT button of the remote control unit to change the repeat mode Each time the REPEAT button is pressed the REPEAT setting of iPod is changed as follows If the iPod is set to repeat one song the Repeat One icon appears in the iPod s display If the iPod is set to repeat all songs the R...

Page 16: ... mechanism at a time Ensure that the disc is correctly mounted on the spindle and locked in place Press the OPEN CLOSE button to close the CD door 4 It takes a few seconds for the unit to load the disc When no disc is loaded in the CD player nocd is displayed Press the Play Pause button y J to start playback 5 Playback starts from the first track of the disc When the playback of all the tracks has...

Page 17: ...vious track in the program is played Search for a part of a track During playback hold down the skip button or for more than 2 seconds and release it when the part you want to listen to is found Every time the REPEAT button is pressed the mode is changed as follows If one of the following buttons is pressed repeat mode will be canceled STOP FUNCTION FM AM OPEN CLOSE STANDBY ON Repeat one track Pre...

Page 18: ...ayed randomly Press the SHUFFLE button during playback or when in the stop mode The SHUFFLE indicator appears on the display If you press the button during shuffle playback next track will be randomly selected and played If you press the button the currently played track will be played from the beginning A track cannot be replayed during shuffle playback Shuffle playback doesn t work during progra...

Page 19: ...If one of the following buttons is pressed the programmed contents will also be cleared FUNCTION FM AM STANDBY ON If the unit is disconnected from the power supply the programmed contents will be cleared When the selection of track numbers is completed press the Play Pause button G J to start programmed playback 4 When the playback of all the programmed tracks has finished or if you press the Stop...

Page 20: ...e PHONES jack of your mini player you must adjust the volume of the mini player or you may hear no sound from your MC DX32i Turning the volume of the mini player up too high may cause the sound from your MC DX32i to be distorted If this is the case reduce the volume of the mini player until the distortion stops and then adjust the volume level of the MC DX32i to a comfortable listening level You c...

Page 21: ...on or is pressed momentarily the frequency changes by a fixed step Press the Skip button or repeatedly until the station you want to listen to is found FM MODE button Pressing this button alternates between STEREO mode and MONO mode STEREO FM stereo broadcasts are received in stereo and the STEREO indicator lights in the display If the sound is distorted and the STEREO indicator flashes the signal...

Page 22: ...t preset stations To select FM or AM press the FM AM button 1 FM AM MEMORY PRESET You can program 10 FM 10 AM channel presets If the power switch of the subwoofer turned off the settings kept in memory clock preset stations timer setting will be erased Tune in a station you want to listen to see steps to of page 21 3 1 1 Press the MEMORY button 2 preset channel Within 5 seconds select a preset cha...

Page 23: ... Press the SKIP button to set the current hour 4 Press the TIME SET button The minute value blinks 5 Press the SKIP button to set the current minute 6 Press the TIME SET button The clock starts 7 TIME SET STANDBY ON Press and hold the TIME SET button for more than 3 seconds and release it when 12H or 24H appears on the display 12 or 24 blinks If you want to change the hour mode press the or button...

Page 24: ...starts flashing Press the SKIP button to set the start time minute and then press the TIMER button 3 TIMER and OFF indiactors appear on the display and the hour value starts flashing Press the SKIP button to set the start time hour and then press the TIMER button 2 Press the SKIP button to set the stop time minute and then press the TIMER button 5 The minutes value starts flashing Press the SKIP b...

Page 25: ...u selected last time If the power switch of the subwoofer turned off the settings kept in memory clock preset stations timer setting will be erased Prepare the source If you selected iPod in step insert an iPod If you selected CD in step set a disc If you selected TUNER in step tune in a station Press the STANDBY ON button to turn the unit off standby 9 6 6 6 8 When you don t use the timer press t...

Page 26: ...en loaded Load a prerecorded disc e Depending on the disc etc it may not be possible to play back CD R RW discs Try again with another disc e You cannot play back unfinalized CD R RW discs Finalize such a disc in a CD recorder and try again Sound skips e Place the unit on a stable place to avoid vibration and shock e If the disc is dirty clean the surface of the disc e Don t use scratched damaged ...

Page 27: ...169 5 x 115 mm L R Speakers 8 1 4 x 6 11 16 x 3 3 16 210 x 169 5 x 81 mm Subwoofer 6 5 16 x 9 5 8 x 13 3 16 160 x 245 x 335 mm Weight Main Unit 3 13 16 lbs 1 4 kg L R Speakers 1 1 2 lbs 0 7 kg each Subwoofer 11 11 16 lbs 5 3 kg Standard Accessories Remote Control Unit RC 1090 x 1 Battery for Remote Control Unit x 1 Dock adapter x 8 adapter 60GB color Photo 40GB 60GB premounted Cover for the Dock x...

Page 28: ...tilation Les orifices de ventilation ne doivent pas être obstrués Vérifiez qu il y a au moins 5 cm d espace de chaque côté de l appareil Ne placez RIEN sur l appareil La tension électrique fournie à l appareil doit correspondre à celle imprimée sur sa face arrière En cas de doute à ce sujet consultez un électricien Choisissez soigneusement le lieu d installation de votre appareil Evitez de l expos...

Page 29: ...aviolets que les CD ordinaires Il est important de ne pas les conserver dans un lieu soumis directement aux rayons du soleil et de les tenir éloignés de sources de chaleur comme des radiateurs ou des appareils électriques producteurs de chaleur Les CD R et CD RW imprimables ne sont pas recommandés car la face avec étiquette peut être collante et risque d endommager l appareil Ne collez pas de papi...

Page 30: ...onnexion Pour éviter les bruits et les ronflements ne regroupez pas les câbles de modulation pour le signal et le cordon d alimentation B A C G H I J E D D F S VIDEO IN VIDEO IN Enceinte D Enceinte G Face latérale de l unité centrale Caisson de graves TV moniteur Face arrière de l unité centrale Antena de AM Antena de FM Cable de altavoz conector rojo C R d e Altavoz derecho R Panel lateral de la ...

Page 31: ...d une télévision ou d un moniteur S VIDEO OUT Le signal vidéo en provenance de votre iPod est disponible sur cette prise de sortie Utilisez un câble S Video pour brancher le Dock sur l entrée S Video d une télévision ou d un moniteur convenablement équipé Donnez la préférence à ce branchement sur celui de vidéo composite J I H G F E Antenne cadre AM Placez l antenne pour obtenir la meilleure récep...

Page 32: ... B A S M C B A D E L N O P K W Note Pour simplifier les explications les instructions de ce manuel se réfèrent exclusivement aux noms des touches et commandes de la face avant Les commandes qui y sont associées sur la télécommande fonctionneront de façon similaire ...

Page 33: ... de CD FM AM Utilisez cette touche pour sélectionner AM ou FM FM MODE En mode FM TUNER utilisez cette touche pour sélectionner STEREO ou MONO ARRÊT H En mode CD utilisez cette touche pour arrêter la lecture Cette touche ne fonctionne pas en mode iPod L K J I H G F E D C B A VOLUME Appuyez sur la touche ou pour régler le volume Connecteur pour Dock Avant de l utiliser insérez l adaptateur de Dock a...

Page 34: ...omme une charpente en bois ou un mur en béton TEAC fournit ces supports au propriétaire du produit pour plus de commodités Consultez le code local de construction et prenez toutes les précautions nécessaires pour monter ces supports Si vous n êtes pas sûr de la façon de les utiliser consultez un artisan qualifié ou un expert en matériaux de construction Pour l accrochage mural 1 Fixez les supports...

Page 35: ...ette sensitive Click Wheel 20 Go U2 Special Edition 40GB pour iPod avec molette sensitive Click Wheel 40 Go Utilisez un adaptateur en vente dans le commerce pour reproduire iPod avec connecteur pour dock avec quatre touches sous l écran Quand vous avez besoin de retirer l adaptateur tenez les côtés gauche et droit de l adaptateur et tirez doucement vers le haut Quand vous n utilisez pas le Dock ut...

Page 36: ... vous maintenez pressée la touche TIMER SET pendant plus de 3 secondes en mode CD ou TUNER l horloge est affichée pendant quelques secondes Faites reproduire la source et réglez le volume avec les touches VOLUME 4 Sélectionnez une source en appuyant sur la touche FUNCTION 3 Allumez le caisson de graves 1 Face arrière du caisson de graves Appuyez sur le commutateur STANDBY ON de l unité centrale 2 ...

Page 37: ...nt appuyez sur les touches VOLUME pour modifier le réglage Le niveau peut réglé entre 5 et 5 Commande de tonalité Coupure du son Muting Pour temporairement couper le son appuyez sur la touche MUTING Appuyez à nouveau sur la touche MUTING pour restaurer le son Minuterie d extinction L appareil peut s éteindre après un temps déterminé Appuyez répétitivement sur la touche SLEEP jusqu à ce que le temp...

Page 38: ...t des deux enceintes du MC DX32i ainsi que du casque La touche d arrêt H ne fonctionne pas en mode iPod Pour suspendre la lecture temporairement mode de pause Appuyez sur la touche Lecture Pause G J pendant la lecture La lecture est interrompue à la position actuelle Pour reprendre la lecture appuyez de nouveau sur la touche Lecture Pause G J Pour sauter à la plage suivante ou précédente Pendant l...

Page 39: ...ité et appuyez sur la touche SELECT Pour activer le mode de lecture répétitive Pendant la lecture appuyez sur la touche REPEAT de la télécommande pour change le mode de lecture répétitive Chaque fois que vous appuyez sur la touche REPEAT le réglage REPEAT de iPod change comme suit Si iPod est régler sur la lecture répétitive d une chanson l icône de la lecture répétitive d une chanson apparaît sur...

Page 40: ... du lecteur avec son côté imprimé face à vous Pressez le disque contre le moyeu jusqu à ce qu un léger clic se fasse entendre indiquant que le disque est correctement monté 3 Ne mettez jamais plus d un disque à la fois dans le mécanisme Vérifiez que le disque est correctement monté sur le moyeu et qu il tient bien en place Appuyez sur la touche OPEN CLOSE pour fermer la porte du lecteur de CD 4 Ap...

Page 41: ...vante du programme qui est lue Recherche d une partie de plage Durant la lecture maintenez enfoncée la touche Skip ou et relâchez la quand vous avez rejoint la partie que vous voulez écouter Chaque fois que vous appuyez sur la touche REPEAT le mode change comme suit Si on appuie sur une des touches suivantes le mode de répétition est annulé STOP FUNCTION FM AM OPEN CLOSE STANDBY ON Répétition d un...

Page 42: ...a reprise depuis son début La lecture aléatoire ne peut pas revenir deux fois sur la même plage La lecture aléatoire ne fonctionne pas en mode de lecture programmée Si on appuie sur une des touches suivantes le mode de lecture aléatoire est annulé SHUFFLE STOP FUNCTION FM AM STANDBY ON OPEN CLOSE Lecture aléatoire MEMORY s allume dans l écran Pour annuler le mode programme appuyez sur la touche St...

Page 43: ...our contrôler l ordre de programmation A l arrêt appuyez répétitivement sur la touche MEMORY Le numéro de plage et son rang dans le programme s afficheront Pour ajouter une plage à la fin du programme A l arrêt appuyez répétitivement sur la touche MEMORY jusqu à ce que s affiche Sélectionnez un numéro de plage avec la touche Skip ou puis appuyez sur la touche MEMORY La plage est ajoutée à la fin d...

Page 44: ...de volume sur le MC DX32i pour obtenir une écoute satisfaisante Vous pouvez utiliser cette façon de connecter pour écouter un iPod qui n a pas de connecteur de Dock ou qui en a un mais dont l adaptateur de Dock approprié n est pas disponible Branchez la prise PHONES prise de sortie audio d un lecteur audio portable à la prise AUX IN du MC DX32i à l aide du câble à mini fiche stéréo fourni 1 Ecoute...

Page 45: ...ion manuelle Quand on appuie fugitivement sur la touche SKIP ou la fréquence se déplace d une valeur fixe Appuyez répétitivement sur la touche SKIP ou jusqu à ce que la station que vous voulez écouter soit trouvée Touche FM MODE Appuyer sur cette touche fait alterner entre les modes STEREO et MONO STEREO Les émissions FM stéréo sont reçues en stéréo et le témoin STEREO s allume à l écran Si le son...

Page 46: ...ge 45 3 1 1 Appuyez sur la touche MEMORY 2 Dans les 5 secondes appuyez sur la touche MEMORY 4 La station est mémorisée et le témoin MEMORY s éteint Pour mémoriser plus de stations répétez les étapes à 4 1 Appuyez répétitivement sur la touche PRESET jusqu à ce que la station préréglée désirée soit trouvée 2 Comment rappeler les stations préréglées presets Appuyez sur la touche FM AM pour sélectionn...

Page 47: ...teur d alimentation du caisson de graves est coupé les réglages conservés en mémoire réglages d horloge des stations préréglées ou presets de la minuterie seront effacés Si l appareil est en service appuyez sur la touche STANDBY ON pour le mettre en veille 1 Appuyez une fois encore sur la touche TIME SET La valeur des heures clignote 3 Appuyez sur la touche SKIP pour régler l heure 4 Appuyez sur l...

Page 48: ...régler l heure de démarrage unité minutes puis appuyez sur la touche TIMER 3 Les témoins TIMER et OFF apparaissent à l écran et la valeur des heures commence à clignoter Appuyez sur la touche SKIP pour régler l heure de démarrage unité heures puis appuyez sur la touche TIMER 2 Appuyez sur la touche SKIP pour régler l heure d arrêt unité minutes puis appuyez sur la touche TIMER 5 La valeur des minu...

Page 49: ...ernier Si vous n utilisez pas la minuterie appuyez sur la touche TIMER pour la couper le témoin TIMER disparaît de l écran Appuyez à nouveau sur la touche TIMER pour la remettre en service Quand la minuterie est activée ses réglages sont affichés un par un et le témoin TIMER est allumé à l écran Le réglage de la minuterie est maintenant terminé et la minuterie est activée Vos réglages de minuterie...

Page 50: ...é Chargez un disque préenregistré e Selon le disque etc il peut être impossible de reproduire des CD R RW Réessayez avec un autre disque e Vous ne pouvez pas reproduire de CD R RW non finalisé Finalisez un tel disque dans un enregistreur de CD et réessayez Le son saute e Placez l appareil sur une surface stable pour éviter les vibrations et les chocs e Si le disque est sale nettoyez sa surface e N...

Page 51: ...P Unité centrale 255 x 169 5 x 115 mm Enceintes G D 210 x 169 5 x 81 mm Caisson de graves 160 x 245 x 335 mm Poids Unité centrale 1 4 kg Enceintes G D 0 7 kg chacune Caisson de graves 5 3 kg Accessoires en standard Télécommande RC 1090 x 1 Pile pour télécommande x 1 Câble de caisson de graves x 1 Câble d enceinte x 2 Antenne FM x 1 Antenne AM x 1 Câble à mini fiche stéréo x 1 Adaptateur de Dock x ...

Page 52: ...ento de la unidad No coloque la unidad a la luz solar directa ni cerca de fuentes de calor Evite los lugares expuestos a vibraciones o a un exceso de suciedad frío calor o humedad No coloque la unidad encima de otros componentes electrónicos No abra la carcasa de la unidad ya que podrían dañarse los circuitos o producirse descargas eléctricas Si entra algún cuerpo extraño en la unidad póngase en c...

Page 53: ... la unidad No adhiera papeles ni láminas de protección a los discos ni aplique ningún tipo de aerosol de revestimiento Utilice un rotulador de punta blanda para escribir en el lado de la etiqueta No emplee nunca bolígrafos ni lápices de punta dura ya que podría dañar la cara grabada del disco No utilice nunca estabilizadores Los estabilizadores de CD existentes en el mercado producirán daños en lo...

Page 54: ... uno de los componentes que tiene intención de usar con esta unidad Inserte correctamente los conectores Para evitar zumbidos y ruidos no tienda los cables de conexión en el mismo mazo del cable de alimentación Altavoz derecho R Altavoz derecho L Panel lateral de la unidad principal Subwoofer Televisor Monitor Panel posterior de la unidad principal 54 ...

Page 55: ...32i Terminal VIDEO OUT Este terminal reproduce señal de vido desde iPod Utilice un cable de video RCA pin para conectar la base Dock al conector de video compuesto de una televisión o un monitor Terminal S VIDEO OUT Este terminal reproduce señal de video desde iPod Utilice un cable de S Video para conectar la base Dock a la entrada S Video de una televisión o un monitor correctamente equipado Util...

Page 56: ... E L N O P K W Observación Para simplificar las explicaciones las instrucciones del manual se refieren únicamente a los nombres de los botones y controles del panel frontal Los botones y controles correspondientes del mando a distancia funcionan de la misma manera 56 ...

Page 57: ... FM FM MODE En el modo FM TUNER pulse este botón para seleccionar STEREO o MONO PARADA H En el modo CD pulse este botón para interrumpir la reproducción Este botón no funciona en el modo iPod L K J I H G F E D C B A VOLUME Pulse las teclas o para regular el volumen Conector de la base Dock Antes de usarla introduzca en la base Dock un adaptador adecuado consulte la página 59 Coloque el dispositivo...

Page 58: ...lejos del subwoofer Taladre los orificios en un material sólido y fiable viga de madera muro de hormigón TEAC suministra estos soportes para facilitar la tarea al usuario Consulte los reglamentos de construcción y extreme las precauciones cuando monte estos soportes Si tiene alguna duda sobre la forma de usar los soportes facilitados consulte en un establecimiento o tienda de materiales de su zona...

Page 59: ...r 40GB 60GB 20GB U2 para el iPod con rueda de clic 20 GB U2 Special Edition 40GB para el iPod con rueda de clic 40 GB Utilice un adaptador comercial para reproducir el iPod con conector para base con cuatro botones debajo de la pantalla Cuando necesite retirar el adaptador sosténgalo por los lados derecho e izquierdo y tire de él hacia arriba con suavidad Cubra la base Dock con la funda que se sum...

Page 60: ... del volumen En el modo CD o TUNER si pulsa y mantiene pulsado durante 2 segundos el botón TIME SET el reloj se mostrará durante unos segundos Encienda el subwoofer 1 panel posterior del subwoofer Pulse el interruptor STANDBY ON de la unidad principal 2 Ponga en marcha la fuente y regule el volumen con los botones VOLUME 4 Seleccione la fuente de sonido con el botón FUNCTION 3 60 ...

Page 61: ...do Si desea comprobar el tiempo restante pulse el botón SLEEP una vez El tiempo restante se visualizará durante varios segundos Desconexión programada Puede ajustar el temporizador de apagado de forma que la unidad se apague a partir de una hora determinada Pulse el botón SLEEP varias veces hasta que aparezca la hora deseada en la pantalla 1 Pulse el botón BASS o TREBLE Pulse el botón de bajos BAS...

Page 62: ...uriculares en el iPod el sonido saldrá por los altavoces del MC DX32i y por los auriculares El botón de parada H no funciona en el modo iPod Para seleccionar el modo iPod Para interrumpir momentáneamente la reproducción modo pausa Pulse el botón PLAY PAUSE G J durante la reproducción La reproducción se interrumpe en la posición actual Pulse de nuevo el botón PLAY PAUSE G J para reiniciar la reprod...

Page 63: ...se por el menú hasta el elemento que desea y después pulse el botón SELECT Para activar la función de repetición Pulse el botón REPEAT durante la reproducción para cambiar al modo de repetición Cada vez que se pulsa el botón REPEAT la función de repetición REPEAT del iPod cambia de la siguiente manera El ícono Repeat One se muestra en la pantalla del iPod si éste está en el modo de repetir una can...

Page 64: ...Compruebe que el disco está perfectamente centrado y encajado Pulse el botón de apertura cierre para cerrar el compartimento de CD 4 La unidad tarda unos instantes en cargar el disco Si no hay un disco cargado en el reproductor la pantalla indicará nocd Pulse el botón PLAY PAUSE y J para dar comienzo a la reproducción 5 La reproducción se inicia desde la primera pista del disco Una vez concluida l...

Page 65: ...ma Búsqueda de un fragmento de la pista Durante la reproducción mantenga pulsado el botón de salto o durante más de 2 segundos y libérelo cuando localice la parte que desea oír Cada vez que pulse el botón REPEAT el modo cambiará en el siguiente orden El modo de repetición quedará cancelado si pulsa uno de los siguientes botones STOP FUNCTION FM AM OPEN CLOSE STANDBY ON Repetición de una pista Puls...

Page 66: ...den aleatorio Pulse el botón SHUFFLE durante la reproducción o desde la posición de parada El indicador SHUFFLE aparece en la pantalla Si pulsa el botón durante la reproducción al azar se seleccionará y reproducirá al azar la siguiente pista Si pulsa el botón la pista en curso se reproducirá desde el principio No se puede repetir una pista durante la reproducción al azar La reproducción al azar no...

Page 67: ...e parada Los contenidos programados se eliminarán si pulsa uno de los siguientes botones FUNCTION FM AM STANDBY ON Si la unidad se desconecta de la toma de alimentación el contenido del programa se borrará Una vez completada la selección de los números de pista pulse el botón G J para dar comienzo a la reproducción programada 4 Cuando se haya terminado la reproducción de todas las pistas o si puls...

Page 68: ...ar AUX 2 Cuando use el jack PHONES del mini reproductor deberá ajustar su volumen o es posible que no oiga el sonido del MC DX32i Si se pone el volumen del mini reproductor demasiado alto el sonido del MC DX32i podría distorsionarse Si ocurre esto reduzca el volumen del mini reproductor hasta que la distorsión se detenga y ajuste el nivel del volumen del MC DX32i a un nivel de escucha cómodo Puede...

Page 69: ... pulsa brevemente la frecuencia cambia en pasos fijos Pulse el botón Skip o repetidas veces hasta localizar la emisora deseada Botón FM MODE Pulse este botón para conmutar entre los modos estéreo y monofónico STEREO estéreo Las emisiones de FM estéreo se reciben en estéreo y el indicador STEREO se ilumina en la pantalla Si el sonido se recibe distorsionado y el indicador STEREO luce intermitente s...

Page 70: ...eccionar presintonías Para seleccionar FM o AM pulse el botón FM AM 1 FM AM MEMORY PRESET Puede programar 10 preajustes de canales FM y 10 AM Si se apaga el interruptor del subwoofer se borrarán los ajustes guardados en la memoria reloj presintonías temporizador Sintonice una emisora pasos a en página 69 3 1 1 Pulse el botón MEMORY 2 presintonía Antes de 5 segundos seleccione con los botones PRESE...

Page 71: ...lto para ajustar la cifra de las horas 4 Pulse el botón TIME SET Parpadeará la cifra de los minutos 5 Utilice los botones de salto para ajustar la cifra de los minutos 6 Pulse el botón TIME SET El reloj empieza a funcionar 7 TIME SET STANDBY ON Mantenga pulsado el botón TIME SET durante más de 3 segundos y suéltelo cuando aparezca 12H o 24H en la pantalla Aparecerá intermitente 12 o 24 Si desea ca...

Page 72: ...botones de salto para ajustar la hora de inicio cifra de los minutos y después pulse TIMER 3 En la pantalla aparecen los indicadores TIMER y OFF y la cifra de las horas intermitente Utilice los botones de salto para ajustar la hora de inicio cifra de las horas y después pulse TIMER 2 Utilice los botones de salto para ajustar la hora de parada cifra de los minutos y después pulse TIMER 5 La cifra d...

Page 73: ... y se enciende la unidad se sintonizará la emisora seleccionada en la última ocasión Si se apaga el interruptor del subwoofer se borrarán los ajustes guardados en la memoria reloj presintonías temporizador Prepare la fuente de sonido Si ha seleccionado iPod en el paso coloque el iPod Si ha seleccionado CD en el paso inserte un disco Si ha seleccionado la radio TUNER en el paso sintonice una emisor...

Page 74: ...ara grabada hacia el lado contrario e Si el disco está sucio limpie su superficie e Puede haber insertado un disco vacío Pruebe con uno pregrabado e Dependiendo del formato etc quizá no sea posible reproducir discos CD R RW Vuelva a intentarlo con otro disco e No se pueden reproducir discos CD R CD RW que no tengan la sesión cerrada Cierre la sesión del disco en una grabadora de CD e inténtelo de ...

Page 75: ...ad principal 255 x 169 5 x 115 mm Altavoces I y D 210 x 169 5 x 81 mm Subwoofer 160 x 245 x 335 mm Peso Unidad principal 1 4 kg Altavoces I y D 0 7 kg cada uno Subwoofer 5 3 kg Accesorios estándar Mando a distancia RC 1090 x 1 Batería del mando a distancia x 1 Adaptador de base Dock x 8 adaptador 60GB color Photo 40GB 60GB pre equipado Funda para la base Dock x 1 Cable de subwoofer x 1 Cable de al...

Page 76: ...legraph Road Montebello California 90640 Phone 323 726 0303 TEAC CANADA LTD 5939 Wallace Street Mississauga Ontario L4Z 1Z8 Canada Phone 905 890 8008 TEAC MEXICO S A De C V Campesinos N 184 Colonia Granjas Esmeralda Delegacion Iztapalapa CP 09810 México DF Phone 525 581 5500 TEAC UK LIMITED Unit 19 20 The Courtyards Hatters Lane Watford Hertfordshire WD18 8TE U K Phone 0845 130 2511 TEAC EUROPE Gm...

Reviews: