2. TV PLACEMENT SETUP
Stand and wall-mounted (optional)
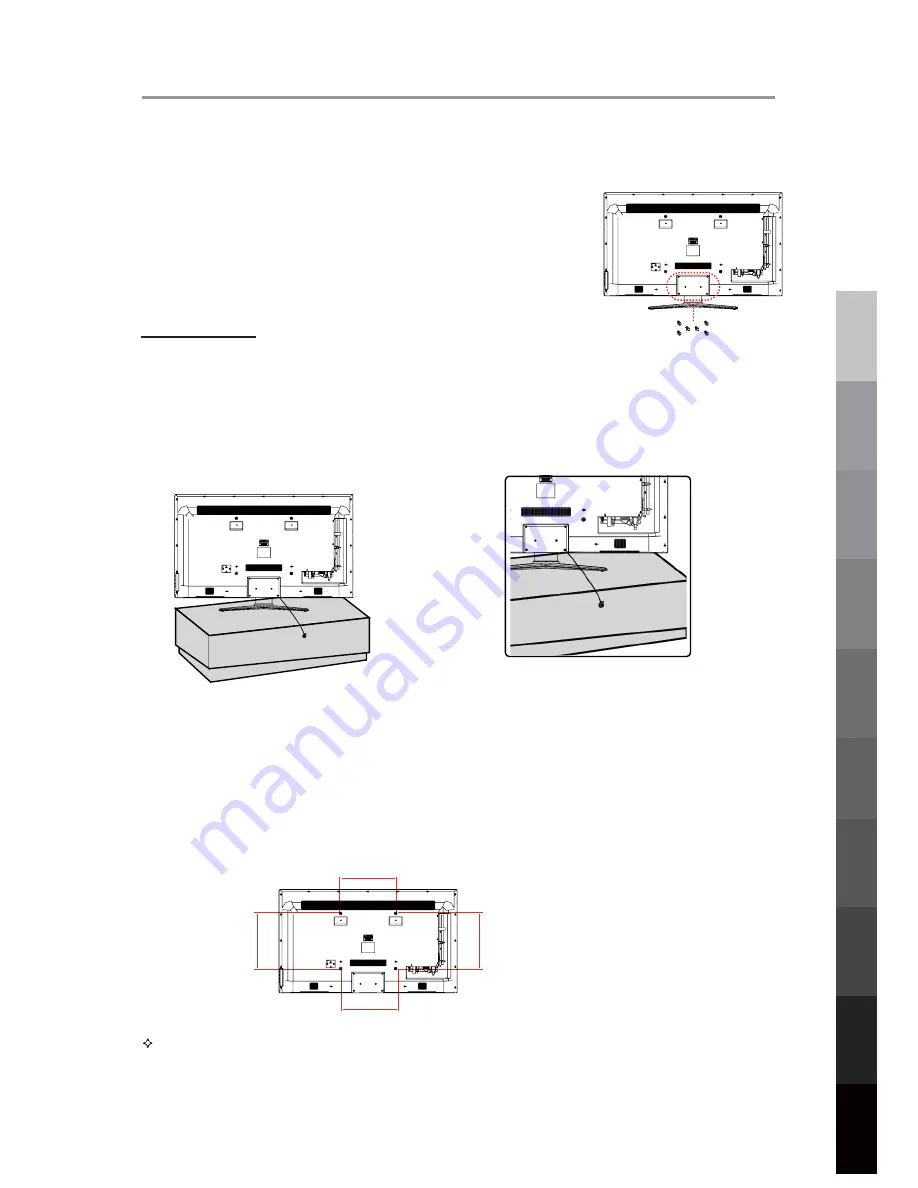
How to remove/re-install the stand
Fall Prevention
How to mount the LED TV on the wall
400mm
400mm
400mm
400mm
Your LED TV is able to accommodate wall mounting with the use of a wall mount bracket (not supplied with LED TV, please
contact your local hardware store) and the mounting hole screw size (M5X8mm) on the back of the unit.
We recommend removing the TV stand prior to mounting the TV on the wall. Please refer to the figures and procedure below.
Follow the instructions below to remove the base of the TV:
1. Place the unit (face down) on a soft surface.
2. Loosen and remove the 6 screws securing the stand to the TV (shown on right).
3. Gently remove the stand.
4. To reinstall the stand, place the unit (face down) on a soft surface and reverse
the above instructions.
NOTE:
Make sure the power is completely disconnected and unplugged before starting.
To prevent the TV from tilting forward and falling over to cause damage or injury, please secure the TV to your table or wall
using screws or eyebolts and strong cord (not provided). An example on fixing the TV to a table is shown below:
Alternatively, secure the TV to the wall directly behind it by fixing eyebolts to the wall and tying them to screws fixed on the
centre of the TV back panel.
1. After detaching the stand, fasten 4 mounting screws (thread size M6X35mm - NOT SUPPLIED. Please contact your
2. Fasten wall mounting bracket (NOT SUPPLIED with LED TV, please contact your local hardware store) with screws
on the wall.
local hardware store) into the 4 screw holes on the rear cover, see the figure below.
3. Carefully check for the strength of the connection before releasing the LED TV.
NOTE
: For more detailed instructions please refer to your “after market” wall mounting instruction book.
Thread hole size – M5 x 8mm depth (TV mounting screw size) on the TV.
1.
Install a wood screw or eyebolt into the table that is supporting the TV.
2.
Fix a machine screw into a screw hole near the base in the back of the TV.
3.
Tie the wood screw or eyebolt to the machine screw with a strong cord.
Reference
Parts & Connections
USB
Multimedia
Playback
TV Placement
Setup
Initial Setup &
Input Sources
Remote Control
On-Screen Display
TV & Electronic
Programme Guide
Digital Video
Recording (DVR)
(OSD) Menu
3D Video Playback
7
Summary of Contents for LE5851FH3D
Page 15: ......
Page 16: ......
Page 25: ...1 MENU Reference USB Multimedia Playback Digital Video Recording DVR 3D Video Playback 21...
Page 35: ...USB Multimedia Playback Reference 10 CANCEL CANCEL 31...
Page 41: ......
Page 42: ......
Page 43: ......
Page 44: ...TEAC CUSTOMER SUPPORT HOTLINE TCS 1300 553 315 Between Monday to Friday AEST 8 30AM to 6PM...


