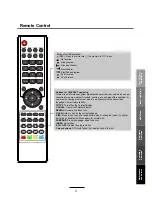
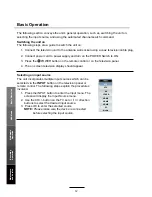
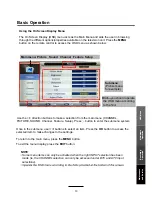
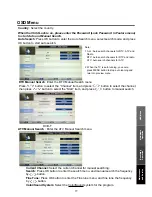
background image

Basic Operation

OSD Menu

Multimedia

 Operation

Recording

Operation

User Guidance

  Information

Maintenance

 and Service

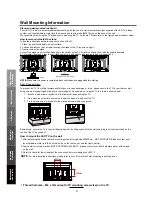
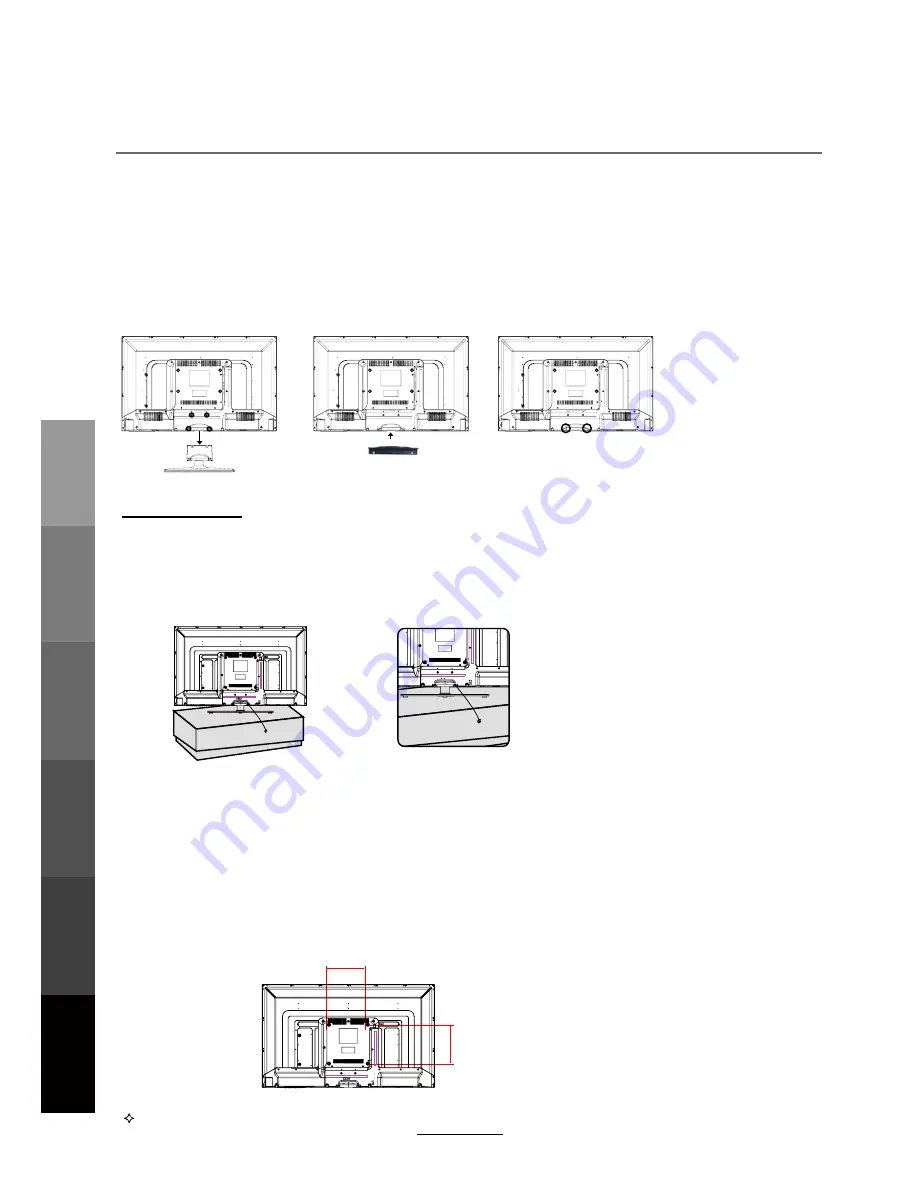
Wall Mounting Information

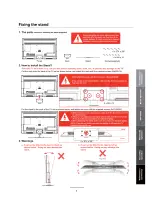
Stand and wall-mounted (optional)

How to remove/re-install the stand

F al l P re ve n ti o n

How to mount the LED TV on the wall

200mm

200mm

Your LED TV is able to accommodate wall mounting with the use of a wall mount bracket (not supplied with LED TV, please 
contact your local hardware store) and the mounting hole screw size (M6X10mm) on the back of the unit.
We recommend removing the TV stand prior to mounting the TV  on the wall. Please refer to the figures and procedure below.

Follow the instructions below to remove the base of the TV:
1. Place the unit (face down) on a soft surface.
2. Loosen and remove the 4 screws securing the stand to the TV (shown on right).
3. Gently remove the stand.
4. Insert the stand Cover for Wall-mounting in the bottom of the TV. Attach the Stand Cover with the supplied screws.
5. To reinstall the stand, place the unit (face down) on a soft surface and reverse 

    the above instructions.

NOTE:

 Make sure the power is completely disconnected and unplugged before starting.

To prevent the TV from tilting forward and falling over to cause damage or injury, please secure the TV to your table or wall
using screws or eyebolts and strong cord (not provided). An example on fixing the TV to a table is shown below:

1.

Install a wood screw or eyebolt into the table that is supporting the TV.

2.

Fix a machine screw into a screw hole near the base in the back of the TV.

3.

Tie the wood screw or eyebolt to the machine screw with a strong cord.

Alternatively, secure the TV to the wall directly behind it by fixing eyebolts to the wall and tying them to screws fixed on the
centre of the TV back panel.

1. After detaching the stand, fasten 4 mounting screws (thread size M6X10mm - NOT SUPPLIED. Please contact your

2. Fasten wall mounting bracket (NOT SUPPLIED with LED TV, please contact your local hardware store) with screws

    on the wall.

    local hardware store) into the 4 screw holes on the rear cover, see the figure below.

3. Carefully check for the strength of the connection before releasing the LED TV.

NOTE

: For more detailed instructions please refer to your “after market” wall mounting instruction book.

Thread hole size – M6 x 10mm depth (TV mounting screw size) on the TV.

(Stand Cover For Wall-mounting)

(Stand)

 6

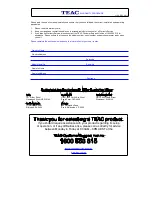
Summary of Contents for LE3990FHD

Page 1: ...USER MANUAL WARRANTY INFORMATION INSIDE PLEASE READ www teac com au IMPORTANT LE3990FHD LED TV Trademark of TEAC Corporation JAPAN...

Page 2: ...your own records Owner s Name Owner s Address Postcode Model Name No Serial No Dealer s Name Dealer s Address Postcode Authorised Service Centres in Major Australian Cities NSW 151 Arthur Street Homeb...

Page 3: ...ill be available for collection by or return to the purchaser at a fee upon request TEAC in home service can be made available at a fee upon request Carry in Service 6 A 12 month replacement warranty...

Page 4: ...nformation Fixing the stand 7 6 Remote control 10 11 Basic Operation Basic Operation 12 13 OSD Menu 1 PICTURE Menu 14 2 SOUND Menu 15 4 Feature Menu 18 19 5 Setup Menu 20 Recording Operation Recording...

Page 5: ...fire or electric shock v KWVOM ML W TM UIa KI M the outlet to overheat and start a fire v loose or improperly inserted power plug may result in fire v WQVO W UIa ZM T QV electric shock v WQVO W UIa ZM...

Page 6: ...n unstable surface such as a sloped table or any stand with a contact area smaller than the bottom surface of the unit stand can prevent accidents from happening Ignoring this precaution may result in...

Page 7: ...service center v IQT ZM W LW W UIa ZM T QV fire or electric shock When removing the batteries from the remote control make sure children do not swallow them Keep the batteries out of the reach of infa...

Page 8: ...ot bend the power cord excessively P revent the cord from being walked on or pinched by weights placed on it 5 Safety Precautions Basic Operation OSD Menu Multimedia Operation Recording Operation User...

Page 9: ...amage which may result in fire or hazards the unit should not be exposed to rain or liquids b Do not place objects containing liquids such as vases on the unit If drinks or liquids have been spilled o...

Page 10: ...is completely disconnected and unplugged before starting To prevent the TV from tilting forward and falling over to cause damage or injury please secure the TV to your table or wall using screws or ey...

Page 11: ......

Page 12: ...Display the input source menu MENU Display exit the OSD menu CH Scan through channels VOL Adjust the volume POWER Turn on standby the TV set Names of each part Front View Accessories User s Guide Rem...

Page 13: ...t of external devices like DVD players with a HDMI cable YPbPr Connect to the YPbPr video output sockets of external devices PC IN Connect to the audio output terminal on the PC VGA For PC video input...

Page 14: ...e video picture modes SOUND Press to cycle through the different sound settings CURSOR KEYS OK Allows you to navigate through the on screen menus and adjust the system settings to your preference CH F...

Page 15: ...function TV TXT Turn off on the Teletext display CANCEL Cancel the Teletext display REVEAL Reveal any hidden text HOLD Hold or carry on the current subpage SIZE Press to see top half of page double s...

Page 16: ...Switch to ON 3 Press the POWER button on the remote control or on the television panel 4 The on screen television display should appear Selecting an input source The unit incorporates multiple input s...

Page 17: ...u Use the direction buttons to make a selection from the main menu CHANNEL PICTURE SOUND Channel Feature Setup Press button to enter the submenu system Once in the submenu use buttons to select an ite...

Page 18: ...Colour Temperature Select an optimum color temperature mode to suit your eyes for viewing from Warm Cool Standard Noise Reduction Backlight Adjust the backlight If the broadcast signal received is we...

Page 19: ...the level of the higherpitched sounds Balance Adjust the audio output between left and right speakers Auto Volume Level AVL The volumes of all sources will be maintained when the function s SPDIF Sel...

Page 20: ...or cancel the setting and the program will not be programed by CH button Press Swap BLUE button to sign the channel press button to move and press OK button to swap the position OSD Menu 3 Channel men...

Page 21: ...the frequency Current Channel Select the current channel for manual searching Search Press OK button to enter the search menu and manual search the frequency Color Sound System Select the Color Sound...

Page 22: ...efault it is 0000 Lock Enable Turn on off the Lock functions Parental Guidance Select the Parental Guidance mode or turn off the function Note When it is be turned on the functions of Parental Guidanc...

Page 23: ...ock as default the information is taken automatically from the digital signal Sleep Timer Lets you set the sleep timer so the television automatically switches off after a certain amount of time Auto...

Page 24: ...the TV system information and custom support information 5 SETUP menu Description PC Setup Change the PC Settings in PC mode Auto Adjust Setup the parameter of the screen automatically H V Position Ad...

Page 25: ...ect Media source by the buttons and press OK button to enter the Multimedia menu as shown below Then press button to program the files be signed you select or the files in the fold you select Preview...

Page 26: ...ft right up down button in Zoom mode Display the information of the current file Display the photo setup menu and select the Repeat mode Background Music Slide Time Effect Display the playing list Sto...

Page 27: ...e Input the time and start playing directly Display the information of the current file Display the movie setup menu and setup the Program Subtitle Audio Repeat mode Display the playing list Stop and...

Page 28: ...stem and that there is sufficient storage space available for recording programs USB device informations 1 Format Format Press RED button to format the selected USB device Recording Operation Set Time...

Page 29: ...in weekly mode Reminder Press GREEN button once to remind the program for watching and press GREEN button again to remind the program for recording You could check it in Timer menu and the TV will rec...

Page 30: ...start recording there will be a sign on the screen Press button on the remote control to start timeshift in DTV mode and the TV will give you Note a Please make sure the USB device is on the TV b Plea...

Page 31: ...appears but there is no sound 1 Check if the MUTE function has been activated 2 Increase the sound level by pressing volume adjustment button 3 Check if sound terminal of external input is connected...

Page 32: ...ard Supported Multimedia Player formats Dimensions Weight Wall mounting dimensions Wall mounting screw size Operating temperature range Power Consumption 1 1 1 1 1 3 The HDMI support 1 3 the HDCP supp...

Page 33: ...phones and cameras for recording purposes 2 Unit will only support hard disk drives with additional power supply maximum disk partition size of 400GB and a maximum capacity of 1 5TB For optimum perfor...

Page 34: ......

Page 35: ......

Page 36: ...TEAC CUSTOMER SUPPORT HOTLINE TCS 1300 553 315 Between Monday to Friday AEST 8 30AM to 6PM...

Reviews: