background image

21

ENGLISH

Troubleshooting

In case you experience any problem with this unit, please take
the time to look through this chart and see if you can solve the
problem yourself before you call your dealer or a TEAC service
center.

No power

e

Check the connection to the AC power supply. Check and
make sure the AC source is not a switched outlet and that,
if it is, the switch is turned on. Make sure there is power to
the AC outlet by plugging another item such as a lamp or
fan.

e

Press the POWER switch of the main unit to turn it on.

Remote control doesn’t work.

e

Press the POWER switch of the main unit to turn it on.

e

If the batteries are dead, change the batteries.

e

Use remote control unit within the range (5m /15ft) and
point at the front panel.

e

Clear obstacles between the remote control unit and the
main unit.

e

If a strong light is near the unit, turn it off.

Severe hum or noise is heard.

e

Place the unit as far away from a TV as possible.

e

Make sure the line cords and speaker cables are as far away
from the AC supply as possible.

Cannot play.

e

Reload the disc with the label side UP.

e

This unit cannot play such discs as CD-ROMs. Use a playable
disc (see page 6).

e

If the disc is dirty, clean the surface of the disc.

e

A blank disc has been loaded. Load a prerecorded disc.

e

If the unit is condensed, leave the unit for one or two hours
with the power turned on (see page 5).

e

If another operation is still in process, wait a moment and
try again. 

Settings are canceled.

e

When the power is suddenly cut due to power failure or by
unplugging the power cord, settings will be cancelled. Be
sure to turn the unit off by pressing the POWER switch
before unplugging the power cord.

Cannot access some setup menu items.

e

Although it is possible to enter the setup menu while
playback is continuing, not all menu functions will be
available. Expand the number of available functions by
pressing the STOP button (see page 17).

Sound skips.

e

Place the unit on a stable place to avoid vibration and shock.

e

If the disc is dirty, clean the surface of the disc.

e

Don’t use scratched, damaged or warped discs.

There is no sound or only a very low-level sound is heard.

e

Check that the amplifier and speakers are connected
securely.

e

Check the operation of the amplifier.

e

Check the audio output setting (see page 19).

e

When the amplifier is connected via the DIGITAL OUT
terminal, set the Digital Out setting to “ON” (see page 19).

No multi-channel audio output

e

Set the Analog Output setting to “Multi-Channel”, or use
the 2CH/MULTI button of the remote control unit to change
the settings (see page 19).

e

Change the speaker configuration if necessary (see page
19).

e

Super Audio CDs may have more than one playback area,
not all of which contain multi-channel audio data. Choose a
multi-channel area (see page 13).

Overall volume is low, or balance between speakers is
strange

e

A speaker’s level (or that of a pair of speakers) has been set
up too low or too high in the speaker setup (see page 20).
Correct the levels.

e

When configuring speaker sizes, making “small” and “off”
settings on speakers other than the subwoofer can affect
the subwoofer volume. Adjust the level on the subwoofer
itself (see page 19).

No digital audio output.
Digital audio recording is not possible on another device.

e

Check that the Digital Out setting is set to “ON” (see page19).

e

No digital audio is output when playing Super Audio CD.

e

Copy-prohibit material cannot be copied digitally.

The CLOCK MODE button flashes and the display shows
“No Word!”

e

The word sync mode is selected, but there is no clock
source. Turn the word sync mode off (see page 16).

e

No word clock is being received. Check cables, connections,
and settings of the clock generator.

The CLOCK MODE button flashes and the display shows
“WRD UNLCK!”

e

Invalid word sync signal is received. Check the setting of the
clock generator.

If normal operation cannot be recovered, unplug the
power cord from the outlet and plug it in again.  This
resets the internal micro-computer which can be disturbed
during electrical storms, power interruptions, et cetera.

Summary of Contents for Esoteric X-01

Page 1: ...D00816700C Super Audio CD CD Player Owner s Manual 2 Manuel du Propri taire 23 Bedienungsanleitung 44...

Page 2: ...apparatus Do not install this apparatus in a confined space such as a book case or similar unit The apparatus draws nominal non operating power from the AC outlet with its POWER switch in the off posi...

Page 3: ...hapter 1 subchapter J based on the Radiation Control for Health and Safety Act of 1968 and is classified as class 1 laser product There is not hazardous invisible laser radiation during operation beca...

Page 4: ...the sled and the speed of the sled is monitored and used to control the sled itself in a servo feedback operation meaning the sled is highly responsive and smooth in its operation Sturdy rigid chassi...

Page 5: ...e the disc tray Do not attempt to clean the unit with chemical solvents as this might damage the finish Use a clean dry cloth Keep this manual in a safe place for future reference DO NOT MOVE THE UNIT...

Page 6: ...place the disc on the disc tray with the label side uppermost Compact discs can be played or recorded only on one side To remove a disc from its storage case press down on the center of the case and...

Page 7: ...s on use Point the remote control unit at the player s remote sensor and use it within seven meters distance of the player There should not be any obstacles between the player and the remote control u...

Page 8: ...t you intend to use with this unit Be sure to insert each plug securely To prevent hum and noise avoid bundling the signal interconnection cables together with the AC power cord or speaker cables RCA...

Page 9: ...cause damage to the unit B A Application notes The unit does not output digital surround sound from Super Audio CDs so to enjoy surround sound from these media you must make analog connections to a su...

Page 10: ...ing power from the AC outlet with its POWER switch in the OFF position A B C D E G H I J F Front Panel POWER Use this to turn the unit on and off When the unit is on the ring surrounding the button li...

Page 11: ...se this button to enter or exit the setup menu OPEN CLOSE button Duplicates the functions of the OPEN CLOSE button on the front panel Clear button Use this button to clear entry errors etc DISPLAY Use...

Page 12: ...ton again 4 The tray closes Take care not to trap your fingers in the tray The unit reads the disc this may take a little time Press the PLAY button to start playback 5 Pausing playback Press the PAUS...

Page 13: ...ack Use the number button to select tracks for playback Use the 10 button to enter the first digit of numbers greater than 9 repeated presses show 1 2 3 etc and the single digit buttons 0 through 9 fo...

Page 14: ...st entry is cleared You can only select tracks on the disc in other words if the disc has six tracks you cannot program track 7 Finish the programming by pressing PLAY Programmed playback begins if th...

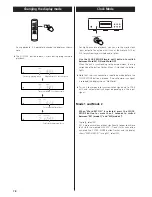
Page 15: ...K track repeat REPEAT DSC whole disc repeat REPEAT OFF no repeat Display dimming The display on the main unit can be dimmed to suit the environment in which you listen to music There are three levels...

Page 16: ...to synchronization signals up to 176 4 kHz and automatically changes depending on the input signal Mode 1 and Mode 2 When Word M1 ON is selected press the CLOCK MODE button for more than 3 seconds to...

Page 17: ...e again Use the cursor buttons to navigate the menus 3 When a option marked with is displayed use the up or down cursor buttons to change the setting and press the ENTER button to confirm the entry 4...

Page 18: ...Distance L R m C m SR SL m SP Level L R Size C Size SR SL Size SW ON OFF LR dB C dB SR dB SL dB SW dB Test Start Test Tone options options options options options options options options options opti...

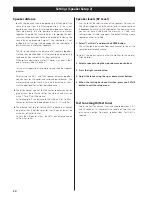
Page 19: ...u have made is used Settings Speaker Setup 1 Use these speaker setup menus when connecting an AV amplifier with analog outputs using the 5 1 multi channel setting there is no need for this setup when...

Page 20: ...be within 1 7m of that L R distance So for example if the distance to the L R pair is set to 5 0m the center distance must be between 3 3m 5 1 7 and 5m The distance that you set for the SR SL surround...

Page 21: ...ips e Place the unit on a stable place to avoid vibration and shock e If the disc is dirty clean the surface of the disc e Don t use scratched damaged or warped discs There is no sound or only a very...

Page 22: ...ponse 5Hz 58 kHz Super Audio CD Signal to Noise Ratio S N 112 dB Super Audio CD 1 kHz Dynamic range 106 dB Super Audio CD 1 kHz Total harmonic distortion 0 001 Super Audio CD 1 kHz Audio output Digita...

Page 23: ...commande 27 Raccordement 28 Caract ristiques de la face avant 30 Comprendre la t l commande 31 Lecture 32 Sauts en lecture 33 S lection d une plage 33 Lecture acc l r e 33 S lection de la zone de lect...

Page 24: ...ond avec vivacit et souplesse Un ch ssis robuste rigide avec support trois pieds sur pointes L appareil est construit avec une plaque robuste en acier de 5mm d paisseur et est divis en trois sections...

Page 25: ...plateau porte disque Ne pas essayer de nettoyer l appareil avec un d tergent chimique ceci risquant d ab mer le rev tement ext rieur Utiliser toujours un chiffon propre et sec Conserver ce manuel dan...

Page 26: ...s que sur une seule face Pour sortir un disque de son emballage appuyer sur la partie centrale de l tui et sortir le disque en veillant bien le tenir par les bords Si la surface du disque est sale l e...

Page 27: ...moins _ Utiliser des piles du m me type Ne jamais essayer d utiliser des types de pile diff rents ensemble Des piles ou des batteries peuvent tre utilis es Se r f rer leurs tiquettes pour les pr caut...

Page 28: ...round Appareil num rique audio enregistreur CD platine MD etc Cordon secteur fourni Prise murale PR CAUTION Coupez l alimentation de tous les appareils avant d effectuer les raccordements Lisez les in...

Page 29: ...r l appareil B A Notes d application L appareil ne fournit pas de signal de sortie en multicanal partir de disques Super Audio CD aussi pour disposer d un son multicanal avec ces media vous devez vous...

Page 30: ...appareil Lorsque l appareil est sous tension l anneau autour du bouton s illumine CLOCK MODE Pour s lectionner une source word sync externe raccord e au connecteur WORD SYNC du panneau arri re capteur...

Page 31: ...configuration SETUP Utilisez cette touche pour entrer ou sortir du menu de configuration OPEN CLOSE Duplique les fonctions du bouton OPEN CLOSE sur la face avant CLEAR Pour effacer les erreurs de sai...

Page 32: ...que l appareil est en lecture cela peut prendre quelques secondes avant que le disque soit d charg puis que le tiroir s ouvre Nombre de plages sur le disque Dur e totale du disque Allumez l appareil e...

Page 33: ...emier digit des nombres sup rieurs 9 des pressions r p t es s affichent 1 2 3 etc et les touches individuelles 0 9 pour le second digit ou pour les num ros des plages un seul chiffre La lecture d marr...

Page 34: ...programm e en utilisant les touches SKIP num ro de la plage num ro d ordre dans la liste programm e La lecture programm e vous permet de lire 30 plages dans l ordre que vous d cidez Appuyez sur la to...

Page 35: ...le cycle REPEAT TRK r p tition de la plage REPEAT DSC r p tition du disque REPEAT OFF hors service Att nuation de la luminosit de l afficheur La luminosit de l affichage de l appareil principal peut...

Page 36: ...areil peut r pondre des signaux de synchronisation jusqu 176 4 kHz et change automatiquement selon le signal d entr e Mode horloge Lorsque Word ON est s lectionn appuyez sur le bouton CLOCK MODE plus...

Page 37: ...our naviguer dans les menus 3 Lorsqu une option marqu e d un est affich e utilisez les curseurs haut et bas pour changer le r glage et appuyez sur la touche ENTER pour confirmer l entr e 4 Sortez du m...

Page 38: ...Direct SP Size Distance L R m C m SR SL m SP Level L R Size C Size SR SL Size SW ON OFF LR dB C dB SR dB SL dB SW dB Test Start Test Tone option option option option option option option option optio...

Page 39: ...amplificateur AV pourvue sorties analogiques en utilisant le r glage son multicanal 5 1 c est inutile quand vous n utilisez pas des raccordements analogiques pour son multicanal Lorsque Direct est cho...

Page 40: ...ette distance L R Ainsi par exemple si la distance de la paire avant gauche droite est r gl e 5 0m la distance de la voie centrale doit tre comprise entre 3 3m 5 1 7 et 5m La distance que vous affecte...

Page 41: ...isque pr enregistr e En cas de pr sence de condensation sur l appareil laissez l appareil pendant une heure ou deux sous tension voir page 42 e Si une autre op ration est en cours attendez un moment p...

Page 42: ...rifiez que le r glage Digital Out est sur ON voir page 39 e Un Super Audio CD ne peut pas d livrer un signal num rique en sortie e Les contenus prot g s copy prohibit ne peuvent pas tre copi s en num...

Page 43: ...dio CD Rapport signal bruit S B 112 dB Super Audio CD 1 kHz Plage dynamique 106 dB Super Audio CD 1 kHz Distorsion harmonique totale 0 001 Super Audio CD 1 kHz 153mm 442mm 353mm 332mm Sortie audio num...

Page 44: ...it drei punktgelagerten Standf en Der X 01 besitzt eine stabile 5 mm starke st hlerne Grundplatte Sein gesamter Aufbau ist in drei logische Gruppen aufgeteilt so dass eine gegenseitige st rende Beeinf...

Page 45: ...igkeit 56 Analoger Audioausgang 56 ndern der Displayanzeige 57 Clock Modus 57 Einstellungen 58 Einstellungen Audio 60 Einstellungen f r die Lautsprechersysteme 60 Hilfe bei Funktionsst rungen 62 Techn...

Page 46: ...sondern immer am Stecker selbst Schlie en Sie stets die Disc Schublade um den Laser Pickup vor unn tiger Verschmutzung zu sch tzen Versuchen Sie bitte nicht den Laser Pickup manuell zu reinigen und b...

Page 47: ...se eines der folgenden Logos tragen und den entsprechenden Spezifikationen entsprechen Entnehmen einer CD Anfassen einer CD Legen Sie die CD stets mit der Labelseite nach oben in die CD Schublade Comp...

Page 48: ...Verst rker DigitalAudio Komponente DAT CD Recorder MD Deck usw Mitgeliefertes Netzkabel Netz Wandsteckdose ACHTUNG Bevor Sie die einzelnen Komponenten Ihrer HiFi Anlage miteinander verbinden schalten...

Page 49: ...ie bitte stets auf korrekten Anschluss des optischen Leiters Vermeiden Sie jedoch den Leiter gewaltsam anzustecken oder abzuziehen da hierbei der X 01 besch digt werden k nnte B A Word Sync Anschluss...

Page 50: ...er auf OFF gestellt ist d h die Ausr stung nicht in Betrieb ist verbraucht sie eine kleine Strommenge POWER Hiermit schalten Sie den X 01 ein und aus Bei eingeschaltetem Ger t leuchtet die Umrandung d...

Page 51: ...ten und ENTER Diese Tasten ben tigen Sie zum Navigieren und Best tigen Ihrer Einstellungen im Setupmodus SETUP Diese Taste dient zum Aufrufen und Verlassen des Setupmen s OPEN CLOSE button entspricht...

Page 52: ...aufene Batterien entnehmen und nach S ubern des Batteriefachs gegen frische auswechseln Batterien nicht erhitzen zerlegen oder verbrennen Hinweise zur Verwendung Richten Sie die Fernbedienung auf den...

Page 53: ...ichneten Titel Gesamtwiedergabedauer der Disc Schalten Sie den X 01 mittels POWER Taste an der Komponente ein 1 Die Umrandung der Taste und das Display leuchten Bet tigen Sie die OPEN CLOSE Taste 2 Di...

Page 54: ...gabe normale Geschwindigkeit Alternativ k nnen Sie auch die SKIP Tasten am X 01 verwenden Bet tigen Sie zum Starten der Suchlauffunktion oder zum ndern der Suchlaufgeschwindigkeit die SKIP Taste und h...

Page 55: ...befindlichen Disc vorhanden sind Mit anderen Worten wenn auf einer Disc sechs Titel aufgezeichnet sind k nnen Sie nicht einen Titel mit der Nummer 7 programmieren Bet tigen Sie zum Beenden der Progra...

Page 56: ...wahl von Multi ch Das Stoppen der Wiedergabe beendet die Wiedergabe wiederholungsfunktion Diese Funktion steht nicht bei allen Discs zur Verf gung Durch Bet tigen einer der folgenden Tasten wird die W...

Page 57: ...vom Eingangssignal werden entsprechende nderungen automatisch vorgenommen Modus 1 und Modus 2 Nach Auswahl von Word ON bet tigen Sie zur Auswahl von M1 Modus 1 oder M2 Modus 2 die CLOCK MODE Taste bi...

Page 58: ...ie Cursortasten 3 Verwenden Sie zum Einstellen der Werte von Men punkten die durch das Symbol markiert sind die Auf oder Abw rts Cursortasten Best tigen Sie Ihre Einstellungen durch Bet tigen der ENTE...

Page 59: ...alOut CD Direct SP Size Distance L R m C m SR SL m SP Level L R Size C Size SR SL Size SW ON OFF LR dB C dB SR dB SL dB SW dB Test Start Test Tone Option Option Option Option Option Option Option Opti...

Page 60: ...Einstellungen f r die Lautsprechersysteme werden ber cksichtigt Verwenden Sie die Lautsprechermen s wenn Sie am X 01 einen AV Verst rker Receiver ber die 5 1 Analogausg nge betreiben diese Einstellung...

Page 61: ...n f r die Entfernung der beiden vorderen Lautsprecherboxen zur H rposition ein Wert von 5 0m eingestellt wurde muss f r die Centerbox ein Wert zwischen 3 3m und 5m eingegeben werden Der f r das Surrou...

Page 62: ...Taste so dass alle Funktionen zur Verf gung stehen siehe Seite 58 Die Tonwiedergabe hat Aussetzer e Stellen Sie den X 01 auf einer ebenen stabilen Fl che auf Vermeiden Sie Vibrationen und Ersch tterun...

Page 63: ...udio CD Signal Rausch Abstand 112 dB Super Audio CD 1 kHz Dynamikbereich 1 kHz 106 dB Super Audio CD 1 kHz Gesamtklirrfaktor 1 kHz 0 001 Super Audio CD 1 kHz 153mm 442mm 353mm 332mm Audio Ausgang Digi...

Page 64: ...o jp TEAC AMERICA INC 7733 Telegraph Road Montebello California 90640 Phone 323 726 0303 TEAC CANADA LTD 5939 Wallace Street Mississauga Ontario L4Z 1Z8 Canada Phone 905 890 8008 TEAC MEXICO S A De C...

Reviews: