background image

audio/video

connecting wires

(accessories)

TV set

video input

Audio/R Audio/L

S -te rm inal

Y

Pb/Cb Pr/Cr

S-video

cable

Prog re ssi ve

or i n ter lac e
con n ecti o n

c abl e s

1

2

3

Video

S-video

Y

Pb/Cb Pr/Cr

Rear pan el conn ection termin al of DV5120HD

MIXOUT R

MIXOUT L

HD MI

HDMI

4

HDMI

VIDE O/ AUD IO

singna lCab le

Connecting To a TV Set

1.

1

2.

2

3.

3

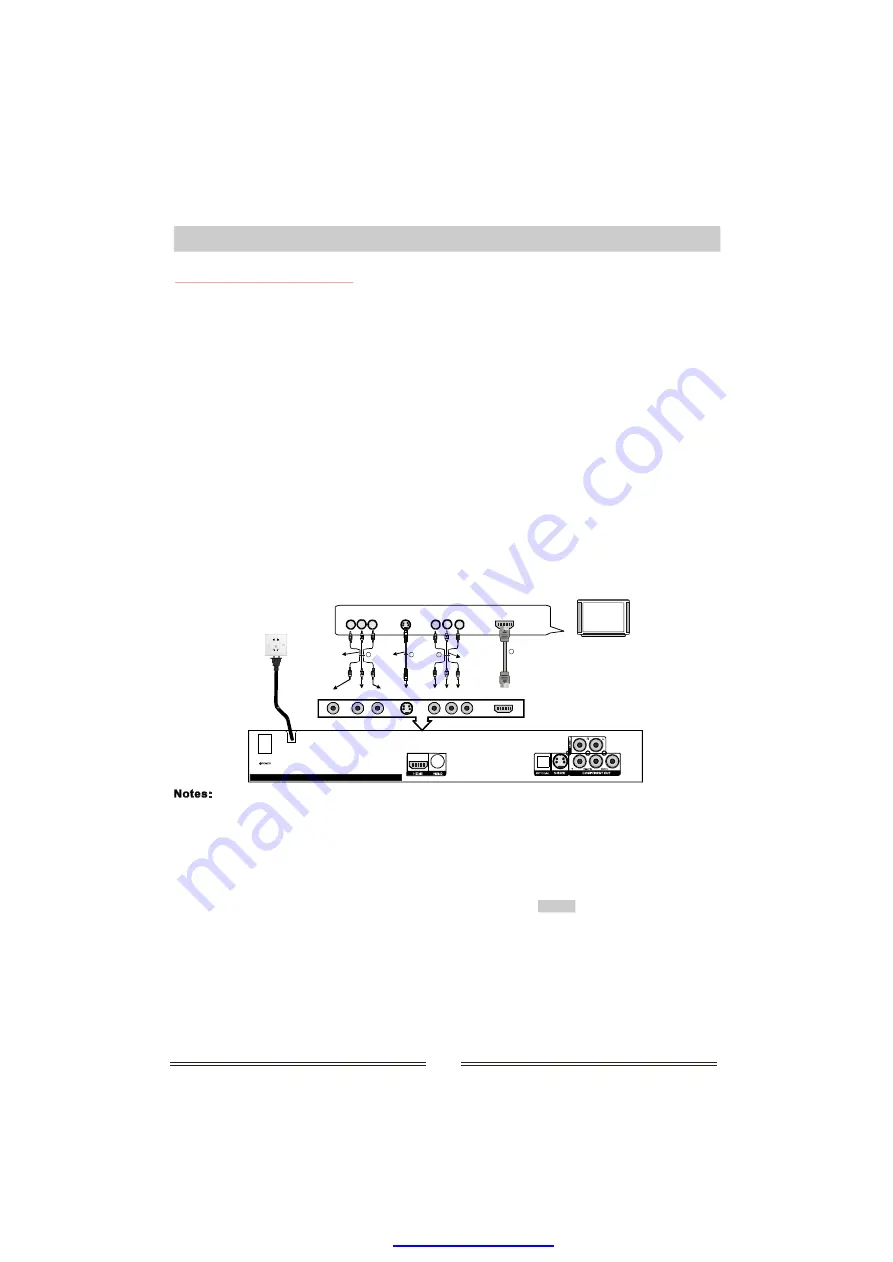
If your TV has an RCA (phono) input p anel, connect the unit to the TV set with the supplied audio/video

connecting lead. Set the TV to AV mode wh

nection is complete and confirmed correct. ( )

In the event that your TV has an S-VIDEO input socket, connect the DVD player with a S-VIDEO connecting lead

(optional). This will give a slightly bet

)

If your TV has a component video input panel (also known as colour difference input), connect the DVD

component output to

rresponding input sockets on your TV. The picture quality is better than S-VIDEO.

( ).

4. If your TV has a HDMI socket, you can connect

TV set via HDMI cable. Then set the TV set and the unit at

HDMI mode. This will give high definition picture quality. (4)

en the con

ter picture. (

the co

Progressive component (P-SCAN) can also be output through these sockets (please ensure when selecting

progressive mode that your TV supports this mode).

the

The connection options above describe

ethods of connection to the TV

1.C omposite vid eo connection with 2 cha nnel audio.
2.S-VIDEO con nection. This solution pro vides a bett er picture de finition. Aud io can be connected in t he

s ame way as option 1 with a pair of RCA (phono) leads connecte d to either th e TV or exte rnal amplifier.

3.Progressive

com ponent con nection. This connection provides

picture quality

S-VIDEO. Audio can be connecte d in the sam e way as op tion 1 with a pair of RCA (phono) leads

c onnected to either the TV or external amplifier.

4.H DMI connection. This pr ovides both a video and audio connection to the TV and the HDMI picture

d efinition is b etter than t hat of a

connection. Press

key on rem ote control to

s witch to HDM I mode dire ctly.

Bef ore making a ny connectio ns, ensure that both the player and th e TV are switched off;

Adjust the output of the player to suit th e system of your TV (P
Only select o ne connection option to avoid the TV mixing signals and reducing quality and interference;
D o not turn the unit on and off rapidly. Allow at least 10 seconds f or the system to boot up before turnin g

o ff again;

D o not connec t digital audio output sockets or optical fibre socke ts to the ana logue input o f any

a mplifier. It m ay damage i t;

D on't not conn ect Component Video Ou tput, S-Video terminal output, HDMI o utput to the TV at the

s ame time, or the quality o f the image would deterio rate.

VIDEO


4 m

an increase in

o ver

AL Standard TV // NTSC );

or normal

the component

System Connection

3

About HD connection

VIDEO

HDMI

HDMI mode

HDMI mode

SYSTEM SETUP

PCM

DIGITAL OUTPUT

AUDIO

SETUP PAGE
Note:

VIDEO input/output

OPEN/CLOSE

A. After connecting, Press

key on remote control to select

mode of the unit or to switch to

via SYSTEM SETUP (See

r details.

B. Please switch the TV set to

to get the standard picture at the same time.

C. Go to

and select

option in the

submenu under the

to get audio output.(See P13 for system setup details)

The video output mode of the DVD player

me as the TV set input mode, if not, the TV set will

no picture or the picture

If there

no picture, please use AV cable to connect

between TV set and DVD player via

socket, then press

key on remote

control to open the disc tray and press

key on remote control to switch the DVD player to VIDEO

mode, then set the TV set to AV mode to resume normal display.

VIDEO

P14)fo

must be the sa

have

is

Note: Pushing the VIDEO button repeatedly will cycle between all the video outputs. This button will only
operate when no disc is playing.

will be distorted

.

PDF created with pdfFactory Pro trial version 

www.pdffactory.com

Summary of Contents for DV-5120HD

Page 1: ...PDF created with pdfFactory Pro trial version www pdffactory com...

Page 2: ...PDF created with pdfFactory Pro trial version www pdffactory com...

Page 3: ...PDF created with pdfFactory Pro trial version www pdffactory com...

Page 4: ...n SS SL 12cm 8cm 74min 242min SS DL With Directory menu 484min DS DL With Directory menu With Directory menu 266min DS SL N A N A Playtimes refer to 12cm discs only NOTE DivX DVD R DVD RW CD R CD RW D...

Page 5: ...ture disc playback Fully compatible with regionDIVX MPEG4 DVD VCD MP3 WMA HDCD CD CD R DVD RW etc New wide ranging switch mode powersupply design ranging from 100V 240V Suitable foreverywhere tion dis...

Page 6: ...speed connections to download feature length movies from the Internet in less than the time it takes to watch them And DivX video technology powers a secure video on demand system thatalready boasts o...

Page 7: ...meras or scanned from photos using a scanner onto CD R disc because CD R s are a reliable long term storage solution of digital pictures This player can browse all discs recorded with JPEG pictures an...

Page 8: ...sion Never let foreign matters or liquid fall into the unit from any opening or gap for this might get in contact with dangerous high voltage or cause short circuit among parts inside which might caus...

Page 9: ...ckward slow motion Frame by frame play Track or chapter skip Repeat System setup menu Details for system setup Language Video Out Audio Misc How to handle protect and clear discs DVD Player Output Cop...

Page 10: ...out right audio output 8 Mix out left audio output 9 Front left audio output 10 Surround left audio output 11 Center audio output 1 Standby On 2 Disc tray 3 Remote sensor 4 Display screen Display scre...

Page 11: ...AA Alkaline batteries remote operating the amb please with new Remote Control Remote Control Play mode selection Stand by ON Repeat mode selection Disc playing information Picture zooming Select subt...

Page 12: ...a video and audio connection to the TV and the HDMI picture definition is better than that of a connection Press key on remote control to switch to HDMI mode directly Before making any connections ens...

Page 13: ...d channels a centre channel and a bass 0 1 channel 6 When setting the speakers the following is recommended for the optimal surround sound experience Use high performance loudspeakers Ensure menu sett...

Page 14: ...instructions that accompanied your amplifier in conjunction with this manual 4 Ensure that both the amplifier and the TV are switched off before commencing connection SYSTEM SETUP AUDIO DIGITAL OUTPUT...

Page 15: ...tomatic recover YES Yes YES No Select and press to confirm The creen will be YES ENTER following s shown Confirm again to use new setting Revert to original setting in 14 seconds YES Yes YES No Here y...

Page 16: ...playback ENTER Load a VCD e g VCD2 0 upon reading the disc you can play songs with the numeric If you want to select the 8th press e screen shows buttons th 8 To select song beyond the press button f...

Page 17: ...only applicable to discs recorded with scenes shot atdifferentangles 1 OFF When the picture is zoomed in use the arrow keys to shift and pan to display the part you want to view OSD On Screen Display...

Page 18: ...rect digit you can press ENTER ENTER NOTE 0 the the ocation or time continuously to clear it l Search Track Time Disc Time DVD VCD CD The DVD player can playback discs including CD R CD RW DVD R DVD R...

Page 19: ...G Preview Upon loading a disc the screen shows a window as follows The following pictur or reference only e is f Selection and Playing Use or arrows to select and pres s key to start playing PLAY When...

Page 20: ...ogram files that you had selected before Program View ENTER to lis Press to start Programmed playback PLAY Operating Instructions For Functions 0 45 01 03 04 05 06 07 Filter Repeat Off Mode Normal Jpe...

Page 21: ...TV screen will show interface as Normal 1 Use arrow ke move the cursor to target opti 2 Press ENTER key enter into your selection or confirm your selection SETUP configure the an shown at right opera...

Page 22: ...tion when the player is connected to a standard 4 3 aspect ratio TV set The full 16 9 wide screen source pictures will be shown on the screen but with black bars on the top and bottom this option when...

Page 23: ...ings must be set to Small F Test Tones In tray open or empty state can be used to check 5 1CH output It gives sound from individuals speakers to ensure connectio ns are OK the test tones G H Center Su...

Page 24: ...lways replace in the box after use Clean the disc by wiping it outwards from the centre gently with a clean soft lint free cloth Do not use alcohol detergent or other chemicals to clean the disc Do no...

Page 25: ...video input format for receiving the player s output signals Firmly insert the audio cable ends to the related terminals Plug the power cord into the power supply Firmly insert the video cable ends t...

Page 26: ...PDF created with pdfFactory Pro trial version www pdffactory com...

Reviews: