background image

TASCAM DR-100MKII

 43

6 – Playback

5   Use the wheel to select 

SELECT

, and press the ENTER/

MARK button.
The display returns to the Home Screen. The first file in 
the folder is selected, and the unit is stopped.
Regardless of the previous setting, the playback area 
is set to 

FOLDER

, and this folder becomes the playback 

area.

Selecting a folder for the playback 

area (2)

When the playback area is set to 

FOLDER

, if you select a file 

on the 

BROWSE

 Screen, the folder that contains the selected 

file becomes the playback area.
1   Press the MENU button to open the 

MENU

 screen.

2   Use the wheel to select 

BROWSE

, and press the ENTER/

MARK.

BROWSE

 screen appears.

3   Use the wheel to select a folder that contains the file 

you want to play.
For an explanation of how to use the 

BROWSE

 Screen, see 

“Screen navigation” on page 39.

4   Press the 

/

 button.

5   Use the wheel to select the desired file.
6   Press the ENTER/MARK button to open the following 

popup menu.

7  Use the wheel to select PLAY and press the ENTER/

MARK button to return to the Home Screen and start 

playback of the selected file. 
If the playback area is set to 

FOLDER

, the folder that 

contains this file becomes the playback area.

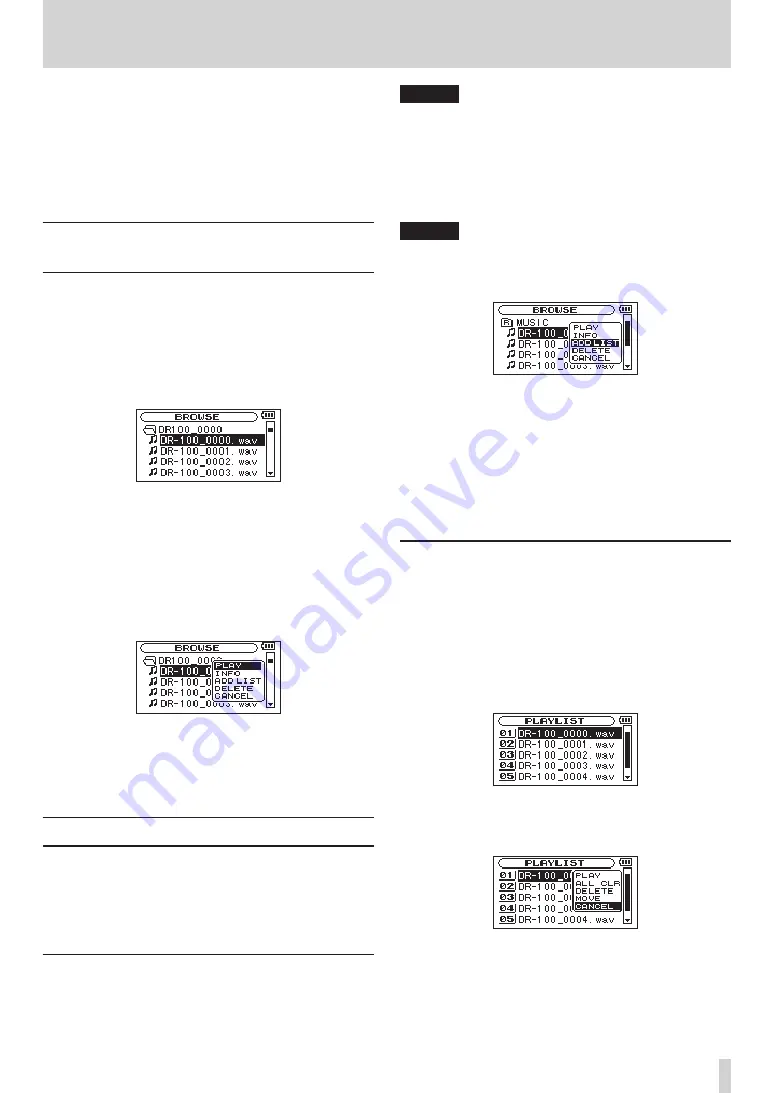
Playlist

You can make a list of files for playback (playlist). On the 

PLAY MODE

 Screen if you select 

PLAYLIST

 for the 

AREA

 item, 

you can set playback to just the files in your playlist.
If there are no files in the playlist, the 

No PLAYLIST

 popup 

message appears.

Adding files to the playlist

1  Press the MENU button to open the 

MENU

 screen. 

2  Use the wheel to select 

BROWSE

, and press the ENTER/

MARK button. 

BROWSE

 screen appears.

NOTE

For an explanation of how to use the 

BROWSE

 Screen, see 

“5 – Working with Files and Folders (BROWSE Screen)” on 
page 39.
3  Use the wheel to select the file you want to add to 

the playlist, and press the ENTER/MARK button.
A pop-up window appears.

NOTE

For details about how to select the file, see “Screen 
navigation” on page 39.
4  Use the wheel to select 

ADD


LIST

.

5   Press the ENTER/MARK button.

The file is added to the playlist and the popup window 
closes. 

6   Repeat steps 3, 4, and 5 as necessary to add more 

files to the playlist. The files are numbered in the 

order that they are added.
Tracks in the playlist are played back in the order that 
they were added.

Editing the playlist

You can view and edit the playlist you have made on the 

PLAYLIST

 screen.

You can also use this screen to play files and to edit the 
playlist.
1   Press the MENU button to open the 

MENU

 screen.

2   Use the wheel to select 

PLAYLIST

, and press the 

ENTER/MARK.

PLAYLIST

 screen appears.

3   Use the wheel to select the file you want to edit, and 

press ENTER/MARK.
A pop-up window appears.

4   Use the wheel to select the item, and press the 

ENTER/MARK button to cause the unit to work as 

follows.
PLAY
Play the selected file and return to the Home Screen. 

Summary of Contents for DR-100MKII

Page 1: ...D01160520A DR 100 Linear PCM Recorder OWNER S MANUAL ...

Page 2: ...ld be disposed of separately from the municipal waste stream via designated collection facilities appointed by the government or the local authorities b By disposing of the electrical and electronic equipment correctly you will help save valuable resources and prevent any potential negative effects on human health and the environment c Improper disposal of waste equipment can have serious effects ...

Page 3: ...ug this apparatus during lightning storms or when unused for long periods of time 14 Refer all servicing to qualified service personnel Servicing is required when the apparatus has been damaged in any way such as power supply cord or plug is damaged liquid has been spilled or objects have fallen into the apparatus the apparatus has been exposed to rain or moisture does not operate normally or has ...

Page 4: ...teries rupture or leak causing fire injury or stains around them When you store or dispose batteries isolate their terminals with insulation tape or something like that to prevent them from contacting other batteries or metallic objects When throwing used batteries away follow the disposal instructions indicated on the batteries and the local disposal laws Small children may mistakenly swallow a l...

Page 5: ...nitors and headphones 25 Mode selection 25 Setting the mode 25 Confirming the mode 25 Restrictions when using HS mode 26 4 Recording 27 Setting the mode 27 Selecting file format sampling frequency and maximum file size 27 Available recording time display 27 Setting where files are saved 28 Setting the analog input 28 Recording with the built in mics UNI OMNI 28 Recording with external mics XLR 28 ...

Page 6: ...puter 47 Disconnecting from a computer 47 Using the INFORMATION screens 48 File information page FILE 48 Card information page CARD 48 System information page SYSTEM 48 8 Settings and Information 48 Battery information page BATTERY 49 Operation settings SETUP 49 Search speed setting 49 Automatic power OFF setting 49 Automatic backlight OFF setting 49 Display contrast setting 49 Backlight brightnes...

Page 7: ... Turn on and various setting information will be displayed Press the button on the left side panel until the unit is turned on and then release it NOTE After purchasing the recorder the first time you turn the power ON the DATE TIMEscreen will open in order to enable it to accurately add date and time information to recorded files Press the or button to move the cursor highlighted portion and adju...

Page 8: ...ker on page 25 NOTE When headphones are connected sound will not be output from the speaker even if the SPEAKER switch is ON 9 Use the SP OUTPUT volume control to adjust the playback volume 10Press the STOP 8 button to stop playback NOTE If you have made several recordings use the or button to select the file to play when playing back or stopped and the Home Screen is displayed 11To turn the power...

Page 9: ... of pushing the RECORD 0 button Automatic track incrementing creates a new file and continues recording when a file size or input level set in advance is exceeded Track incrementing allows the creation of new files at any time during recording without pausing Tripod mounting hole built in Wireless remote control TASCAM RC 10 included with wired remote control adapter and cable USB cable soft case ...

Page 10: ... the United States and or other countries Apple Macintosh iMac Mac OS and Mac OS X are trademarks of Apple Inc Other company names product names and logos in this document are the trademarks or registered trademarks of their respective owners Any data including but not limited to information described herein are intended only as illustrations of such data and or information and not as the specific...

Page 11: ... directly exposed to rain or other water Hum might occur if a powered amplifier or other device with a large transformer is used near this unit If this should happen try increasing the distance between this unit and that device and changing their orientations Uneven colors might appear on televisions and noise might be heard from radios that are used near this unit If this should happen use the un...

Page 12: ...ready been set pressing this button will clear those points See Loop playback on page 45 0 QUICK button When the Home Screen is open and the recorder is stopped paused or playing back press this button to open the QUICK popup menu See Add identification tags to files QUICK TAG on page 40 and Delete the selected file QUICK DEL on page 41 q button Press this button to return to the beginning of a pl...

Page 13: ...automatic recording function and to enable it See Automatic recording AUTO REC on page 35 p RECORD 0 button indicator Press this button when stopped to start recording standby The recording indicator will blink when in standby Press this button when in recording standby to start recording The recording indicator will light when recording Press this button when recording to pause recording Front pa...

Page 14: ...age 47 NOTE Always connect the recorder directly to a computer Do not use a USB hub z DC IN 5V connector Connect a PS P520 AC adaptor or BP 6AA battery pack both sold separately x button Press and hold to turn the power ON and OFF Right side panel c REMOTE DIGITAL IN jack Connect the included TASCAM RC 10 wired remote control or a TASCAM RC 3F footswitch sold separately here You can use the remote...

Page 15: ...an power the unit See Using AA batteries on page 20 Remote control TASCAM RC 10 1 m button Press this button briefly to return to the start of a file If the playback position is already near the start of a track it will skip to the start of the previous file Press and hold this to search a track in reverse 2 STOP 8 button Press to stop playback and recording 3 RECORD 0 button Use to start recordin...

Page 16: ...s when a TASCAM PS P520 AC adaptor sold separately or TASCAM BP 6AA external battery pack sold separately is connected NOTE Sometimes a Battery Lowwarning appears when recording or conducting other demanding operations even when battery power remains 7 Recorder operation status This icon shows the recorder operation status Display Operation 8 Stopped 9 Paused 7 Playing back Fast forwarding m Fast ...

Page 17: ...ed remaining recording time This shows the elapsed time of the file being recorded or the remaining time hours minutes seconds according to the set maximum file size If the remaining time available on the SD card is less however that will be shown instead When in recording standby or recording press the HOME button to switch between the elapsed recording time and the remaining recording time When ...

Page 18: ...52 SETUP Make various settings 49 BATTERY Make settings related to the battery 50 DATE TIME Make date and time settings 23 Using menus In this example we show how to change the sampling frequency 1 Press the MENU button to open the MENUscreen 2 Use the wheel to select a menu item highlighted and press the ENTER MARK button to move to various settings screen REC SETTING selected 3 Use the wheel to ...

Page 19: ...he selection of a setting item or to answer YES to a confirmation message STOP button Use this to answer NO to a confirmation message button Use this to move the cursor the highlighted area to the right on the screen and to open folders on the BROWSE screen button Use this to move the cursor the highlighted area to the left on the screen and to close folders on the BROWSE screen Wheel Use to selec...

Page 20: ...included USB cable Charging takes about six hours See 7 Connecting with a Computer on page 47 NOTE Connect this unit to the computer directly Proper operation cannot be guaranteed when using a USB hub When connected by USB recharging occurs even if the unit s power is off When recharging through the USB port the unit will switch to USB connection mode so other functions cannot be used The CHARGE i...

Page 21: ...is recorder while the recorder still has batteries in it power will be provided by the external battery pack Preparing the remote control Installing the battery 1 Remove the battery holder While pressing 1 pull in direction 2 2 Install the coin shaped lithium ion battery CR2025 into the holder with the correct orientation 3 Reinsert the battery holder into the remote control NOTE At the time of pu...

Page 22: ...e to the REMOTE DIGITAL IN jack on the right side of the recorder Enable wired remote control use On the REMOTE D IGI INsetting screen enable use of the wired remote control 1 Press the MENU button to open the MENUscreen 2 Use the wheel to select REMOTE D IGI INand press the ENTER MARK button to open the REMOTE D IGI INsetting screen 3 Use the wheel to select FUNCTION and press the ENTER MARK or b...

Page 23: ...ways use the button to turn the unit power OFF When the power is ON do not remove the battery or batteries set as the MAIN battery or disconnect the PS P520 adaptor sold separately if no batteries are installed Doing so will cause all recordings settings and other data to be lost Lost data cannot be restored Battery settings You can set either the lithium ion battery or the AA batteries as the mai...

Page 24: ...ks into place Removing the card 1 Open the SD slot cover 2 Press the SD card in gently and then release it to allow it to come out CAUTION Do not remove the SD card from the unit when it is connected to a computer by USB NOTE SD cards that meet SD or SDHC standards can be used with this unit A list of SD cards that have been confirmed to work with this unit can be found on our website http tascam ...

Page 25: ...plifier and speakers Headphones Mode selection You can set the operation mode used for recording and playback Setting the mode 1 While pressing the ENTER MARK button press the button to turn the power ON and open the MODE SELECTscreen STD default Standard mode for using WAV files with sampling frequencies of 44 1 or 48 kHz and MP3 files HS Mode for using WAV files with sampling frequencies of 44 1...

Page 26: ...d adjustment and VSA functions cannot be used with 96 kHz WAV files The SPEEDicon on the Home Screen appears with an X in it to show this Function disabled indication When using loop playback with 96 kHz WAV files a gap will occur at the beginning of the loop When starting a new track and continuing recording without pause using 96 kHz WAV files each recorded file must be at least 4 seconds long 3...

Page 27: ... quality than MP3 files but they take up more space so MP3 formats allow for longer recordings 5 Press the button to show settings 6 Use the wheel to select SAMPLE and press the or ENTER MARK button Set the sampling frequency with the wheel to one of the following options STD mode options 44 1k default 48k HS mode options 44 1k default 48k 96k 7 Press the button to show settings 8 Use the wheel to...

Page 28: ...ou can also select the input of XLR MIC LINE 1 jack by changing the MIC LINE 1 switch on the front panel MIC Use this setting when connecting external mics to the recorder LINE 1 Use this setting when connecting line output jacks of external devices to the analog inputs of this recorder Recording with the built in mics UNI OMNI UNI MICS Set the INPUT switch on the top panel to UNI These mics are s...

Page 29: ...t the AC adaptor when using phantom power Doing so could damage this device Since using phantom power reduces the amount of time the unit can operate on battery power we recommend that you use a TASCAM PS P520AC adaptor sold separately or TASCAM BP 6AA external battery pack sold separately If alkaline batteries are used to supply phantom power some microphones will only be able to be used for a ve...

Page 30: ...on used on the mic inputs The default value is LMT See Using the level control function on page 32 When set to LMT limiter the input gain will be adjusted automatically according to the analog input level so that the recording level will not be distorted even if the input signal is very loud When set to AUTO auto gain control the gain is automatically adjusted to make the volume as even as possibl...

Page 31: ...in to enable it to record even very quiet sounds For this reason if using an AC adaptor when the MIC GAIN is set to H HIGH touching the mics could cause noise hum or modulation to be heard depending on placement conditions To avoid this do not touch the built in mics when recording with them When the input is set to LINE 1 2 the MIC GAIN setting is disabled 2 Press the RECORD 0 button to start rec...

Page 32: ...n control the input gain is adjusted automatically so the INPUT volume control has no effect When the input is LINE 1 2 regardless of the setting it will always function as LMT limiter Recording The following explanation assumes that you have already set the input source and adjusted the analog input level and that the Home Screen is open 1 Press the RECORD 0 button to put the unit in recording st...

Page 33: ...ge 37 Dividing a file manually DIVIDE You can split a recorded file into two files at any position you like This is convenient for splitting a continuous recording into multiple files 1 Select a file to be divided using the or button or the BROWSEscreen 2 Press the MENU button to open the MENUscreen 3 Use the wheel to select D IVIDEmenu item 4 Press the ENTER MARK button to open the D IVIDE screen...

Page 34: ...press the HOME button to return to the Home Screen TIP In addition to overdubbing you can also use this setting above to practice singing or playing along with recorded or imported audio files You can even use it for karaoke NOTE You cannot change this setting during recording or when in recording standby Adjusting the input and playback sound levels 1 Press the PLAY PAUSE y 9 button to start play...

Page 35: ...T LEVEL Signal is judged to have been input when it exceeds this level Options are OFF 6dB 12dB default 24dBand 48dB END LEVEL Signal is judged to have stopped when it becomes less than this level Options are OFF 6dB 12dB 24dB default and 48dB END DELAY Time until the signal is determined to have stopped The setting range is 1sec 5sec default 5sec NOTE If you press the AUTO button when recording o...

Page 36: ...m 4 Set the value of the END LEVELitem 5 Press the HOME button to return to the Home Screen 6 Press the RECORD 0 button while holding down the AUTO button to put the unit into recording standby Recording starts automatically when the input signal exceeds the START LEVELvalue 7 Press the STOP 8 button to stop automatic recording NOTE You can also create new files manually See Creating new files man...

Page 37: ...the wheel to select the PRE REC item and press the or ENTER MARK button 4 Use the wheel to set the PRE RECitem to ON TIP By using this in combination with the auto record function you can record events without losing the beginnings of sounds NOTE If the amount of time in record standby is less than two seconds the sound for that amount of time is recorded You cannot use the PRE REC function with o...

Page 38: ...7 42 96 kHz 0 28 0 57 1 55 3 51 MP3 32 kbps 44 1 kHz 48 kHz 69 25 138 51 277 11 554 58 64 kbps 44 1 kHz 48 kHz 34 42 69 25 138 35 277 29 96 kbps 44 1 kHz 48 kHz 23 08 46 17 92 23 184 59 128 kbps 44 1 kHz 48 kHz 17 21 34 42 69 17 138 44 192 kbps 44 1 kHz 48 kHz 11 34 23 08 46 11 92 29 256 kbps 44 1 kHz 48 kHz 8 40 17 21 34 38 69 22 320 kbps 44 1 kHz 48 kHz 6 56 13 53 27 43 55 29 The recording times...

Page 39: ...cture When a file or folder is selected press the ENTER MARK button to open the pop up window When a file is selected highlighted if you press the button the file will be loaded and the Home Screen will reopen This folder that contains this file becomes the current folder and new recorded file will be saved in this folder If the playback area has been set to FOLDER this folder becomes the new play...

Page 40: ...to confirm that you want to delete all the files in the selected folder at once Press the ENTER MARK button to erase the files or press the STOP 8 button to cancel NOTE You cannot erase read only files and files that are not recognized by this unit CANCEL The operation for the selected file is canceled and the pop up menu is closed Add identification tags to files QUICK TAG You can easily add symb...

Page 41: ...en the Home Screen is open press the QUICK button to open a popup menu 2 Select DELfrom the menu and press the ENTER MARK button The QUICK DELETEscreen appears 3 Press the ENTER MARK button to delete the file or press the STOP 8 button to cancel deletion 5 Working with Files and Folders BROWSE Screen ...

Page 42: ... the MENU button to open the MENUScreen 2 Use the wheel to select PLAY MODEand press the ENTER MARK The PLAY MODEscreen appears 3 Use the wheel to select AREA and press the or ENTER MARK button 4 Use the wheel to set the playback area ALL FILES Set the playback area as all files in the Music Folder on the SD card FOLDER default Set the playback area as all the files in the currently selected folde...

Page 43: ...et playback to just the files in your playlist If there are no files in the playlist the No PLAYLISTpopup message appears Adding files to the playlist 1 Press the MENU button to open the MENUscreen 2 Use the wheel to select BROWSE and press the ENTER MARK button BROWSEscreen appears NOTE For an explanation of how to use the BROWSEScreen see 5 Working with Files and Folders BROWSE Screen on page 39...

Page 44: ...l skip to the beginning of the previous file If you press the button when located at the beginning of or middle of a file the playback position will skip to the beginning of the next file NOTE Only files in the playback area that is currently set can be selected for playback The track name file number and other file information for the currently playing file appear on the display The 8 icon appear...

Page 45: ...ction you can continuously repeat loop the playback of a selection that you make 1 During playback or when paused press the I O LOOP button at the point where you want to start the loop playback interval The current playback position will be set as the starting IN point 2 Press the I O LOOP button at the point where you want to end the loop playback interval The current playback position will be s...

Page 46: ...ng of playback speed can be changed The VSA setting will not work with 96kHz files but if you return to the Home Screen and use the and buttons for example to load a 44 1 48 kHz file the playback speed setting will become effective Changing playback speed Use the SPEEDitem to set the playback speed Just setting the speed however does not enable the speed control function After making the setting p...

Page 47: ...Save Data appears on the screen Transferring files to a computer 1 Click the DR 100MK2 drive on the computer screen to show the MUSIC and UTILITY folders 2 Open the MUSIC folder and drag and drop the files that you want to transfer to the computer to destinations of your choice Transferring files from a computer 1 Click the DR 100MK2 drive on the computer screen to show the MUSIC and UTILITY folde...

Page 48: ...ile type For WAV files bit length stereo mono and sampling frequency Hz also appear For MP3 files the bit rate kbps CBR constant bit rate or VBR variable bit rate type and sampling frequency Hz also appear TITLE Shows the file name If an MP3 file has ID3 tag title information that information appears DATE Date of file creation SIZE File size Card information page CARD The CARDpage shows the status...

Page 49: ...es to open the SETUPscreen 1 Press the MENU button to open the MENUscreen 2 Use the wheel to select the SETUPmenu and press the ENTER MARK button to open the SETUPmenu screen Use the items on the SETUPscreen to make the following settings Use the and buttons and the wheel to set each item Search speed setting CUE REV SPDsets the forward and backward search speed used when you press and hold the bu...

Page 50: ...talled you can set one as a main power source and the other as a backup Usually the unit uses the main power source When the remaining power of the main battery source becomes low the unit automatically switches to the backup allowing continued operation The battery source currently used and the amount of remaining power it has are shown on the Home Screen 1 Press the MENU button to open the MENUs...

Page 51: ...ct BATTERY and press the ENTER MARK button BATTERYscreen appears 3 Use the AA TYPEitem to set the AA battery type to be used Options ALKALI Alkaline batteries default Ni MH Nickel metal hydride batteries Setting the file name format You can set the format of the names given to files when recorded by this unit 1 Press the MENU button to open the MENUscreen 2 Use the wheel to select FILE NAME and pr...

Page 52: ...the ENTER MARK or button 6 Use the wheel to change the MODEitem Options PLAY default RECORD1 RECORD2 MINUTES MODE FOOT SW L C R PLAY REW PLAY STOP FWD RECORD 1 STOP REC PAUSE INC RECORD 2 STOP REC PAUSE MARK MINUTES REW PLAY STOP SPEED CHANGE 7 Press the STOP 8 button to return to the Home Screen Using the footswitch Press a pedal on the footswitch to operate the unit The function of each pedal co...

Page 53: ...53 9 Using the REMOTE DIGITAL IN jack NOTE If FUNCTIONis set to D IGI INon the REMOTE D IGI IN setting screen moving the INPUT switch on the top panel will not change the input and the following popup message will appear ...

Page 54: ...AT formatting erases all data currently on the card Format Error Format CARD The FAT formatting of the card is abnormal or broken This message also appears if you FAT formatted the card using a computer connected by USB and if a new card is inserted in the unit Always use the DR 100MKII to conduct FAT formatting of cards to be used with it Change the card or press the ENTER MARK button when this m...

Page 55: ...nd the external digital audio equipment are matched Press the STOP 8 button to close this message When this error occurs the input from the REMOTE DIGITAL IN jack cannot be used but recording is possible If this message appears during recording noise might occur in the recording Not Continued If one of these errors occurs turn the unit s power OFF and then ON again If you are unable to turn the po...

Page 56: ...rted by this unit If you are trying to play an MP3 file confirm that its bit rate and sampling frequency are supported by this unit See Selecting file format sampling frequency and maximum file size on page 27 No sound is output 8 8 Are headphones connected Is the SPEAKER switch OFF Check the connections with the monitoring system Is the volume of the monitoring system minimized Is the OUTPUT LEVE...

Page 57: ...Maximum output level 6 dBV Others Nominal output level 10 dBV Maximum output level 6 dBV jack Connector 1 8 3 5 mm stereo mini jack Maximum output 25 mW 25 mW with 32Ω headphone connection Built in speaker Output 0 4 W mono Digital audio input ratings DIGITAL IN jack Connector 3 32 2 5 mm TRS jack using the conversion cable made for this unit Format IEC60958 3 S PDIF Control input output ratings U...

Page 58: ...r Playback MP3 44 1 kHz 128 kbps About 4 hours Headphones 32Ω Playback MP3 44 1 kHz 128 kbps About 4 hours Built in speaker Recording WAV 44 1 kHz 16 bit About 4 hours Built in mics UNI OMNI Recording MP3 44 1 kHz 128 kbps About 4 hours Built in mics UNI OMNI JEITA Recording Playback Alkaline batteries EVOLTA Format Continuous operation time Note Playback WAV 44 1 kHz 16 bit About 2 hours 45 minut...

Page 59: ...TASCAM DR 100MKII 59 Notes ...

Page 60: ... Phone 1905 890 8008 Facsimile 1905 890 9888 http tascam com 5939 Wallace Street Mississauga Ontario L4Z 1Z8 Canada TEAC MEXICO S A de C V Phone 52 55 5010 6000 http www teacmexico net Río Churubusco 364 Colonia Del Carmen Delegación Coyoacán CP 04100 México DF México TEAC UK LIMITED Phone 44 8451 302511 http www tascam co uk Suites 19 20 Building 6 Croxley Green Business Park Hatters Lane Watford...

Reviews: