background image

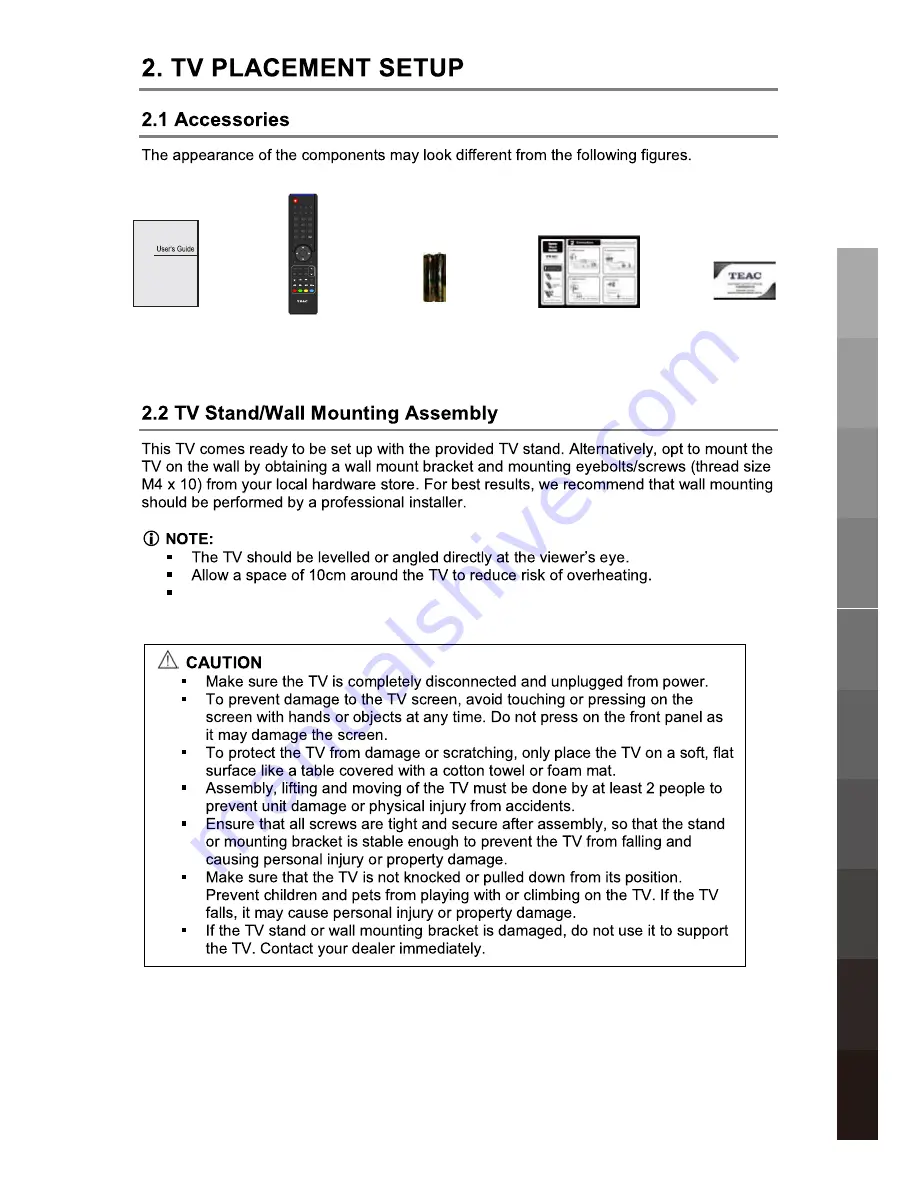
User’s Guide

2 x AAA Battery

Contact Card

Quick Start Guide

Initial Setup & 

 5

Remote Control

1

2

3

4

5

6

7

8

9

0

OK

CH.FAV

AUDIO

MUTE

DTV/USB

INPUT

PICTURE

SOUND

ASPECT

SLEEP

EXIT

DISPLAY

CH

CH

VOL

VOL

HOLD

D.MENU

D.TITLE

VOL

TV/TXT

CANCEL

REVEAL

REPEAT

D.SETUP

SUBTITLE

A-B

GOTO

SIZE

SUBPAGE

INDEX

DELETE

REC.LIST

SCH.LIST

SCREEN

MENU

EPG

0118020315

Parts & Connections

USB

Multimedia

 Playback

TV Placement 

  Setup

Initial Setup & 

  Input Sources

Remote Control

On-Screen Display

TV & Electronic 

Programme

Guide

Digital Video 

Recording (DVR)

 (OSD) Menu

Reference

DVD Operation

Do not force the TV to turn as this will damage the stand.

Summary of Contents for DLEDV3989FHD

Page 1: ...USER MANUAL WARRANTY INFORMATION INSIDE PLEASE READ www teac com au IMPORTANT DLEDV3989FHD LED TV Trademark of TEAC Corporation JAPAN ...

Page 2: ...your own records Owner s Name Owner s Address Postcode Model Name No Serial No Dealer s Name Dealer s Address Postcode Authorised Service Centres in Major Australian Cities NSW 151 Arthur Street Homebush West NSW 2140 Queensland Unit 1 320 Curtin Ave West Eagle Farm QLD 4009 Western Australia Unit 2 50 Pilbara Street Welshpool WA 6106 South Australia 11 McInnes Street Ridleyton SA 5008 Victoria 28...

Page 3: ...will be available for collection by or return to the purchaser at a fee upon request TEAC in home service can be made available at a fee upon request Carry in Service 6 A 12 month replacement warranty is applicable to all Accessories such as Remote Power Adaptors and Cables 7 TEAC will ensure to the best of its abilities that all required parts are made available for any required service repair 8 ...

Page 4: ...5 2 Battery Installation 6 On Screen Display OSD Menu 6 1 OSD Menu Overview 6 2 Menu Map 7 TV Electronic Programme Guide 7 1 ATV DTV Mode 7 2 Electronic Programme Guide EPG 7 3 Channel Customisation 7 4 Channel List and Favourite List 7 5 Password Lock for Channels and Programmes 8 Digital Video Recording DVR 8 1 Setting up for USB Recording 8 2 Instant Recording 8 3 Time Shift Pause Live TV 8 4 S...

Page 5: ...g fully into the outlet fire or electric shock the outlet to overheat and start a fire loose or improperly inserted power plug may result in fire electric shock fire or electric shock When disconnecting the power cord from an outlet always grasp it by the plug can damage the internal wire and may result in a fire cleaning fire or electric shock 1 Safety Precautions Parts Connections USB Multimedia...

Page 6: ...with a contact area smaller than the bottom surface of the unit stand can prevent accidents from happening Ignoring this precaution may result in the unit toppling over and causing injury Install the antenna away from high voltage power lines and communication cables Make sure it is installed securely contact with the antenna may result in fire electric shock or serious injury Install the unit at ...

Page 7: ...c shock When removing the batteries from the remote control make sure children do not swallow them Keep the batteries out of the reach of infants and children I D FKLOG KDV VZDOORZHG D battery seek medical attention immediately 2 127 LQVHUW DQ PHWDO objects such as a screwdriver paper clip or a bent wire into the ventilation openings or A V terminals RLQJ VR SRVHV D VHULRXV ULVN of fire or electri...

Page 8: ...ions Parts Connections USB Multimedia Playback TV Placement Setup Initial Setup Input Sources Remote Control On Screen Display TV Electronic Programme Guide Digital Video Recording DVR OSD Menu Reference DVD Operation ...

Page 9: ...NU D TITLE VOL TV TXT CANCEL REVEAL REPEAT D SETUP SUBTITLE A B GOTO SIZE SUBPAGE INDEX DELETE REC LIST SCH LIST SCREEN MENU EPG 0118020315 Parts Connections USB Multimedia Playback TV Placement Setup Initial Setup Input Sources Remote Control On Screen Display TV Electronic Programme Guide Digital Video Recording DVR OSD Menu Reference DVD Operation Do not force the TV to turn as this will damage...

Page 10: ...s and strong cord not provided An example on fixing the TV to a table is shown below 1 Install a wood screw or eyebolt into the table that is supporting the TV 2 Fix a machine screw into a screw hole near the base in the back of the TV Alternatively secure the TV to the wall directly behind it by fixing eyebolts to the wall and tying them to screws fixed on the centre of the TV back panel 3 Tie th...

Page 11: ... soft surface 4 Remove the attached leg at the bottom of the TV by removing the 5 screws on the leg cover 5 Refit the cover securely by replacing the 5 screws into their original positions 6 Fasten 4 eyebolts panel according to the diagram 7 Fasten the wall mounting bracket using screws onto the wall 8 Connect the eyebolts and the wall bracket securely with strong rope 9 Carefully check that all f...

Page 12: ...H Scan through channels VOL Adjust the volume POWER Turn on standby the TV set Parts Connections USB Multimedia Playback Initial Setup Input Sources Remote Control On Screen Display TV Electronic Programme Guide Digital Video Recording DVR OSD Menu Reference DVD Operation ...

Page 13: ... Connect to the PC VGA output to display PC graphics RF Connect to antenna or cable source COAX Digital output to AV receiver USB Connect to a USB storage device for DVR Recording and USB Multimedia Playback Video Connect to the composite video output of external devices Audio L R In Audio signal input for AV shared with YPbPr Parts Connections USB Multimedia Playback Initial Setup Input Sources R...

Page 14: ...Select Quit OK EXIT AV YPbPr 10 OK DVD OK OK USB Multimedia Playback Initial Setup Input Sources Remote Control On Screen Display TV Electronic Programme Guide Digital Video Recording DVR OSD Menu Reference DVD Operation ...

Page 15: ...PUT PICTURE SOUND ASPECT SLEEP EXIT DISPLAY CH CH VOL VOL HOLD D MENU D TITLE VOL TV TXT CANCEL REVEAL REPEAT D SETUP SUBTITLE A B GOTO SIZE SUBPAGE INDEX DELETE REC LIST SCH LIST SCREEN MENU EPG 0118020315 POWER Switch the TV on or off Standby mode DTV USB Switch to DTV USB Mode INPUT Access the Input Source Menu PICTURE Cycle through preset picture profiles SOUND Cycle through preset sound profi...

Page 16: ...in DTV Mode REPEAT Toggle Repeat options in USB Mode Stop playback Fast Rewind Fast Forward up to 16x D MENU Function not available with this model D TITLE Function not available with this model No function for this model Play Pause playback or toggle DTV Time Shift Previous next chapter track Teletext operation Teletext is an information system broadcasted by certain channels providing news weath...

Page 17: ...LOCK Submenu Channel menu for example Hint you should operate the OSD menu according to the hint Channel Edit OK OK USB Multimedia Playback On Screen Display TV Electronic Programme Guide Digital Video Recording DVR OSD Menu Reference DVD Operation ...

Page 18: ...atible USB Disk Show if the selected USB storage device is compatible Format Format the selected USB storage device Time Shift Size Available data storage space for Time Shift recording USB Speed Shows the speed of the selected USB storage device PICTURE Picture Mode for manual customisation Contrast Adjust picture contrast Brightness Adjust picture brightness Colour Adjust picture colour Sharpnes...

Page 19: ...15 Enable Locks System Info Display detailed information or controls USB Multimedia Playback On Screen Display TV Electronic Programme Guide Digital Video Recording DVR OSD Menu Reference DVD Operation ...

Page 20: ...16 OK OK OK OK OK OK USB Multimedia Playback TV Electronic Programme Guide Digital Video Recording DVR Reference DVD Operation ...

Page 21: ...17 7 3 Channel Customisation 1 2 3 4 5 OK OK USB Multimedia Playback TV Electronic Programme Guide Digital Video Recording DVR Reference DVD Operation ...

Page 22: ...18 OK CH FAV CH FAV CH FAV CH FAV USB Multimedia Playback TV Electronic Programme Guide Digital Video Recording DVR Reference DVD Operation ...

Page 23: ...19 Enable Locks Block Channel OK OK USB Multimedia Playback TV Electronic Programme Guide Digital Video Recording DVR Reference DVD Operation ...

Page 24: ...20 USB Multimedia Playback TV Electronic Programme Guide Digital Video Recording DVR Reference DVD Operation ...

Page 25: ...21 OK USB Multimedia Playback Digital Video Recording DVR Reference DVD Operation ...

Page 26: ...22 OK OK USB Multimedia Playback Digital Video Recording DVR Reference DVD Operation ...

Page 27: ...23 OK USB Multimedia Playback Digital Video Recording DVR Reference DVD Operation ...

Page 28: ...The current state of the program The current time The name and number of the program The process of the program A B mark 24 OK USB Multimedia Playback Digital Video Recording DVR Reference DVD Operation ...

Page 29: ...n on screen control bar 5 Press to start playing the selected file NOTE If playback is stopped the track position is remembered and playback will resume from there If the recorded programme is locked because of parental control settings key in the correct password to view it Deleting Recorded Files 1 Press to view the Recorded File List then use to select a file 2 Press to delete a file OK USB Mul...

Page 30: ...26 9 Return to device list Up Folder Preview Information 9 OK OK OK USB Multimedia Playback Reference DVD Operation ...

Page 31: ...27 OK OK OK OK OK USB Multimedia Playback Reference DVD Operation ...

Page 32: ...28 OK OK OK OK OK USB Multimedia Playback Reference DVD Operation ...

Page 33: ...29 NOTE If playback is stopped the track position is remembered and playback will resume from there OK OK OK OK OK OK USB Multimedia Playback Reference DVD Operation ...

Page 34: ...ay vary as to how the disc was authored and what features are included Some discs have an autoplay function Some offer different modes such as Menu Play Sequence Play and other modes as illustrated below Menu Play 1 Compatible with DVD SVCD or VCD2 0 2 If the disc is a DVD a ROOT MENU will appear on the screen If it is SVCD or VCD 2 0 please press the Menu button to see the menu 3 When a DVD disc ...

Page 35: ...electing Tracks Compatible with DVD SVCD VCD CD HD CD WMA Digital Audio disc JPEG discs 1 When playing a DVD disc press the numeric buttons on the menu or title page to select tracks During DVD playback you can input desired title numbers directly 2 During sequence playback of a SVCD or VCD disk press the numeric buttons to select tracks During Program Playback and when the playback control PBC is...

Page 36: ...ton five times it would resume normal play 2 During DVD playback normal play resumes when Fast Forward reaches the beginning of the next title chapter During SVCD or VCD play with PBC on when Fast Forward reaches the beginning of the next track it resumes normal play Freeze Frame Compatible with DVD SVCD VCD CD HD CD WMA Digital Audio disc JPEG discs During CD HD CD WMA or Digital Audio disc JPEG ...

Page 37: ... Chapter Chapter being played Total number of chapter Time Title elapsed time Disc Type Title Title being played Total number of titles Chapter Chapter being played Total number of chapter Time Countdown of total time SVCD Display feature When the DISPLAY button is pressed repeatedly while a SVCD is being played the response will show as follows Disc Type Track Track being played total tracks Mute...

Page 38: ...CD VCD CD HD CD WMA Digital Audio disc JPEG discs This function varies in its purpose for different disc types Press the AUDIO button to display the current Soundtrack being played Audio Selection for SVCD or VCD There are five audio selections available Stereo L R L L R R L L Auto A D Detect and R R Auto A D Detect With each consecutive press of the button the audio selection cycles through these...

Page 39: ...ve surface Hold the disc at the edges with your fingers and gently place the disc into the slot The player will automatically draw the disc into the player To eject the disc press the EJECT button on the TV or the EJECT button on the remote control Insert a disc with the label facing the correct direction according to the picture next to the disc slot Audio 10 DVD Operation 35 Reference DVD Operat...

Page 40: ...ion can memorize where disc playback was stopped and resume from there when the same disc is inserted again This function can memorize up to 4 discs and is dependent on the disc content Select On to enable the function and Off to turn it off 10 DVD Operation 36 Reference DVD Operation ...

Page 41: ...up option then press OK Select to downmix multichannel audio soundtracks to LT RT channel output Select to downmix multichannel audio soundtracks to stereo output Dual Mono 10 DVD Operation 37 Reference DVD Operation ...

Page 42: ...channel audio soundtracks to stereo output Choose a preferred language track to be played if it is available on the disc If it is not available the default language will be played TV Type 10 DVD Operation 38 Reference DVD Operation ...

Page 43: ...s available on the disc If it is not available the default language will be used Choose a preferred menu language to be used if it is available on the disc If it is not available the default language will be used 10 DVD Operation 39 Reference DVD Operation ...

Page 44: ...disc rating 10 DVD Operation 40 Reference DVD Operation ...

Page 45: ...Reset the DVD settings to the original factory settings by choosing RESET and pressing the OK button 10 DVD Operation 41 Reference DVD Operation ...

Page 46: ...42 11 11 Reference ...

Page 47: ...r formats Dimensions Weight Wall mounting dimensions Wall mounting screw size Operating temperature range Power Consumption 39 1 1 1 1 1 3 The HDMI support 1 3 the HDCP support 1 1 1 1 1 2 12W 75 ohm USB2 0 0 40 C DVR Recording FAT32 USB Multimedia Playback FAT32 and NTFS Maximum hard disk partition size 400GB 100W 100 240V 50 60Hz 0 4W WUXGA Maximum supported resolution 1360X768 60Hz 200x100mm M5...

Page 48: ...44 Reference 11 1920x1080 ...

Page 49: ...rives CD DVD Drives and other devices connected via USB cannot be used This unit cannot copy or move files Playable formats FAT12 FAT16 FAT32 Depending on the condition of the USB flash drive this unit might not be able to play the files on it or skipping might occur NTFS HFS and HFS formats are not supported and cannot be used Max number of playable folders 200 Max number of playable files 999 If...

Page 50: ... 7 86720 5 6833257 27 1 7 6 HWZHHQ 0RQGD WR ULGD 67 0 WR 30 ...

Reviews: