


– 5 –
0
e
y
q
0
w
r
t
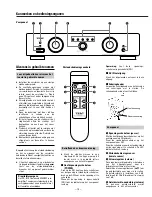
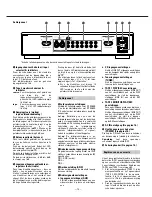
Rear Panel
0
Speaker Terminals
Connect left loudspeaker to "SPEAKER L",
and right loudspeaker to "SPEAKER R".
Be sure that the loudspeakers are
connected in phase.
Caution:
Short-circuiting of either of the
loudspeaker terminals to the cabinet,
ground or signal cables can damage the
amplifier. Short-circuit between the
loudspeaker terminals will blow the fuses.
Always turn off the amplifier when
connecting or disconnecting loudspeaker
cables or signal cables.
Caution:
The loudspeaker output is
balanced. Do not connect any equipment
with unbalanced input (e.g. spectrum
analyzers and some electrostatic
loudspeakers).
q
Balanced Input Connector
The balanced input is connected with XLR
plugs in accordance with IEC
specifications.
PIN 1: GND
PIN 2: +
PIN 3: –
w
GND Terminal
Connect the ground lead of the turntable to
this terminal.
e
Audio Signal Jacks
●
AUX Input Jacks
Connect the audio output jacks of the
VCR to these jacks.
●
CD Input Jacks
Connect the output (LINE OUT) jacks of
the CD player to these jacks.
●
TUNER Input Jacks
Connect the output jacks of the tuner to
these jacks.
●
TAPE 1 PLAY/REC Jacks
Connect the output (LINE OUT) jacks of
the tape deck to the PLAY jacks and
connect the input (LINE IN) jacks of the
deck to the REC jacks.
●
TAPE 2 MONITOR PLAY/REC Jacks
These jacks are used for connection of a
second tape deck. Connect the output
(LINE OUT) jacks of the tape deck to the
PLAY jacks and connect the input (LINE
IN) jacks of the deck to the REC jacks.
r
AC IN Socket (See page 3.)
t
Main POWER Switch (See page 3.)
Press the ON side of this rocker (seesaw)
switch to turn power ON (standby position).
Note:
Leave this main power switch ON at
all times.
y
Fuse Holder (See page 3.)
Tape Dubbing
You can dub from the deck connected to
TAPE 1 jacks to the deck connected to TAPE
2 jacks. Dubbing from TAPE 2 deck to TAPE
1 deck is not possible.
1. Set the playback deck (TAPE 1) to the
playback mode, and the recording deck
(TAPE 2 MONITOR) to the record mode.
Adjust recording level accordingly.
(Refer to the owner's manuals of the
decks.)
2. Set the input selector to the tape 1
position and set the tape 2 monitor
switch to source.
Specifications
Continuous Power Output (RMS):
100W + 100W
(20 - 20,000 Hz, 8 ohms)
160W + 160W
(20 - 20,000 Hz, 4 ohms)
Dynamic Power Output (EIA):
120W + 120W (8 ohms)
220W + 220W (4 ohms)
Total Harmonic Distortion
:
(Continuous rated output power)
0.04% (20 - 20,000 Hz, – 6dB, 8 ohms)
0.06% (20 - 20,000 Hz, – 6dB, 4 ohms)
Input Sensitivity/Impedance:
CD, TUNER, AUX, TAPE;
300 mV/ 20 k ohms
BALANCED (XLR); 600mV/10 k ohms
Output Level/Impedance:
TAPE 1, TAPE 2; 300 mV/100 ohms
Signal-to-Noise Ratio (IHF-A):
CD, TUNER, AUX, TAPE; 104 dBA
Frequency Response:
CD, TUNER, AUX, TAPE, BALANCED;
20 - 20,000 Hz, +0 /– 0.8 dB
Power Requirements/Power Consumption:
120 V AC, 60 Hz, 5 A (U.S.A./Canada
Model/General Export Model)
220 V AC, 50/60 Hz, 500 W (Korea)
230 V AC, 50 Hz, 500 W (Europe/ UK /
General Export Model)
Dimensions (W x H x D):
442 x 103 x 383 mm
Weight (net):
12.0 kg
Standard Accessories:
Remote Control Unit (RC-685) x 1,
AC cord x 1
Improvements may result in features and
specifications being changed without
notice.
Rear Panel
*
Turn off all components before making connections.


