TDS VSi Series Maintenance Manual Download Page 25


VSi,VS,RF Series  Maintenance Guide 


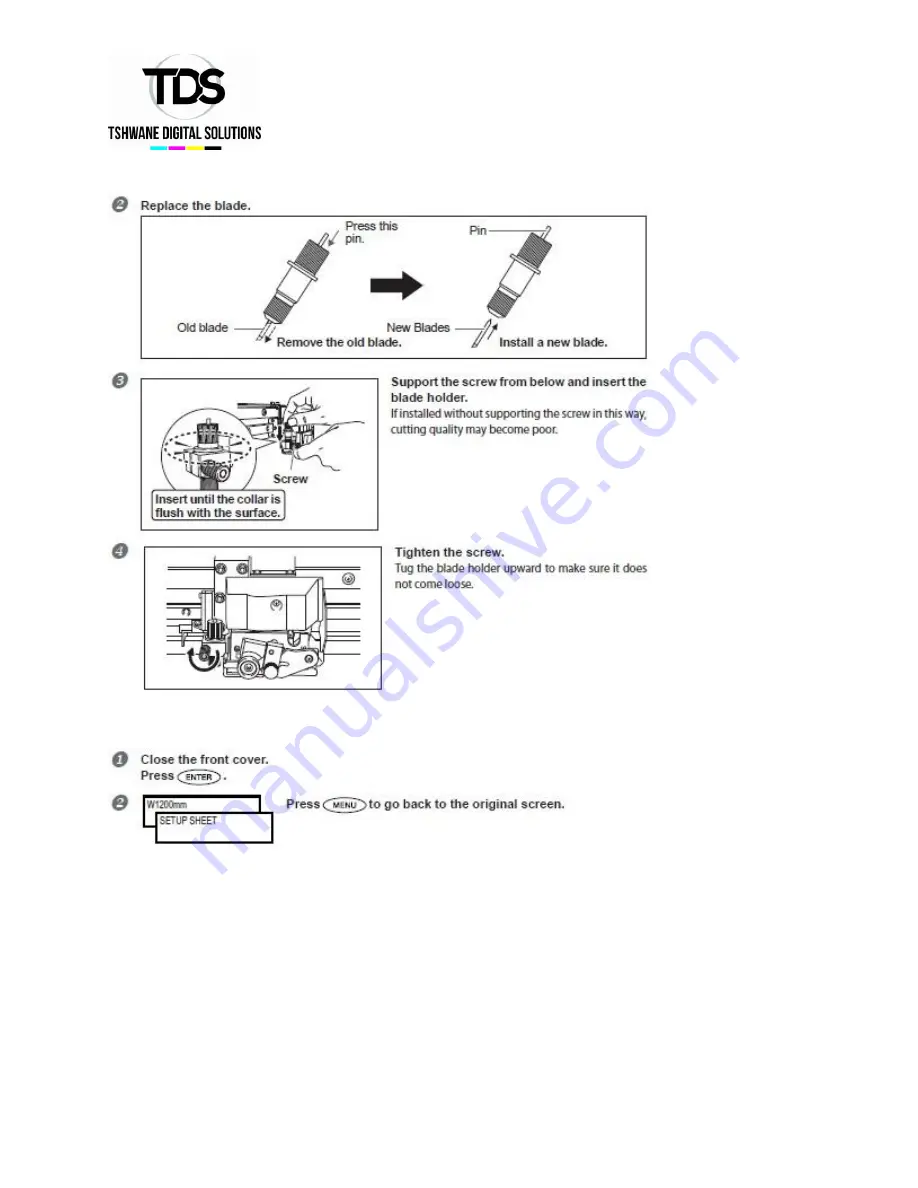
3. Quit the blade replacement menu. 


4. Adjusting the cutting conditions and cutting-in amount. 

Adjust the cutting conditions and cutting-in amount. 

Replacing the Separating Knife 

If the separating knife becomes dull, replace it with the included replacement knife. 

Note: 

Be sure to perform operations as specified by the following instructions, and never touch 

any area not specified in the instructions. 

Summary of Contents for VSi Series

Page 1: ...nd Replacing Cartridges Checking for Remaining Ink Procedure How to Replace Ink Cartridges When ink runs out a warning beep sounds and printing pauses unless the default settings have been changed Pul...

Page 2: ...ny of the following locations Any location exposed to open flame Any location where high temperature may occur Near bleach or any other such oxidizing agent or explosive material Any location within r...

Page 3: ...VSi VS RF Series Maintenance Guide Maintenance that Should Be Performed Daily Disposing of Discharged Fluid Procedure...

Page 4: ...e discharged fluid temporarily place it in the included drain bottle or in a durable sealed container such as a metal can or polyethylene tank and cap tightly Any spillage or vapor leakage may cause f...

Page 5: ...30 minutes Wipe away any buildup of ink or grime on the media path and other locations as daily cleaning In particular the pinch rollers grit rollers and platen are likely to get buildup of grime Clea...

Page 6: ...Normal Cleaning is Not Effective Medium Powerful Cleaning When the problems such as dot drop out are not cleared up by the normal cleaning try the more forceful medium cleaning If the condition is no...

Page 7: ...Occurs Light Choke Cleaning Note Light choke cleaning consumes a large quantity of ink Frequently performing light choke cleaning makes the print heads more likely to be damaged Avoid using it more th...

Page 8: ...VSi VS RF Series Maintenance Guide...

Page 9: ...r Periodic Cleaning The time frame for periodic cleaning varies depending on the ink Ink When maintenance is necessary ECO SOL MAX 2 If the message TIME FOR MAINTENANCE is displayed approximately once...

Page 10: ...de Manual Cleaning Note Be sure to perform operations as specified by the instructions above and never touch any area not specified in the instructions Sudden movement of the machine may cause injury...

Page 11: ...VSi VS RF Series Maintenance Guide...

Page 12: ...VSi VS RF Series Maintenance Guide 2 Remove cover R 3 Clean using the cleaning stick...

Page 13: ...VSi VS RF Series Maintenance Guide 4 Reattach cover L cover R and quit the manual cleaning menu...

Page 14: ...es Maintenance Guide 5 Perform a printing test to verify the results of the procedure Perform a printing test to check the results Perform a cleaning using the machines cleaning feature several times...

Page 15: ...cleared up even after performing cleaning using the cleaning function normal medium or powerful or manual cleaning perform the operation described below Note A large amount of ink will be discharged d...

Page 16: ...ep If you do not discard the discharged fluid at this step the Discharged fluid overflows from the drain bottle during the subsequent process Note Before you detach the drain bottle be sure to wait fo...

Page 17: ...t heads When the screen displays a message like the one shown it means the item needs to be replaced Replace with new items Note be sure to perform operations as specified by the following instruction...

Page 18: ...VSi VS RF Series Maintenance Guide 2 Replace the wiper...

Page 19: ...VSi VS RF Series Maintenance Guide 3 Reattach the cover R and quit the wiper replacement menu...

Page 20: ...rocedure Perform a printing test to check the result Replacing the Felt Wiper The felt wiper is the part used for cleaning of the print heads When such the screen is displayed on the display screen it...

Page 21: ...VSi VS RF Series Maintenance Guide 2 Replace the felt wiper...

Page 22: ...VSi VS RF Series Maintenance Guide 3 Reattach the cover R and quit the felt wiper replacement menu...

Page 23: ...the blade is chipped or if the blade quality is lowered replace it with a new blade Note Be sure to perform operations as specified by the following instructions and never touch any area not specified...

Page 24: ...VSi VS RF Series Maintenance Guide 2 Replace the blade...

Page 25: ...in amount Adjust the cutting conditions and cutting in amount Replacing the Separating Knife If the separating knife becomes dull replace it with the included replacement knife Note Be sure to perfor...

Page 26: ...Maintenance Guide Sudden movement of the machine may cause injury Note Never touch the tip of the blade with your fingers Doing so may result in injury 1 Enter the blade replacement menu 2 Replace the...

Page 27: ...VSi VS RF Series Maintenance Guide 3 Quit the blade replacement menu When Not in Use for a Prolonged Period Keep performing Maintenance...

Page 28: ...achine remains unused for about one month this screen appears and a warning beep sounds If the screen appears switch on the sub power When maintenance operations finish switch off the sub power This f...

Page 29: ...id temporarily place it in the included drain bottle or in a durable sealed container such as a metal can or polyethylene tank and cap the container tightly Any spillage or vapor leakage may cause fir...

Page 30: ...VSi VS RF Series Maintenance Guide...

Reviews: