TDL Triton RT2 Series Replacement Procedure Download Page 10

10

HIGH BRIGHT DISPLAY CCFL 

TO

 LED BACKLIGHT REPLACEMENT

REPLACING THE CCFL BACKLIGHTS WITH THE LED 

BACKLIGHTS IN A OPTREX DISPLAY

To replace the CCFL backlights with the LED backlights, complete the following procedure:

1. Put the ESD wrist strap on and attach the cord to ground.  Wear the safety glasses during the replacement 
process.

2. Obtain the display previously set aside.

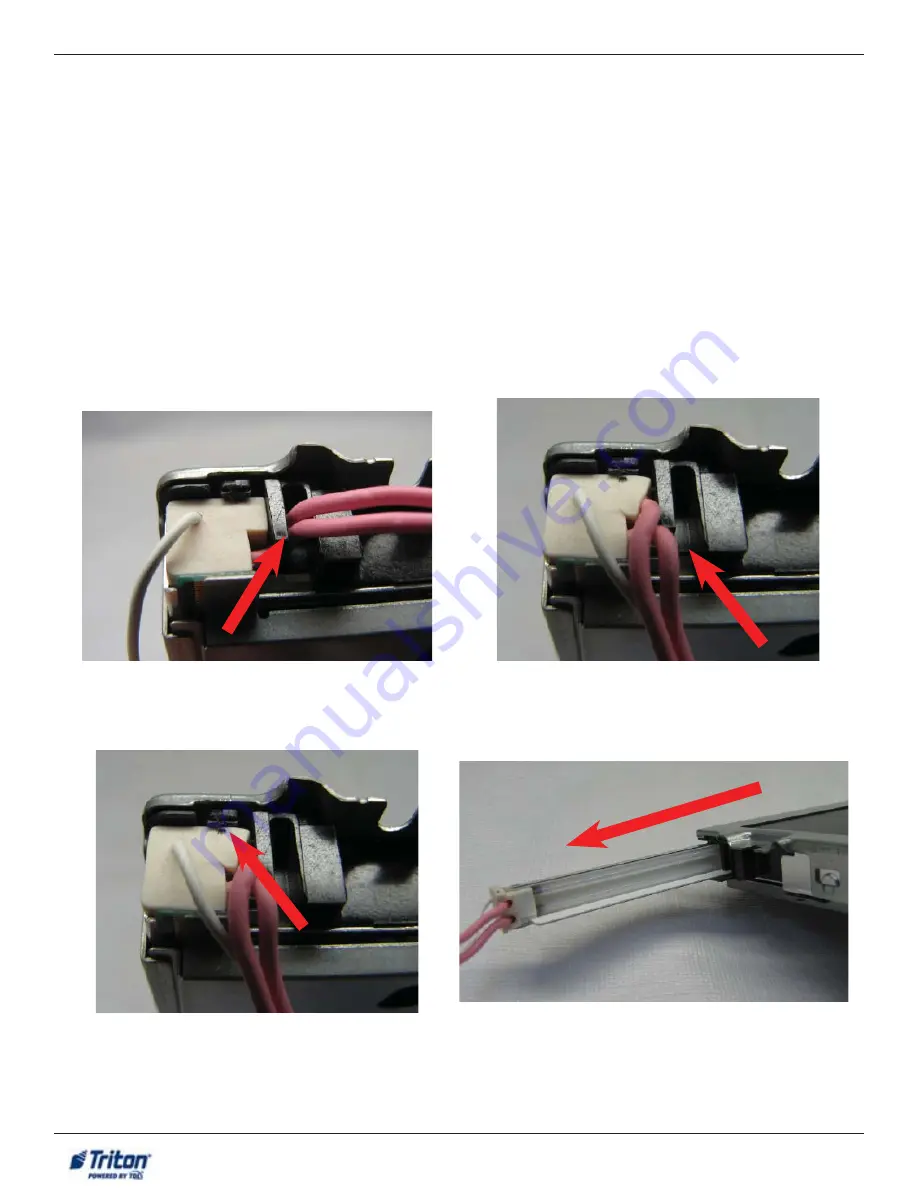
3. Locate where the backlight rails enter the display (on the right side of the display).  Move the backlight 
cables from under the notch in the bracket.

4. BEFORE pulling the backlight rail out, locate the locking latch shown below.  While holding the locking 
latch up, pull the CCFL backlight rail out.

5. Repeat step 3 & 4 for the second CCFL backlight rail.

Optrex Display Triton Part Numbers
01160-00054 Display only
09200-10010 Assembly
09200-00326 Assembly

Tools:

      1 - ESD wrist strap with grounding cord


1 - Safety glasses


1 - Small needle nose pliers 

      Electrical tape

Summary of Contents for Triton RT2 Series

Page 1: ...REPLACEMENT PROCEDURE TDN 07103 00445 AUGUST 28 2013 COPYRIGHT NOTICE 2013 Triton All Rights Reserved TRITON logo is a registered trademark of Triton Systems of Delaware LLC 21405 B Street Long Beach...

Page 2: ...ing Triton ATMs OVERVIEW The RT2 FT5 High Bright Display CCFL to LED Backlight Replacement document will require the replacement of the display backlight bulbs and inverter board The kit does NOT incl...

Page 3: ...se pliers Small wire cutters Electrical Tape ESD wrist strap with grounding cord Safety Glasses KIT P N 06200 00185 FT HIGH BRIGHT LED STRIP W DRIVER KIT PARTS SUPPLIED PART NUMBERS DESCRIPTION QUANTI...

Page 4: ...2 Perform a proper shutdown on the unit Unlock and open the upper portion of the cabinet 3 Push the AC power ON OFF switch on the power supply to the OFF 0 position 4 Unplug all connectors from the d...

Page 5: ...Remove the display assembly from the unit control panel per the previous instructions 3 Carefully remove the glass cover from the display assembly set aside 4 Remove the gasket from the assembly and s...

Page 6: ...edure 1 Put the ESD wrist strap on and attach the cord to ground 2 Disconnect the inverter cable from the inverter 3 Using the 1 Phillips screwdriver remove the two screws securing the inverter to the...

Page 7: ...side of the display BEFORE pulling the backlight rail out locate the locking latch shown below While holding the locking latch up gently pull the CCFL backlight rail out 4 Repeat step 3 for the second...

Page 8: ...to break the tubes as there is a small amount of mercury inside 8 Using the small pliers bend the end tab of the rail 90 to make it flush with the rail Cut the wires as close to the tab as possible S...

Page 9: ...the strip Line up the end of the strip with the end tab of the rail Slowly lower the strip into the rail putting light pressure on it to ensure the adhesive sticks to the rail 12 Bend the tab covering...

Page 10: ...y set aside 3 Locate where the backlight rails enter the display on the right side of the display Move the backlight cables from under the notch in the bracket 4 BEFORE pulling the backlight rail out...

Page 11: ...rubber stopper and bulbs out of the rail Again be careful not to break the tubes Set the bulbs aside 8 Obtain one LED strip Peel the protective backing off the strip Line up the end of the strip with...

Page 12: ...il the locking latch clicks down into place Repeat for the second LED rail 10 Cut a 1 1 2 inch square piece of electrical tape Without covering the display install the tape on the front of the display...

Page 13: ...oard 3 Ensure the display data cable is connected properly to the rear of the display Route the cable out of the bracket through the grommet if previously removed Set the display into place on the sta...

Page 14: ...e bracket as guides secure the glass in place with slight pressure Ensure the glass is not covering the driver board as indicated below with the red box NOTE Triton suggests testing the display prior...

Reviews: