TDK DA-5900 User Manual Download Page 16

16

This section covers advanced recording methods.

When the 

MANUAL/AUTO

button is pressed, the track division mode

used during recording changes.

The A-TRACK indicator lights when the automatic track division 
mode is enabled.

When the unit is in manual track division mode (A-TRACK 
indicator not lit), the track number on the disc you’re recording is 
only increased when the 

RECORD

button is pressed during recording.

When the A-TRACK indicator is lit, the track number is increased 
when three seconds of silence is detected or when 

RECORD

is pressed.

ABOUT MANUAL TRACK NUMBERING

It is possible to manually divide the CD-R or CD-RW disc into tracks
while recording.

While recording is taking place, press the 

RECORD

button. 

The current track number will be increased by one.

Manual track division cannot be used when dubbing a disc from 
TRAY I to a disc in TRAY II.

Manual track division can be used when A-TRACK (automatic track
division) is OFF or ON.

ABOUT AUTOMATIC TRACK NUMBERING

During dubbing:

A-TRACK (automatic track division) is always ON. When three
seconds of silence is detected, the unit will automatically increase to
the next track number. You cannot add track numbers manually.

When recording through a digital input from an external source:

When A-TRACK is ON, and three seconds of silence is detected, 
the unit will automatically increase to the next track number.

If the source doesn’t contain silence between the tracks, 
A-TRACK does not work at all.

If that’s the case, add track numbers by pressing the 

RECORD

button during recording.

When recording through the analog inputs from an external source:

If A-TRACK is ON, the unit will automatically increase to the next 
track number when three seconds of silence is detected. 

If A-TRACK is OFF, the track number will only be increased 
manually by pressing 

RECORD

during recording.

Even when A-TRACK is ON, you can also add track numbers by 
pressing the 

RECORD

button during recording 

from an external source.
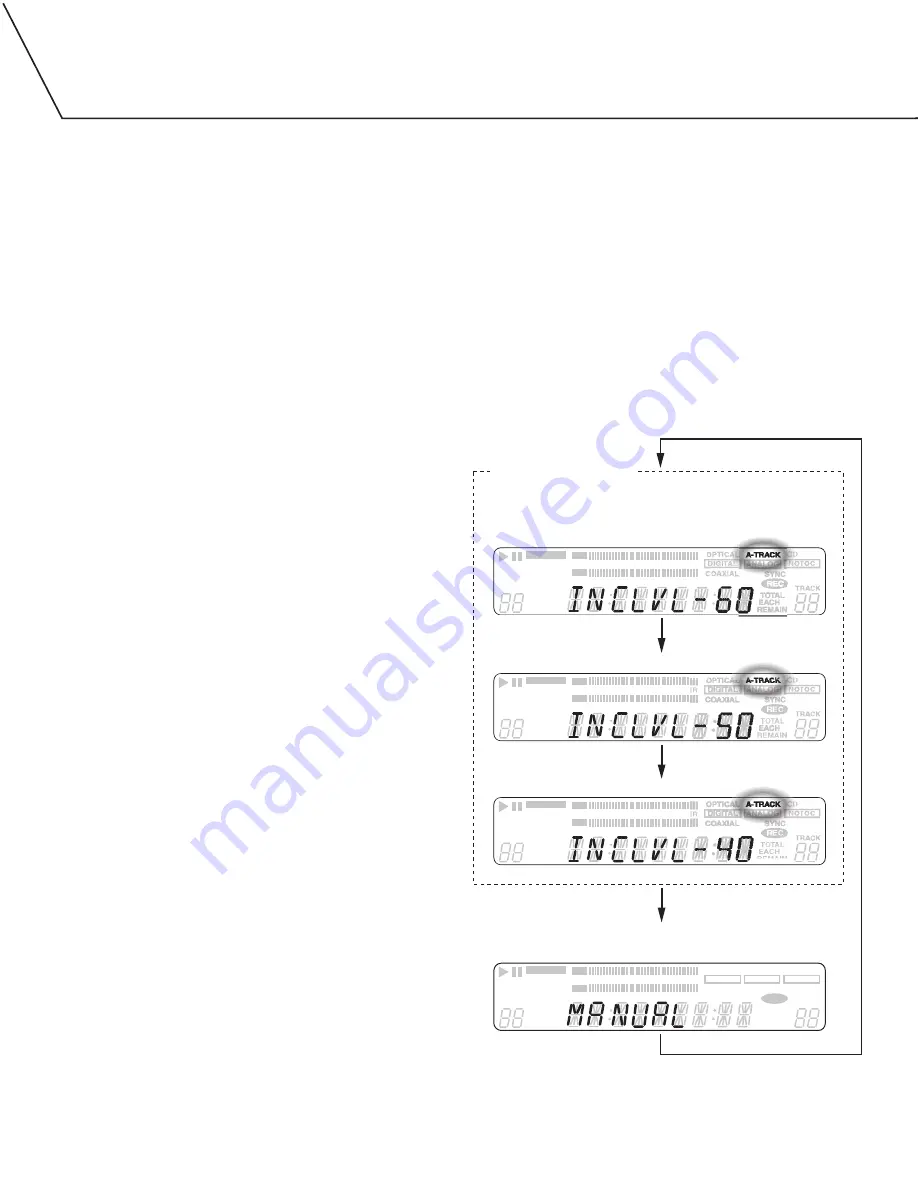
INCREMENT LEVEL

The increment level setting affects when the DA-5900 will start
recording during DIGITAL SYNCHRONIZED mode recording.

AND

When the unit will add a new track number during A-TRACK 
mode recording.

The settings options are:

-60 dB
-50 dB
-40 dB 
(A decibel (dB) is a measure of sound volume.)
The unit defaults to the -60 dB setting.

Advanced Recording

REPEAT

1ALL A-B

OVE

3

6

12

20

50

–dB

0

SHUFFLE

INTRO

TOTAL

EACH

REMAIN

–RW

TRACK

PROGRAM

L

R

REPEAT

1ALL A-B

OVE

3

6

12

20

50

–dB

0

SHUFFLE

INTRO

TOTAL

EACH

REMAIN

–RW

TRACK

REMAIN

PROGRAM

L

R

REPEAT

1ALL A-B

OVER

3

6

12

20

50

–dB

0

SHUFFLE

INTRO

TOTAL

EACH

REMAIN

COAXIAL

OPTICAL A-TRACK CD–RW

SYNC

REC

TRACK

TOTAL

EACH

REMAIN

TRACK

PROGRAM

NOTOC

ANALOG

DIGITAL

L

R

REPEAT

1ALL A-B

OVER

3

6

12

20

50

–dB

0

SHUFFLE

INTRO

TOTAL

EACH

REMAIN

–RW

TRACK

PROGRAM

L

R

A-TRACK:ON

MANUAL (A-TRACK:OFF)

INCREMENT LEVEL -60dB

INCREMENT LEVEL -50dB

INCREMENT LEVEL -40dB

Summary of Contents for DA-5900

Page 1: ...AUDIO CD R AND CD RW DISCS R E C O R D S A U D I O C D R R W D I S C S C OMPUTER DATA TYPE CD R R W D I S C S C A N N O T B E R E C O R D E D DUB YOUR MUSIC RECORD FROM EXTERNAL SOURCES ANALOG AND DIG...

Page 2: ...ode Properties Material Ga Al As Wavelength 765 815nm 25 C play 780 786nm 25 C record Laser Output Continuous wave max 5mW play Continuous wave max 40mW record Safety and Care Instructions WATER AND M...

Page 3: ...NS 8 PLAYBACK 9 REPEAT PLAYBACK 10 SHUFFLE PLAYBACK INTRO CHECK 11 PROGRAMMED PLAYBACK 12 BEFORE RECORDING 13 DUBBING 14 15 BASIC RECORDING 15 ADVANCED RECORDING 16 17 FINALIZING DISCS 18 TIME DISPLAY...

Page 4: ...nly on one side Never touch the recording non label side of a disc Recording requires a clean surface Fingerprints dust grease etc can cause errors If the disc surface becomes dirty wipe it in an outw...

Page 5: ...cks on a source device such as a receiver or a tape deck B DIGITAL IN OUT The DA 5900 has optical and coaxial digital jacks for playback and recording Both types of digital connections offer perfect s...

Page 6: ...ave to get closer than normal to the DA 5900 in order for the remote control to operate the unit the batteries need to be replaced BATTERY PRECAUTIONS Never use different types of batteries together R...

Page 7: ...speed 6 AUTO DUB Press to enter record pause mode Recording is armed but does not start 7 ENTER Press to begin the recording process if recording has been armed 8 INPUT Press to select the input anal...

Page 8: ...p tracks 11 RECORD Press to enter record pause mode Recording is armed but does not start 12 RECORD LEVEL Adjust to set the recording level 13 TRAY II PLAYBACK CONTROLS PLAY Press to start playback re...

Page 9: ...of a track that s currently playing Press the TRACK SKIP BACK button To return to the beginning of the previous track while a track is playing Quickly press the TRACK SKIP BACK button twice When usin...

Page 10: ...nalized CD R or CD RW discs 1 Start playback 2 When the beginning of the section of music you wish to repeat is reached press the remote s A B button 3 When the end of the section of music you wish to...

Page 11: ...cel SHUFFLE playback press the SHUFFLE button INTRO CHECK To activate this mode when playback is stopped press the remote s INTRO button then the PLAY button The beginning of each track will play for...

Page 12: ...irst song on the disc will be programmed Up to 32 tracks from 2 discs can be programmed in the desired order PGM FULL will appear when no more tracks can be programmed Shuffle playback does not work d...

Page 13: ...ill automatically finalize the disc and stop When the number of tracks exceeds 99 during recording the unit stops recording The recording time of a track may slightly differ from that of the original...

Page 14: ...and DUBB 1 2 4X will alternately appear on the display Even if this happens you can still dub most of the disc To dub as much of the disc as possible press the ENTER button when DUBB 1 2 4X is display...

Page 15: ...finalize a disc 1 Load an unfinalized disc in TRAY II 2 With playback stopped press and hold in the FINALIZE button for three seconds To record from a DIGITAL external source 1 Connect the source dev...

Page 16: ...ly increase to the next track number If the source doesn t contain silence between the tracks A TRACK does not work at all If that s the case add track numbers by pressing the RECORD button during rec...

Page 17: ...cally ends when the signal from an external source ends Digital synchronized recording is only possible when recording through a digital input from an external source such as a CD player or MiniDisc d...

Page 18: ...If for some reason you wish to cancel the finalize process press STOP When the operation is finished COMPLETE will appear briefly on the display then the display will return to its track time display...

Page 19: ...0 50 dB 0 SHUFFLE INTRO TOTAL EACH REMAIN COAXIAL OPTICAL A TRACK CD RW SYNC REC TRACK TOTAL TOTAL EACH REMAIN REMAIN TRACK PROGRAM NOTOC ANALOG DIGITAL L R REPEAT 1ALL A B OVER 3 6 12 20 50 dB 0 SHUF...

Page 20: ...age CAN T REC Cannot record erase or finalize the disc D UNLOCK Digital input is selected but you cannot record DISC FULL NOCD DA D2 DATA Discs designed for computer systems cannot be used for audio r...

Page 21: ...te control that use infrared light may interfere with operation of the DA 5900 Cannot play audio Insert disc with label side up If the disc is dirty clean the surface of the disc A blank disc has been...

Page 22: ...States contact the authorized dealer from whom you purchased the Product to determine what warranty if any applies In order to obtain warranty service you must deliver the Product to TDK freight prep...

Page 23: ...23...

Page 24: ...24...

Page 25: ...25 FRENCH COVER...

Reviews: