Setting Clock & Schedule
The SZ1017N clock and schedule may be set through the
keypad on the face, or with a PC. For more information on
programming through the PC, consult your software manual.
SETTING CLOCK & SCHEDULE
THROUGH THE KEYPAD
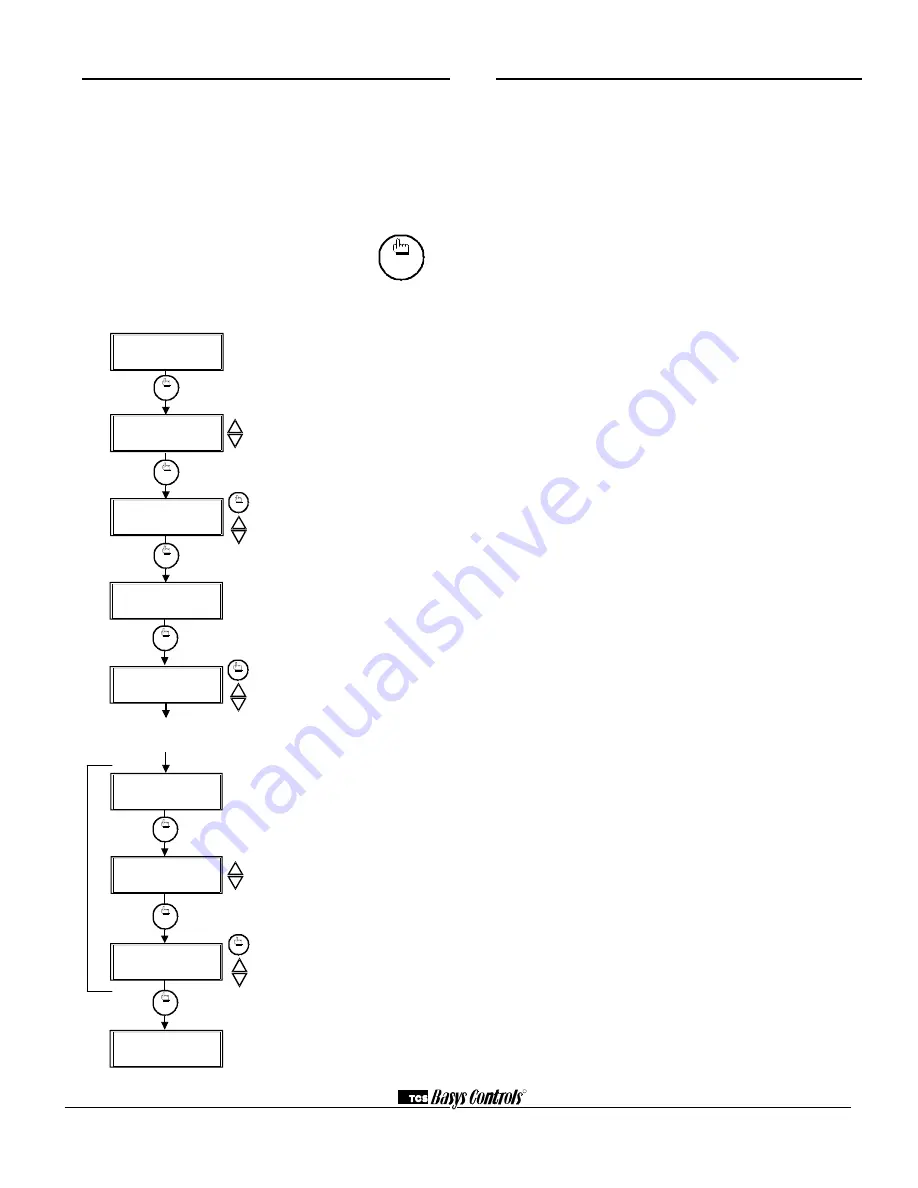
To access the clock and schedule screens, press the clock
setup button. To make changes, use the warmer
and cooler keys. For screens that have more
than one field to set, use the override key to
move to the next field. Access may be locked
out with dipswitches, or an access code may be required.
clock
setup
Main Monitoring Screen.
Press the
service button to access the following
screens.
Access Code Entry Screen.
May
appear if access code is required for
setting clock and schedules. Use 248
as the default. If the wrong code is
entered, it will revert to the previous
screen.
Time and Day Screen.
Set the hour,
minutes, AM or PM, and day of the
week.
Schedule Announcement Screen.
Announces the next screen.
Occupied Times Screen.
Set hours
and minutes of start and end times for
up to two occupied periods.
Schedule Announcement Screen.
Announces the next screen.
Copy Schedule Screen.
Choose to
use the same schedule that was used
for the previous day. If so, the next
screen does not appear.
Occupied Times Screen.
Set hours
or minutes of start and end times for
up to two occupied periods.
Main Monitoring Screen.
MON
72F
12:00 AM
3.
1.
clock
setup
ENTER ACCESS
SET TIME & DAY:
MON
12:00 AM
2.
000
CODE
override
clock
setup
clock
setup
SET OCCUPIED
A:08:00 TO 12:00
4.
5.
TIMES MONDAY:
B:13:00 TO 17:00
SET OCCUPIED
6.
TIMES TUESDAY:
The following screens are repeated for
Wednesday, Thursday, Friday, Saturday
and Sunday.
COPY MON FOR
TUE? YES
7.
MON
72F
12:00 AM
A:08:00 TO 12:00
B:13:00 TO 17:00
clock
setup
override
clock
setup
clock
setup
clock
setup
override
Operation
UNOCCUPIED SETBACK
The SZ1017N operates in either an occupied or unoccupied
mode. During the occupied mode, the occupied heating and
cooling setpoints will be maintained, and the fan will oper-
ate according to its occupied setting. During the unoccupied
mode, the unoccupied heating and cooling setpoints will be
maintained, and the fan will operate according to its unoc-
cupied setting. The occupied LED will be lit when the unit
is operating in the occupied mode.
The occupied schedule may be set utilizing the internal time
clock or DI3 may be used with an external time clock,
whereas when DI3 is closed, the unit is in the occupied
mode. The Smart Recovery function is disabled when DI3
is used for external time clock.
OVERRIDE
A timed override is available on the keypad or through
momentary N.O. contacts. The amount of time the unit will
be overridden is set from 0 to 255 minutes in the program-
ming. This override only activates when the thermostat is
operating in the unoccupied mode. Both the software and
the service button allows you to view the time remaining in
the override mode. If the occupant desires to return the ther-
mostat to unoccupied operation before that time interval is
up, they may press the button on the keypad or the momen-
tary contact again.
Continuous override is available using DI3. If DI3 is set to
external override, the unit will be in the occupied mode
whenever the DI3 contact is closed. When using this option,
the timed override may still be activated.
The software allows you to override the thermostat by
putting the override parameter into the remote mode, and
thus disabling the timed override.
SETBACK AND OVERRIDE APPLICATIONS
In most applications, it is desired to maintain a regular
schedule, and allow timed override with the button on the
face or with a remote momentary contact.
To allow a regular schedule, and also automatically override
with the use of occupancy or light sensor, set DI3 to over-
ride and set it up so that the contact is closed when you
want the override.
For applications where a room might not be used on a regu-
lar schedule, such as conference rooms, set DI3 to time
clock and close the contact when you want the room occu-
pied, such as with a switch or wind-up timer. If each occu-
pancy period is about the same, (theaters, meetings) another
option is to set the DI3 to time clock, and use the timed
override button to put the unit in occupied mode.
To make the unit always occupied, set DI3 to time clock
and short the DI3 terminal to ground.
R
2800 LAURA LANE
I
MIDDLETON, WI 53562
I
(800) 288-9383
I
FAX (608) 836-9044
I
www.tcs-basys.com
7


