TCL LE39FHDE5300 User Manual Download Page 6

5

Connections and Setup   

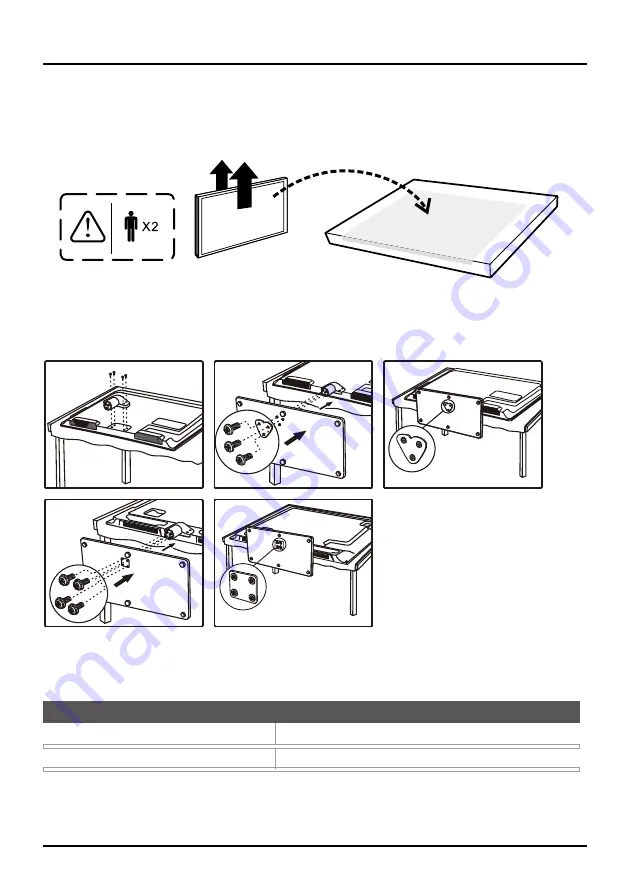
Attaching Your TV to the Table Stand

Your TV comes without the table stand attached so that you can choose to mount your TV either to its table 

stand or to a wall (wall mount sold separately). If you want to mount your TV to the wall, don’t attach the table 

stand.  Follow the Mounting Your TV to the Wall instructions.

First, remove the TV bag and place it on a large, flat surface such as a table or countertop. Remove the TV 

from the carton and place it face down on the TV bag. Be sure that the TV is face down to avoid scratching 

the screen.

Then follow the steps below:

Note:

  A for 32” model, B for 39” model.

Mounting Your TV to the Wall

The VESA number is the horizontal and vertical measurement of the mounting holes. For example,

200x100 refers to the fact that the mounting measurements are 200mm horizontally and 100mm vertically.

Notes: 

Follow the directions included with the wall mount to mount the TV to the wall.

Caution: 

Your wall mount must be able to bear a minimum of five times the TV’s net weight to avoid causing damage.

To mount your TV to the wall, purchase a VESA wall mount.

32” Models

40”, 39” Models

Purchase a VESA 200 x 100, M4 screw


Purchase a VESA 400 x 200, M4 screw


If you are mounting your TV to the wall, don’t attach the table stand, remove the hinge cover and hinge. 

B - 2

B - 1

A - 3

3/3x

A - 2

4/4x

A - 1

70-STDD33-XEU1B


Summary of Contents for LE39FHDE5300

Page 1: ...LED TV User s Guide For use with models LE32HDE5300 LE32HDF3300 LE39FHDE5300 LE39FHDF3300 LE43FHDF3300 Need Assistance Please visit our website at www tclusa com or call 1 877 300 8837 ...

Page 2: ...o completely shut the power off you will need to disconnect the power cord from the outlet The mains plug appliance coupler is used as disconnect device the disconnect device shall remain readily operable Therefore you should ensure that the TV is installed in a manner that allows you to disconnect the power cord when desired Product Information Keep your sales receipt to obtain warranty parts and...

Page 3: ...ean only with dry cloth 11 Use only with the cart stand tripod bracket or table specified by the manufacturer or sold with the component When the TV is placed on a cart use caution when moving the cart to avoid injury from tip over 12 Warning To avoid any injury caused by lean of the product please always ensure the whole product was place within the table surface in horizontal 13 Unplug this comp...

Page 4: ...pness 13 Expert Settings 13 Advanced Settings 13 PC Settings 13 Reset Picture Settings 13 Sound Menu 13 Equalizer 13 Balance 14 Surround 14 Speaker 14 SPDIF Type 14 Auto Volume Control 14 Analog TV Sound 14 Default Audio Language 14 Current Audio Language 14 Setup Menu 14 Signal Type 14 Channel Scan 14 Channel Skip 14 Channel Edit 15 Input Skip 15 Input Labels 15 Closed Caption 15 Time Setup 16 Sy...

Page 5: ...rom it won t harm other components Avoid Audio Interference Position cables properly insert each cable firmly into the designated jack If you place components above the TV route all cables down one side of the back of the TV instead of straight down the middle If your antenna uses 300 ohm twin lead cables do not coil the cables Keep twin lead cables away from audio video cables Avoid Direct Light ...

Page 6: ...en follow the steps below Note A for 32 model B for 39 model Mounting Your TV to the Wall The VESA number is the horizontal and vertical measurement of the mounting holes For example 200x100 refers to the fact that the mounting measurements are 200mm horizontally and 100mm vertically Notes Follow the directions included with the wall mount to mount the TV to the wall Caution Your wall mount must b...

Page 7: ...ection when using the CMPT VIDEO input Red and white jacks for R AUDIO and L AUDIO connection For mono audio sources be sure to use the L AUDIO input Note AUDIO VIDEO IN and COMPONENT IN share the same L R AUDIO input jacks AUDIO VIDEO IN AV Lets you connect a component that has composite video jacks such as a VCR DVD player or set top box Yellow jack for VIDEO connection red and white jacks for R...

Page 8: ...gital cable box with an HDMI output for the best picture quality HEADPHONE Allow you to connect headphones to listen to the sound coming from the TV Choose Your Connections There are several ways to connect components such as DVD players and set top boxes to your TV Note No cables are supplied with this unit Please purchase the necessary cables A high speed HDMI cable is recommended for better com...

Page 9: ...ons and Setup Input TV AV CMPT PC HDMI 1 HDMI 2 USB No label No label No label No label No label No label Same connection to HDMI 1 IN HDMI 2 IN AUDIO VIDEO IN AV COMPONENT IN CMPT HDMI DVI IN 1 INPUT PC VIDEO IN ...

Page 10: ...format SLEEP Sets the TV to turn off after a given amount of time PIC Selects picture mode INFO If no menus are currently active press INFO to display the Channel information VOL Increases or decreases the TV volume MUTE Turns the volume on and off FAV Press the FAV button to browse the channels in your favorite list Use to highlight options then press OK to select Or press the FAV button repeated...

Page 11: ...n how to switch on your TV set and use the remote control before going on to following pages describing how to use the channel scan procedure 1 Insert two AAA batteries in the remote control Precautions on using batteries Only use the battery types specified Make sure you use the correct polarity Do not mix new and used batteries Do not use rechargeable batteries Do not expose batteries to excessi...

Page 12: ...Sat Press OK to continue to the next screen Note If you are using a satellite or cable set top box you do not have to complete the Channel Scan 5 The Channel Scan screen is now displayed The default choice is to scan Press OK to begin the channel scan for available channels to be stored in the TV s memory Note If you do not want to scan for channels at this time you can select Skip Scan or press O...

Page 13: ...Sleep Timer Back MENU Enter Select Exit CLEAR OK Picture Setup Parental Control Language Sound Picture USB Exit Picture Preset Brightness Natural Advanced Settings 50 Sharpness 5 Contrast 75 Reset Picture Settings Expert Settings Back MENU Adjust Select Exit CLEAR Parental Control Channel Block Button Block Setup Parental Control Language Sound Picture USB Exit V Chip Input Block Change Password O...

Page 14: ...e Color and Tint are not available in PC mode Advanced Settings Light Sensor when activated this feature monitors the ambient light conditions in the room and adjusts the TV s backlight for optimum viewing It also serves as an energy saving feature by lowering the backlight power level when appropriate typically in darker conditions Dynamic Backlight this option automatically adjusts the brightnes...

Page 15: ...riptions of the video for the visually impaired Default Audio Language choose the language you prefer for dialog on digital channels If the preferred language is not broadcasted with the program then the TV plays the default audio for the program usually English in the US There are 3 available default languages English French Spanish Note The Default Audio Language option is only available for dit...

Page 16: ...p Input Labels press OK to display the Input Labels screen 2 Press to highlight the input source you wish to label 3 Press to select the label for this source 4 Press MENU to return to the previous menu or press CLEAR to close the menu Closed Caption Many programs are encoded with closed captioning information which allows you to display the audio portion of a program as text on the TV screen Note...

Page 17: ...l No Reset All This option resets all settings except parental control settings to the factory defaults When you select this option a confirmation box opens Note If some channels are blocked you must enter the V chip password then you can follow the operation below 1 Press to select OK or Cancel 2 Press OK to confirm Parental Control Menu The choices in the US V Chip and Canada V Chip menus involv...

Page 18: ...udience only You can also customize the TV ratings for the following content A Sexual dialog D Sexual explicit dialog L Adult language S Sexual situations V Violence FV Fantasy violence 2 Press to navigate through the TV rating options Press OK to block locked or allow unlocked US V Chip Movie Ratings You can automatically block all program ratings above a specified age based rating level 1 Select...

Page 19: ... digital camera a multi format card reader or an MP3 player If you have a USB drive plug it into the drive directly If you have a device with a USB port connect one end of the USB cable to the USB port and the other end to the USB jack on the side of the TV The USB feature on your TV allows you to play audio files format supported MP3 or display pictures format supported JPEG To utilize this featu...

Page 20: ...log channel Why are there bars on my screen and can I get rid of them Most digital video is sent in a 16 9 format which fills your screen but is sometimes sent in 4 3 which does not fill your screen It depends on how the station or device connected to your TV is formatting the video If there are bars on the screen press the ZOOM button to try a different format that may eliminate the bars Some bar...

Page 21: ...d blue and green connect to the corresponding COMPONENT INPUT jacks on the back of your TV Check the antenna connections Make sure all of the cables are firmly connected to the jacks There is no sound but the picture is fine The sound might be muted Try pressing the volume up button to restore sound If using DVI or Y PB PR remember to also connect the device s left and right audio output jacks to ...

Page 22: ...for further assistance If you have black bars on each side of your picture the component you connected might have a switch or a menu option allowing you to change the picture quality output that will fix this Choose either 720p or 1080i The remote control doesn t work Something might be between the remote and the remote light sensor on the front of the TV Make sure there is a clear path The remote...

Page 23: ...ee cloth as well Take care not to scratch or mar the screen If necessary you may use a cloth dampened with warm water While cleaning do not spray liquid directly on the screen or allow liquid to run down the screen and inside the TV Also never place drinks or vases with water on top of the TV This could increase the risk of fire shock hazard or damage to the TV Television Specifications Broadcasti...

Page 24: ...tatement At the sole discretion of TTE television screen sizes 32 and smaller will either be repaired at an Authorized TCL Service Center or directly exchanged for a new or refurbished remanufactured unit At the sole discretion of TTE television screen sizes 33 through 55 will either be repaired at an Authorized TCL Service Center or repaired in home If repaired at an Authorized TCL Service Center...

Page 25: ...AND LIMITED WARRANTY ARE GOVERNED BY THE LAWS OF THE STATE OF CALIFORNIA EXCEPT TO THE EXTENT PROHIBITED BY APPLICABLE LAW ANY IMPLIED WARRANTY OF MERCHANTABILITY OR FITNESS FOR A PARTICULAR PURPOSE ON THIS PRODUCT IS LIMITED TO THE APPLICABLE WARRANTY AND WARRANTY PERIOD SET FORTH ABOVE How State Law relates to this warranty Some states do not allow the exclusion nor limitation of incidental or c...

Page 26: ...s and can radiate radio frequency energy and if not installed and used in accordance with the instructions may cause harmful interference to radio communications However there is no guarantee that interference will not occur in a particular installation If this equipment does cause harmful interference to radio or television reception which can be determined by turning the equipment off and on the...

Reviews: