background image

EN

9

English

Getting started

Important

Batteries shall not be exposed to excessive heat such as sunshine, fire or the like. Remove batteries when 

the remote control is not to be used for a long time. Batteries left in equipment may cause damage through 

deterioration and corrosive leakage, invalidating the guarantee.
To protect the environment use local recycling facilities for battery disposal. Dispose of used batteries 

according to the instructions.

CAUTION

: Risk of explosion if batteries are replaced by an incorrect type. Replace only with the same or 

equivalent type recommended by the equipment manufacturer.
If the batteries in your remote control are run down, you can use the button on your TV set.
You can turn on the TV from standby mode by pressing the   button on your TV set.
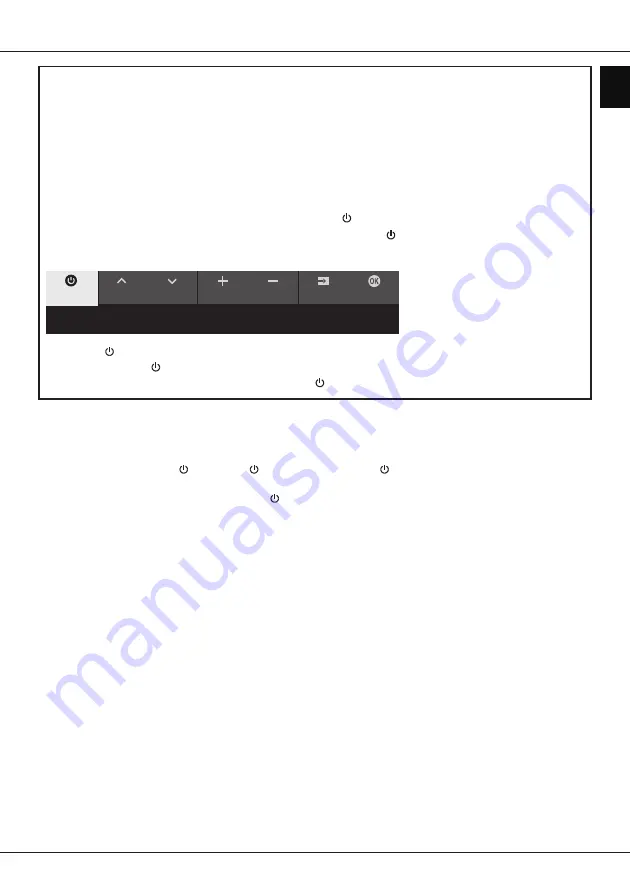
While the TV is on, the multi-function menu appears by pressing the   button on your TV set. For more 

information about how to use the multi-function menu, please refer to the figure below.

CH+

CH-

Source

OK

Volume-

Standby

Tips: Click to select options, press and hold to confirm.

• 

Press the 

 button to move the highlight to the next function selection.

• 

Press and hold the 

 button for more than 2 seconds to confirm your selection.

Note: Please refer to the Quick Start Guide to find the   button on your TV set.

Switch the TV on and off

1. 

When the power cord is connected, the TV will be turned on directly or be in standby mode. If the TV is in 

standby mode, press the   or 

POWER/

 button on the set or the   button on the remote control to turn it 

on.

2. 

To put the TV into standby mode, press the   button on the remote control. The TV set remains powered up, 

but with low energy consumption.

3. 

To switch the TV off, unplug the mains plug from the mains outlet.

Note: In order to save energy and protect environment, certain models are designed with a relay switch. It is 

normal phenomenon if you hear the sound of the relay when you turn on or off the TV set.

Initial setup

The first time you switch the set on, the 

Welcome

 screen appears, which guides you through the initial setup 

process. Follow the on-screen instructions to finish the initial setup process such as selecting the language, 

connecting to the network, scanning channels, and more. During each step, either make a choice or skip the 

step. If you skip a step, you can perform the setup later from the settings menu. 

Note: If the channel search retrieved only the analogue channels it could be caused by poor broadcasting and 

therefore is not covered by manufacturer warranty. Manufacturers cannot be held responsible for lack of 

or poor broadcasting in some areas.

Summary of Contents for 85C845

Page 1: ...erson in order to avoid a hazard Leave more than 10cm clearance around the television to allow adequate ventilation The ventilation should not be impeded by covering the ventilation openings with item...

Page 2: ...nnection mode or USB playing mode due to electrostatic discharge user intervention is required Bluetooth function notice Bluetooth technology if available in your TV uses 2 4GHz frequency thus close p...

Page 3: ...ocal municipal office your household waste disposal service or the shop where you purchased the product Penalties may be applicable for incorrect disposal of this waste in accordance with national leg...

Page 4: ...sing common interface services 11 Using subtitles 11 Turning on off subtitles 11 Enabling subtitle languages on digital TV channels 11 Selecting a subtitle type on digital TV channels 12 Using Teletex...

Page 5: ...ice port HDMI 1 4K 144Hz HDMI 2 4K 120Hz eARC ARC Antenna Cable input Satellite input 13 18V 0 4A MAX AV adapter Common interface HDMI 3 4K 60Hz HDMI 4 4K 60Hz HD game console Blu ray Disc player HD C...

Page 6: ...C section It is recommended to use high quality and well shielded HDMI cables to avoid possible interferences Please use headphones with 3 5mm TRS connector Excessive sound pressure from headphones ca...

Page 7: ...vious menu or quit an App To access the Smart TV homepage To access the Electronic Programme Guide only available for digital channels Or access to DTV EPG Available only in Google TV mode VOL To cont...

Page 8: ...replaced by an incorrect type Installing batteries 1 Push to open the back cover as illustrated 2 Insert two AAA batteries according to the polarities marked on the batteries case 3 Replace the back...

Page 9: ...irm your selection Note Please refer to the Quick Start Guide to find the button on your TV set Switch the TV on and off 1 When the power cord is connected the TV will be turned on directly or be in s...

Page 10: ...ING Configure the network settings before using Smart TV applications Slow responses and or interruptions may occur depending on your network conditions If you experience a problem using an applicatio...

Page 11: ...d terms Using the common interface module WARNING Switch off your TV before inserting a common interface module Be sure to follow the instructions described below Wrong insertion of a common interface...

Page 12: ...power on when you power on a CEC device e g DVD with the device s remote Press OK to turn it on to enable this function Using Auto standby Enables all CEC devices to automatically go to the standby m...

Page 13: ...ettings Remotes and accessories and press OK to enter 2 Select Pair accessory and press OK to enter The TV will search nearby Bluetooth devices automatically Select an available device press OK and fo...

Page 14: ...and energy menu to enjoy hands free voice control in TV standby mode Standby power consumption will increase because the built in MIC is always listening when the Google Assistant or voice control wit...

Page 15: ...screen function on your phone and choose the TV s name you want to connect in the searching list 4 For the first time depending on different types of phones there are two situations An invitation prom...

Page 16: ...ting Try to clean the remote sensor window on the TV front with a soft cloth If the above suggestions do not solve your technical issue please refer to the warranty card for service information Operat...

Page 17: ...UT WARRANTY OF ANY KIND EITHER EXPRESS OR IMPLIED TCL EXPRESSLY DISCLAIMS ALL WARRANTIES AND CONDITIONS WITH RESPECT TO THE DEVICE AND ANY CONTENT AND SERVICES EITHER EXPRESS OR IMPLIED INCLUDING BUT...

Reviews: