background image


9


Connections and Setup

Switching On

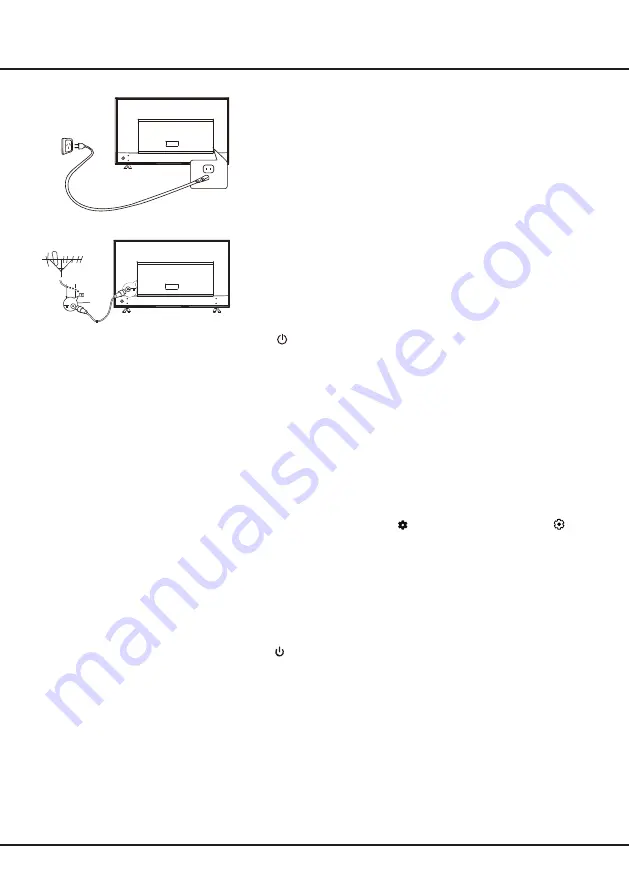
1. Connect the power cable FIRST to the television, THEN to a mains 

    socket. (

Note:

 For some models, the power lead may be 昀椀xed to the    

    television.

)


WARNING:

Your TV set should only be connected to an AC supply. 

    The TV’s standby light should be turned on. It must not be connected 
    to a DC supply. If the plug is detached from the cable, do not, under       
    any circumstances, connect it to a mains socket, as there is a risk of 
    electric shock.

2. Connect an outside aerial to the 

ANTENNA IN

 socket at the back of 

the TV set. 

The aerial socket (75 OHM - VHF / UHF / cable) can be used for 

connecting an external aerial or other equipment 昀椀tted.

3. When powered on, the TV will be turned on directly or be in standby 
    mode.

If the power indicator lights up, the TV set is in standby mode. Press 
the 

 button on the remote control or on the TV set to turn on the TV.

Initial Setup

The 昀椀rst time you switch the set on, the 

Welcome

 wizard appears, which guides you through the initial setup process. 

Follow the on-screen instructions to 昀椀nish the initial setup process such as selecting the language, pairing your 

remote, connecting to the network, and more. During each step, either make a choice or skip the step. If you skip a 
step, you can perform the setup later from the Settings menu. 

Notes:


- It’s recommended to select 

Set up Google TV

 and 昀椀nish its setup to enjoy more features during the initial setup process. 

If you have 昀椀nished basic TV’s setup, you can reaccess Google TV by pressing


on the remote control, selecting


(Settings) > Set up Google TV

 and pressing 

OK

 to con昀椀rm.

- When you pair your remote, keep the remote control and TV within 1 meter, and follow the on-screen guide for 

pairing. After 昀椀nishing pairing the remote, you can use the Google Assistant button. If you skip remote pairing, you 

will be prompted to pair the remote with the TV again when you use the Google Assistant button for the 昀椀rst time.

Note:

 The 昀椀gures are for representation only, 

the location of power socket of the television 

might di昀昀er depending on the model.

Switching O昀昀

•  To put the TV set into standby mode, press the   button on the remote control. The TV set remains powered up, 

but with low energy consumption.

• 

To switch o昀昀 the TV set, unplug the mains socket from the mains 

outlet.

Note: 

In order to save energy and protect environment, certain models are designed with a relay switch. It is a normal 

phenomenon if you hear the sound of the relay when you turn on or o昀昀 the TV set.

Summary of Contents for 75P745

Page 1: ...unt a free TCL account and a reliable broadband internet connection are required Figures and illustrations in this User Manual are provided for reference only and may differ from actual product appear...

Page 2: ...Selecting a Subtitle Type on Digital TV Channels 11 Using EPG Electronic Program Guide 11 Freeview 11 HbbTV 11 HbbTV Access 11 HbbTV Deactivation 11 Chapter 4 Using More of Your TV Accessing Google TV...

Page 3: ...ervice by yourself Refer all servicing to quali ed personnel Do not touch the screen surface with ngers as this may scratch or mar the TV screen Do not impact the TV screen with hard pressure as this...

Page 4: ...ed to connect a range of equipment including video recorders camcorders decoders satellite receivers DVD players or games consoles The VIDEO IN socket provides composite video connection ANTENNA IN so...

Page 5: ...t the usual ways to connect your TV to the wired or wireless network The connection method may be di erent depending on your actual network con guration If you have any questions about your home netwo...

Page 6: ...Right OK To con rm an entry or selection To return to the previous menu or quit an app To access the Google TV homepage To access Electronic Program Guide only available for digital channels To selec...

Page 7: ...on using batteries Only use the battery types speci ed Make sure you use the correct polarity Do not mix new and used batteries Do not use rechargeable batteries Do not expose batteries to excessive...

Page 8: ...mation about how to use the multi function menu please refer to the figure below Press to move the highlight to the next function selection Press and hold the button for more than 2 seconds to con rm...

Page 9: ...ng to the network and more During each step either make a choice or skip the step If you skip a step you can perform the setup later from the Settings menu Notes It s recommended to select Set up Goog...

Page 10: ...els Using the Up Down buttons press the Up Down buttons on the remote control to scroll through the channels Using the OK button press the OK button to display the freeview bar and press Left Right an...

Page 11: ...referred language and press OK to con rm 3 Press Up Down to select Digital Subtitle Language 2nd and press OK Right to enter 4 Press Up Down to select a secondary subtitle language and press OK to con...

Page 12: ...nctions depend on the devices connected and it is possible that some devices may not interoperate correctly when connected to this TV The Accessing Google TV Homepage Allows you to enjoy the entertain...

Page 13: ...he TV will search nearby Bluetooth devices automatically 3 Select an available device press OK and follow the guides on the screen to connect it Note Bluetooth technology if available in your TV uses...

Page 14: ...rn the built in MIC switch to o if you are not going to use it Standby power consumption will increase because the built in MIC is always listening when the Google Assistant or voice control with the...

Page 15: ...ed the file is damaged or the file cannot be decoded Do not disconnect the USB drive when the system is reading a file or transmitting data otherwise the system or the drive may be damaged Using Telet...

Page 16: ...art device into a sophisticated remote control provid ing more features than your normal TV remote control You can then control your TV through your smart device Follow the on screen instructions to s...

Page 17: ...f the language setting is correct Check if Google server is available and stable 1 Fail to link to the network Check if your TV is connected with the network Reboot your TV Consult your Internet servi...

Page 18: ...d in the fringe area of a television signal where the signal is weak the picture may be marred by dots When the signal is extremely weak it may be necessary to install a special antenna to improve the...

Page 19: ...implied including but not limited to warranties of merchantability of satisfactory quality tness for a particular purpose of accuracy of quiet enjoyment and non infringement of third party rights TCL...

Page 20: ...respective owners Freeview uses HbbTV technology which combines broadcast and broadband Internet connection is required Data usage charges and conditions apply For DTS patents see http patents dts com...

Reviews: