background image

EN

6

English

Connections

Notes:


-

Your TV might not have all connectors visible on diagram above. Number of USB and HDMI ports may vary 

according to TV model.


-

Button and connector locations may vary according to TV model.


-

USB connectors are for data input from USB drives and for connecting other relevant USB devices where 

applicable. External HDD drives without own power supply have to be connected to USB connector marked 

with 1A current output.


-

All USB devices have to be directly connected to TV set without cable extenders. In case extender is 

required, maximum 50cm length is recommended. Longer extenders should have ferrite beads.


-

ARC (Audio Return Channel) function is only supported on the HDMI port identified with ARC. To use ARC 

function, please turn on T-Link function first as described in the 

T-Link

 section.


-

Compatibility with MHL enabled devices allows you to connect mobile device to HDMI input in TV set marked 

as MHL compatible.


-

It is recommended to use high quality and well shielded HDMI cables to avoid possible interferences.


-

Please use headphones with 3.5mm TRS connector. Excessive sound pressure from headphones can cause 

hearing loss.

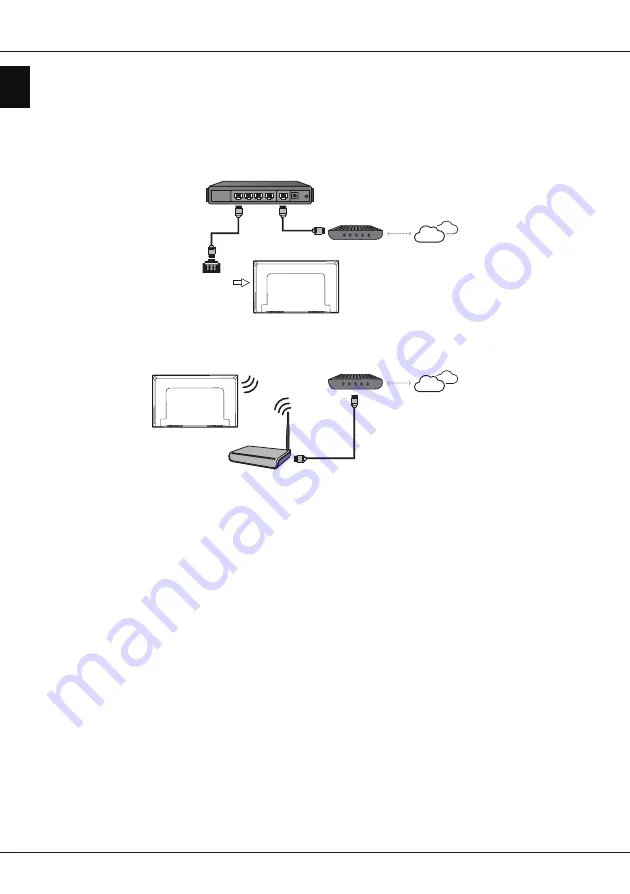
Connect to the Internet

Wired connection

Wireless connection

Router

Modem

Internet

LAN port

Modem

Internet

Wireless router

Note: The following instructions are just the usual ways to connect your TV to the wired or wireless network. 

The connection method may be different depending on your actual network configuration. If you have any 

questions about your home network, please refer to your Internet service provider.

Summary of Contents for 55UC6596

Page 1: ...acturer or his service agent or a similar qualified person in order to avoid a hazard Leave more than 10cm clearance around the television to allow adequate ventilation The ventilation should not be i...

Page 2: ...you face interruptions in audio reception you should restart your Bluetooth device to find frequency with less interferences and if you continue to face issues you should move closer to TV or increas...

Page 3: ...cordance with your national legislation and the Directive 2012 19 EU 2006 66 EC and 2008 12 EC By disposing of these products correctly you will help to conserve natural resources and will help to pre...

Page 4: ...settings menu 10 Chapter 4 Using more of your TV Installing channels 11 Common interface 11 Using the common interface module 11 Accessing common interface services 11 Using subtitles 11 Turning on of...

Page 5: ...er cord before connecting devices Cable Chapter 1 Connections HDMI 3 4K HDMI 4 4K LAN SPDIF Component input CMP R L Pr Pb Y Video Audio AV input Antenna Cable input 5V 0 5A MAX USB 2 0 Service port Co...

Page 6: ...d on the HDMI port identified with ARC To use ARC function please turn on T Link function first as described in the T Link section Compatibility with MHL enabled devices allows you to connect mobile d...

Page 7: ...select a sound type available for selected analogue TV programme to select an audio language available for selected digital TV programme GUIDE To toggle the Electronic Programme Guide on or off only a...

Page 8: ...when available To turn on the voice function Available only when the network connection is normal Note This remote control is available only for selected models The remote control type may be changed...

Page 9: ...the TV on and off 1 When the power cord is connected the TV will be turned on directly or be in standby mode If the TV is in standby mode press the or POWER button on the set or the button on the rem...

Page 10: ...xperience a problem using an application please contact the content provider According to circumstances of the content provider an application s updates or the application itself may be discontinued D...

Page 11: ...nsertion of a common interface module may damage both the module and your TV 1 Following the directions printed on the common interface module gently insert the module into the common interface slot o...

Page 12: ...nabling or disabling T Link 1 Press on the remote control select System T Link and press OK to enter 2 Press to select T Link and press OK to enter 3 Press to select On or Off and press OK to confirm...

Page 13: ...select Apply and press OK to confirm Custom schedule Press the red button to set a schedule You can select one or more items and press OK to edit then add it into your schedule list Select date Press...

Page 14: ...nt lighting Try to clean the remote sensor window on the TV front with a soft cloth If the above suggestions do not solve your technical issue please refer to the warranty card for service information...

Page 15: ...UT WARRANTY OF ANY KIND EITHER EXPRESS OR IMPLIED TCL EXPRESSLY DISCLAIMS ALL WARRANTIES AND CONDITIONS WITH RESPECT TO THE DEVICE AND ANY CONTENT AND SERVICES EITHER EXPRESS OR IMPLIED INCLUDING BUT...

Reviews: