background image


1

5


3. 

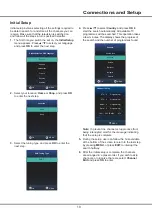
The search process may take a few minutes. During 

the process, you can press 

MENU

 or 

EXIT

 to abort 

halfway.

4. 

Once the scan ends, the TV automatically goes to 

the first channel searched, and all channels are 

arranged in a preset order. You can press 

LIST

 to 

display the channel list.

DTV Manual Tuning

This allows you scan for digital channels from a specific 

frequency range you select.

1. 

Select 

Preference

 > 

Channel

 > 

DTV Manual 

Tuning

, and then press 

OK 

to enter.

2. 

Press ▲/▼/◄/► to select the country, and then 

press 

OK

.

3. 

Press ◄/► to select a 

channel

 range and press 

OK

 to start channel scan.

4. 

Press 

MENU

 to return or 

EXIT

 to close the menu.

ATV Manual Tuning

This allows you scan, fine tune and store analogue 

channels manually. Operations are similar to that of

 DTV 

Manual Tuning.
1. 

Select 

Preference

 > 

Channel

 > 

ATV Manual 

Tuning

, and then press 

OK 

to enter.

2. 

Press ▲/▼ to highlight 

System BG 

(the system 

displayed may vary), press ◄/► to select the PAL 

system, and then press 

OK

.

3. 

Press ▲/▼ to highlight 

Search

 and press ◄/► 

to start channel scan. To fine tune the channel 

searched, highlight 

Fine Tune

 and press ◄/►. To 

store the channel to your preferred channel number, 

highlight 

Storage to 1 

(the number displayed may 

vary) and press ◄/► to select a channel number.

4. 

Press the red button to save the setting, and then 

press 

MENU

 to return or 

EXIT

 to close the menu.

Country

This option shows the state for DTV tuning, the country 

showed varies according to the country you select in 

Auto Tuning

 and 

DTV Manual Tuning

.

Bandwidth Switch

This allows you to switch between different bandwidths, 

if available, for DTV tuning. The availability and 

adjustability of this option varies according to the 

country you select for DTV tuning. For some countries, 

this option is not available; and for some conutries, this 

opiton is not adjustable.

Program Edit
1. 

Select 

Preference

 > 

Channel

 > 

Program Edit

 and 

press 

OK

 to enter.

This section explores the system settings menu of your 

TV. Each menu is outlined and detailed to help you get 

the most from your TV. Please note that some function 

might be unavailable in certain input source. To access 

the menu system

1. 

Press 

, press ▲/▼/◄/► to select 

Preference 

and then press 

OK

 to display the main menu. Or,


after you enter an input source, press 

MENU

 on 

remote control to display the main menu.

2. 

Press ◄/► to select 

CHANNEL

PICTURE

SOUND

TIME

OPTION

LOCK

, then press 

OK

 to 

enter the submenu.

3. 

In the submenu, press ▲/▼ to select menu options, 

press ◄/► to set functions or change values, press 

OK

 to open the corresponding submenu or activate 

a setting.

4. 

To return the previous menu, press 

MENU

. To close 

the menu, press 

EXIT

.

Note

: Figures and illustrations in this User Manual are 

provided for reference only and may differ from actual 

product appearance. And for some models, certain 

options are not available.
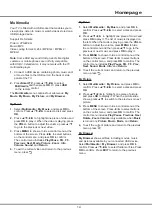
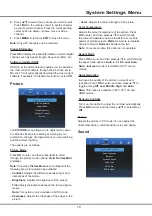
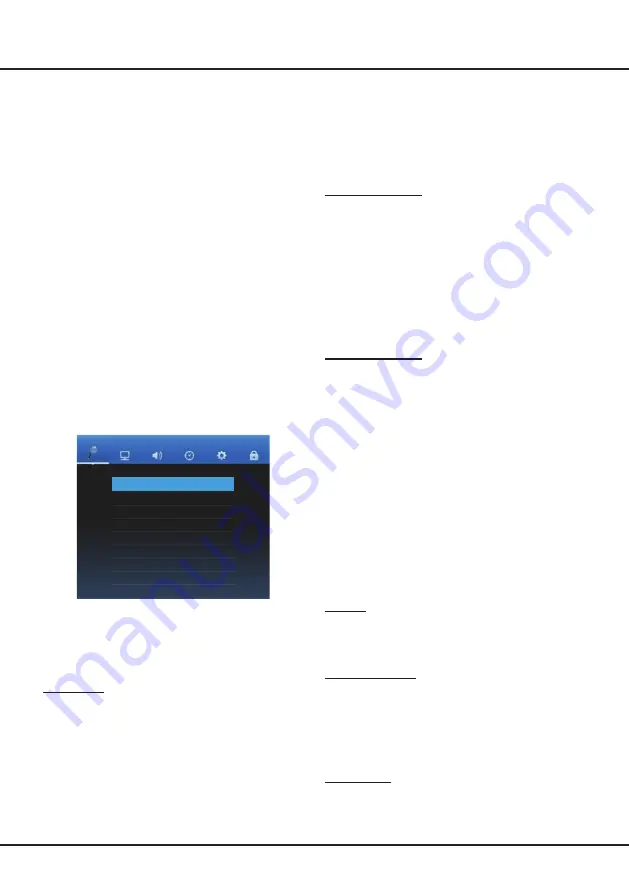
Channel

CHANNEL

Auto Tuning

DTV Manual Tuning

ATV Manual Tuning

Program Edit

Country Australia

Signal Information

Software Update(OAD)

Bandwidth Switch

The 

CHANNEL

 menu allows you to select all the 

settings required to be able to search for and store all 

the channels you can receive. You also may edit those 

channels.
The options are as follows:

Auto Tuning
1. 

Select 

Preference

 > 

Channel

 > 

Auto Tuning

, and 

then press 

OK

 to enter.

2. 

Press ◄/► to select 

ATV

DTV

 or 

ATV


+


DTV

 as 

desired, press ▲/▼/◄/► to select the country, and 

then press 

OK

Note

: When 

ATV

 is selected, only analogue channels 

will be searched for, and the original analogue channels 

will be overwritten. The same applies to 

DTV 

and 

ATV + 

DTV

.

Chapter 4 

System Settings Menu

Smart TV

Summary of Contents for 32E4900S

Page 1: ...32E4900S...

Page 2: ...ystem Settings Menu Channel 15 Auto Tuning 15 DTV Manual Tuning 15 ATV Manual Tuning 15 Country 15 Bandwidth Switch 15 Table of Contents Program Edit 15 Signal Information 16 Software Update OAD 16 Pi...

Page 3: ...children about the dangers of climbing on furniture to reach the television or its controls Precautions Read all of the instructions before operating the set Keep these instructions well for future us...

Page 4: ...4 Introduction Press MENU button to bring up the NAV menu select to bring up the main menu Long press MENU button to return to the previous menu...

Page 5: ...st picture quality It also provides an uncompressed digital connection that carries both video and audio data by way of an integrated mini plug cable USB 2 0 socket input This socket can be used to co...

Page 6: ...dio language TEXT SUBTITLE LIST Not use for some model use Goes to the smart TV homepage In USB mode Press to select sound track mode Searches forward Searches backward Note The above six buttons can...

Page 7: ...pply It must not be connected to a DC supply If the plug is detached from the ca ble do not under any circumstances connect it to a mains socket as there is a risk of electric shock Note socket of the...

Page 8: ...red network 1 Ensure you have An Ethernet cable long enough to reach your TV A router or modem with an available Ethernet port A high speed Internet connection An Ethernet LAN port on the back of the...

Page 9: ...U_WiFi PUB_WiFi Home HelloWiFi SmileWiFi Disconnect Refresh View Detail MAC Address Press OK to see the MAC address of your TV set Then press MENU to return or press EXIT to exit menu Network Configur...

Page 10: ...T to interrupt the search halfway 6 After the initial setup is complete the channels are arranged in a preset order If you wish to skip channels or organize channels select Channel Edit and press OK t...

Page 11: ...continued Unsupported fonts within the provider s content will not display normally Depending on your country s regulations some applications may have limited service or not be supported Using Homepag...

Page 12: ...need a webcam to achieve some of the above functions Webcam is not a standard accessory you may need to buy separately Some external devices like webcam smart phone game handle and external wireless a...

Page 13: ...GoLive is a revolutionary international video entertainment platform that delivers a diverse selection of content from all over the world to virtually any connected TV phone tablet or box Our unique t...

Page 14: ...ng movies music and pictures available in your connected USB device Select Multimedia My Browser and press OK to confirm Press to select folders or files Press OK to confirm Press EXIT to return to th...

Page 15: ...o the country you select for DTV tuning For some countries this option is not available and for some conutries this opiton is not adjustable Program Edit 1 Select Preference Channel Program Edit and p...

Page 16: ...set the channel as your favourite channel Press the corresponding colour button to delete rename move or skip a channel 3 Press MENU to return or EXIT to close the menu Note Only ATV channels can be r...

Page 17: ...PCM if the audio device connected to the SPDIF socket is only compatible with linear PCM signal Otherwise select Auto Time TIME Auto Sync On Clock 03 47 Off Time Sleep Timer Time Zone The TIME menu a...

Page 18: ...ftware Update You can check the software version and update the software by USB or by network Lock LOCK Lock system Off Set Password Block Program Parental Guidance The LOCK menu allows you to effecti...

Page 19: ...can view the recording from the start from a specific time point or from time point A to time point B You can also fast forward or rewind the recording or play the recording in slow motion Chapter 5 S...

Page 20: ...time and end time to schedule a recording You can also set the record mode Press to select Mode and press to select Once Every Day or Weekly Once a schedule is set the TV will automatically switches...

Page 21: ...may be something wrong with your mobile hard disk s damaged or with low voltage You could increase power supply by inserting the two plugs on one end on the USB wire into TV s USB port simultaneously...

Page 22: ...o picture no sound 1 Check if the fuse or circuit breaker is working 2 Plug another electrical device into the outlet to make sure it is working or turned on 3 Power plug is in a bad contact with the...

Page 23: ...e provided solely for your personal noncommercial use You may not use any content or services in a manner that has not been authorized by the content owner or service provider Without limiting the for...

Reviews: