background image

9

Advanced Functions

Chapter 3

Sound

Press 

MENU 

to enter the main menu, Press     /     button 

to select.
Press 


to enter.

Press 

MENU

 again to exit or back to parent menu.


Noise Reduction

Set options to reduce video noise. 

Off                            

Select to turn off video noise detection.

Low                          

Detect and reduce low video noise.

Medium                   Detect and reduce moderate video noise.
High                         

Detect and reduce enhanced video noise.


Dynamic Backlight 


Press     /      button to select (Off/Low/Hight).

Picture Mode

Adjust picture mode to change picture appearance. 

Press    /    button to select(Standard / Vivid / Soft / User / 
Power Saving). 

Standard                 Produces a highly defined image in a 
                                normally lit room. 
Vivid                        Produces a highly defined image in a 
                                brightly lit room
Soft                         Produces a highly defined image in a 
                                soft lit room.
User                        Select to customize picture settings.


Brightness

Adjust darkness of black sections in the picture. 
Press     /      button to adjust.

Power Saving         Under power saving condition, it can 
                                meet “Energy Star” requirement.
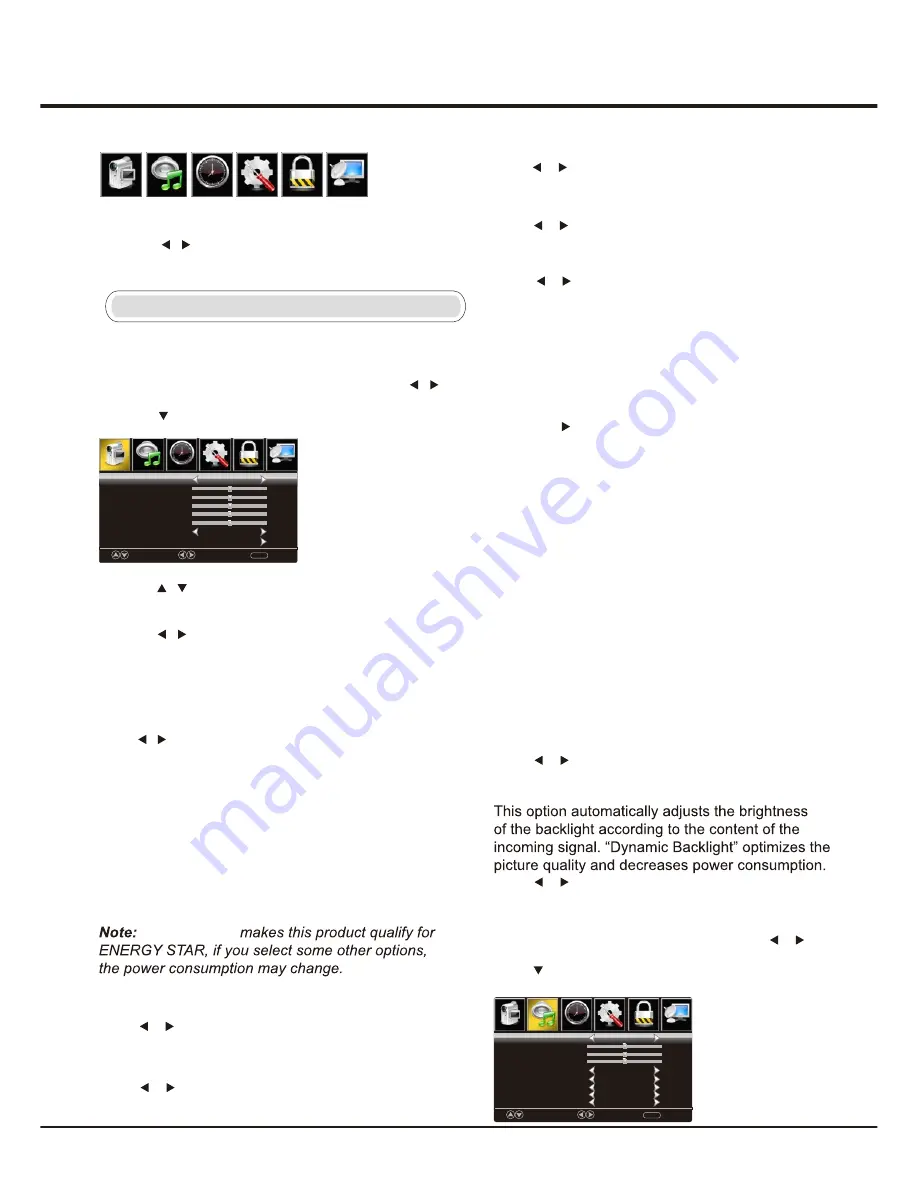
Main Menu Operation

Picture

1. Press MENU to enter the main menu, Press    /      
    button to select.
2. Press     to enter.

3.Press     /     button to select among Picture Mode / 
Brightness / Contrast / Color / Tint / Sharpness / 
Color Temperature / Advanced Settings.
5.Press     /      button to adjust.
6.Press MENU again to exit or back to parent menu.

Move   

Select 

MENU  

Picture Mode

Brightness
Contrast
Color
Tint
Sharpness
Color Temperature
Advanced Settings

User

50
50

50

Normal

Return   

50
50

Picture

Sound

Time

Setup

Lock

Channel

Picture

Sound

Time

Setup

Lock

Channel

Menu

1. Press MENU to display the main menu or return to the 
    previous menu or close the main menu.
2. Press     /    to highlight the desired menu icon.


Tint

Adjust the hue(Red,Green) of the picture. 
Press    

button to adjust.

 /      


Sharpness

Object edges are enhanced for picture detail. 
Press     

button to adjust.

 /     


Color Temperature

Change the overall color cast of the picture. 

Normal                     
Warm                       
Cool                         

Produces a vivid image.

Produces a red-hued image.
Produces a gentle blue-hued image.


Advanced Settings

Adjust advanced video features to fine tune the picture. 
Press 

OK/

    button to enter.


Aspect Ratio

Adjust how the picture fills the screen. 

Normal                     

Wide                        

Zoom                       

Cinema                   

Automatically  adjust Aspect Ratio 

                                  based on TV size and TV program.

Use to watch wide screen(16:9) 

                                 content.

Expands image to fill screen. Top and 

                                 button maybe cut off.

Stretches image at edges but keeps  a 

                                clear image in the center.


Contrast

Adjust the white level of the picture. 
Press      /     button to adjust.

Color

Adjust the color intensity of the picture.

Press

button to adjust.


 /     

Bass
Treble

Audio Language

AVL

Digital Audio Output
Surround Sound

50
50

English

RAW

Off
Off

Balance

0

MTS

Stereo

Move   

Select   

Return

MENU  

Picture

Sound

Time

Setup

Lock

Channel

Sound Mode

Standard

“Power Saving”


Dynamic Contrast


Automatically adjust picture detail and brightness.

Press     /      button to select (Off/On).

Summary of Contents for 32B2800

Page 1: ...and 48 States or 1 877 800 1269 for AK HI and Puerto Rico User s Guide For use with model 32B2800 Figures and illustrations in this User s Guide are provided for reference only and may differ from actual product appearance Product design and specifications may be changed without notice ...

Page 2: ......

Page 3: ...they exit is ...

Page 4: ...ronment Cleaning Hanging the TV Set on the Wall Sockets Remote Control Functions Buttons on the TV Switching off Setup Wizard S Switching on Source elect Menu Picture Sound Time Setup Lock Photo Music Channel PC AV Component HDMI Media Troubleshooting 16 Base Installation Important Information 1 Important Safety Instructions 2 17 Battery Caution Disposal Information 17 Care and Cleaning 17 Televis...

Page 5: ...he cabinet damaged Where the mains plug or an appliance coupler is used as disconnect device the disconnect device shall remain readily operable Where an all pole mains switch is used as the disconnect device the switch shall remain readily operable Power and Plug Do not allow anything to rest on or roll over the power cord and the signal cable Protect the power cord and the signal cable from bein...

Page 6: ...In some menus VOL also acts like the OK button on the remote HDMI 1 HDMI1 and HDMI2 socket input HDMI 2 HL M or The HDMI can be used to connect a PC with a compatible video card installed certain DVD players or a high definition compatible digital satellite decoder This socket p High Definition Multimedia Interface socket rovides an uncompressed digital connection that carries both video and audio...

Page 7: ...r television s functions are available via the menus that appear on the screen The remote control supplied with your set can be used to navigate through the menus and to configure all the general settings In TV source use these buttons to enter channel ...

Page 8: ...7 RF IN long press MENU button for 5 seconds ...

Page 9: ...nalog Digital RF CH 7 Total Found Move Select Return MENU Cable 0 Source elect S Press INPUT button to display the input source list Press button to select the input source Press OK button to enter the input source Press Clear button to quit Source Select TV Component HDMI1 HDMI2 PC Media AV Setup Wizard TV Location Go to next step Please select your preferred mode Move Select Clear MENU Retail Mo...

Page 10: ...tness Contrast Color Tint Sharpness Color Temperature Advanced Settings User 50 50 50 Normal Return 50 50 Picture Sound Time Setup Lock Channel Picture Sound Time Setup Lock Channel Menu 1 Press MENU to display the main menu or return to the previous menu or close the main menu 2 Press to highlight the desired menu icon Tint Adjust the hue Red Green of the picture Press button to adjust Sharpness ...

Page 11: ...olume control Press button to select On Off 2 Press button to adjust 3 Press MENU again to exit or back to parent menu Sleep Timer Set a timer for the TV to turn off automatically Press button to select Off 5min 10min 15min 30min 60min 90min 120min 180min 240min Picture Sound Time Setup Lock Channel 3 Press button to select among Menu Language Transparent OSD Timeout Closed Caption Input Label Oth...

Page 12: ...ease refer to page 8 Press button to select On Off ption O Adjust the digital Closed Captioning setting Press OK button to enter Mode Set the Mode of digital Closed Captioning Automatic uses broadcaster s style Press button to select Default Custom Font Style Select from 8 font styles Press button to select Default Font 0 Font 1 Font 2 Font 3 Font 4 Font 5 Font 6 Font 7 TV Default AV Default Close...

Page 13: ...e content ratings will increase depending on the level of the age based rating For example a program with a TV PG V violence rating may contain moderate violence while a TV 14 V violence rating may contain intense violence So locking a higher level option will automatically cause locking the options that has more sensitive level MPAA This system defines the rating control which come from MPAA rule...

Page 14: ...ams which are using French rating system French Channel Press ENU to enter the main menu Press M button to select 2 Press button to select among Air Cable Auto Scan Favorite Channel List Show Hide Channel Number Channel Label 1 Press to enter 3 Press button to adjust 4 Press ENU again to exit or back to parent menu M Air Cable Select signal type Press button to select Air Cable Move Select Clear M...

Page 15: ...TV 3 Close Caption in SETUP menu is invalid 4 US Canada RRT Setting and Reset RRT in LOCK menu is invalid 5 mode has no CHANNEL menu PC AV COMPONENT HDMI 1 PICTURE menu and description are the same as that for mode TV 2 TIME menu and description are the same as that for mode TV 3 The function of Close Caption is available only in AV TV mode 4 US Rating Canada Rating is available only in AV TV mode...

Page 16: ... press OK button to enter Press button to select drive disk you want to watch then press OK button to enter Press button to select return option to back to the previous menu Press button to select the file you want to watch in the file selecting menu then press OK button to display picture Press button to select PHOTO in the main menu then press OK button to enter Press button to select drive disk...

Page 17: ...VGA mode Perhaps the TV can not recognize the resolution set by the PC Suggest to change to the best resolution or other standard resolutions of the Windows system Snowy dots and interference If the antenna is located in the fringe area of a television signal where the signal is weak the picture may be marred by dots When the signal is extremely weak it may be necessary to install a special antenn...

Page 18: ...Chapter 4 Other Information 17 ...

Page 19: ...18 ...

Page 20: ...19 ...

Page 21: ...20 ...

Page 22: ...Part No 72 HB2800 ENA9A ...

Reviews: