


6
SINGTHING User Manual
(5)
OUT jack
– Use this output to connect SingThing to an audio mixer for larger
venues that have a PA system. All of the inputs (voice, instrument, and aux)
are mixed together and sent out as a mono signal via this output.
(6)
MIDI Input
– This input gives you the ability to control parameters from a
MIDI controller or MIDI keyboard.
(7)
Headphone Output
– Plug in a 1/8" (3.5 mm) stereo headphone jack here.
(8)
USB
– This is how you connect SingThing to your computer. SingThing, like
all of our products, works in concert with VoiceSupport to manage your
presets and keep your products updated with our latest firmware. Download
it here:
TC-HELICON.com/products/voicesupport
(9)
Power Jack & Power Switch
– Plug your SingThing’s power supply into the
lower left jack. Do NOT substitute any other power supply or you will likely
damage your SingThing. Sad!
Toggle your SingThing on and off with the Power Switch to the right of the
Power Jack.
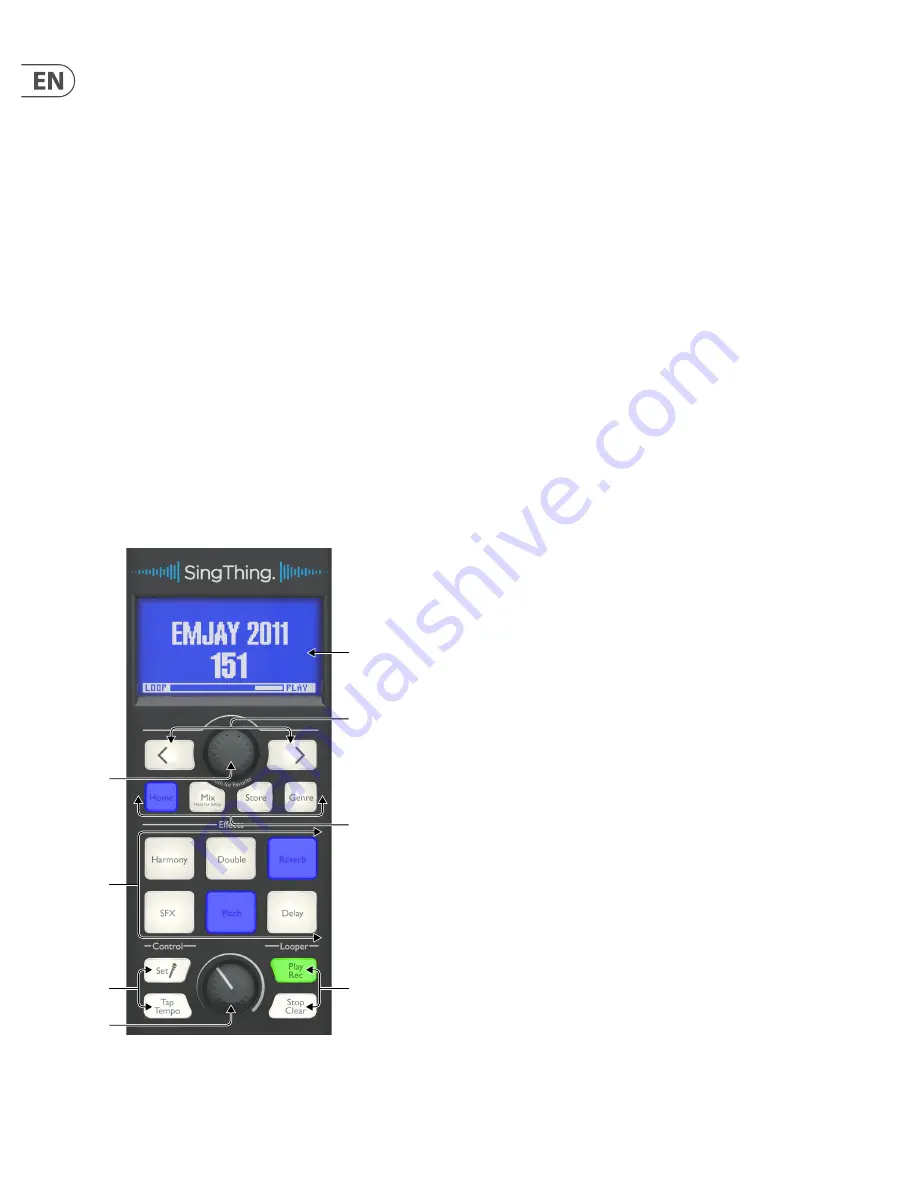
4. The Front Panel
Knobs & Buttons
The front panel of your SingThing is the control interface you’ll use to create
interesting new sounds and manipulate your voice in ways that you’ve never
heard before. There’s a lot of potential for exploration here, so have fun with it!
This section will give you a quick overview of the front panel features, then we’ll
dive into the specifics in later sections.
(1)
LCD Display
– The LCD Display shows the currently-selected preset’s name
and number, along with some other useful details like the preset’s genre.
(2)
Control Knob
– This knob is your master control tool. Use it to scroll
through presets, adjust level settings, control effects parameters, and more!
Press the knob while on the home screen to select the displayed preset as
one of your favourites.
(3)
Navigation Buttons
– Here we have your left/right navigation buttons to
switch between presets or change menu pages.
(4)
Menu Buttons
– These buttons, from left to right, will get you back to the
home screen, allow you to change mix volume and system settings, save
presets, and navigate presets by genre.
(5)
Effects
– Press these buttons to hear what almost 20 years of “hey, wouldn’t
it be cool if…” sounds like when it’s applied to technology for your voice.
There are six styles to choose from! Press and hold an effect button to bring
up a simple editing menu for that effect.
(6)
Control
– With the Mic Set button, you can automatically set the input level
on your microphone so that it’s just right for your voice. Tap Tempo lets you
tap in time to the beat, causing all of the time-based effects in SingThing
(echoes and delays) to sync up to this tempo.
(7)
Looper
– One of our favourite things to do at the TC HELICON HQ is play
around with vocal loops. Now you can, too! This simple one-track looper is
easy to use and a lot of fun.
(8)
Volume
– This is the master output level control. Play it loud!
5. Menu Buttons
5.1 Home
The Home button does what you might imagine. Press once to jump back to the
home screen, which will show you the current preset and information about that
preset, including its genre and whether or not it’s one of your favourites. Just a
reminder, you can make any preset a favourite by pressing the Control Knob while
that preset is displayed on the home screen.
If you press and hold the Home button, it will flash white and the LCD will show
you the Switch Learn Mode screen. Switch Learning is a simple and intuitive way
to set up footswitch or mic control on your SingThing. You may have noticed that
the MP-75 microphone that came in the box has a button – did you know you can
use that button to control the features on your SingThing? True fact. You can use
Mic Control (or a Switch-3 or Switch-6, sold separately) to turn effects on and off,
start and stop the looper, or scroll through presets!
Switch Control
To start from a blank slate, make sure no effects are turned on when you
enter Switch Learn Mode. Here’s how to teach your SingThing a new trick with
your switches:
1. Press and hold the Home button.
2. Press a Mic Control button on your MP-75 or MP-76 microphone, or one of
the footswitches on a Switch-3 or Switch-6. SingThing will recognize your
microphone or switch and prompt you to choose the functions you want to
control with the specific button or switch you pressed.
3. Select from any of the white-lit buttons – you can control a single effect,
or several things at once, even Setup features! For example, there’s a guitar
tuner in the Setup menu; if you navigate to the guitar tuner before entering
Switch Learn Mode, then choose Mix as the feature for your switch, you can
turn the guitar tuner on and off with your footswitch or mic. Neat!
4. Repeat steps 2-3 to assign controls for all the buttons on your microphone or
footswitch. In addition to the MP-75 and MP-76 microphones, SingThing also
supports the Sennheiser E835FX.
(1)
(3)
(4)
(2)
(6)
(8)
(7)
(5)
Summary of Contents for SINGTHING
Page 12: ......