background image

User Manual NVR TBK-NVR5016P8 TBK PLUS   


31 

www.tbkvision.com 

9


Remote Surveillance 

9.1 IE Remote Surveillance by NAT 

9.1.1 NAT Settings 


The NVR shall be powered on and connected to the network. 


Go to Main Menu

Setup

Network

Network. You can obtain the IP address, Subnet Mask and Gateway automatically. You can also 

manually input them according to the actual network situation. And the IP address shall be in the same network segment as the network 
which is used. 


Set the preferred or alternative DNS Server (Please refer to 5.6.1 Network for details). 


Go to Main Menu

Setup

Network

NAT tab. 


Enable NAT and input the NAT Server (The default NAT Server is 

www.autonat.com

). 


Click “Apply” to save the parameters (Please refer to 5.6.4 NAT for details). 


9.1.2 NAT Access 

After finishing the NAT settings, you can enter the NAT Server on the remote PC (Input 

http://www.autonat.com


to go to the IE client). If you 

are the first time to access the NAT, the network will download the ActiveX automatically. 


Note: The WEB client must be in the remote network. It cannot be in the same local network as that of the NVR; 

otherwise, access failure will happen

. If you cannot download and install ActiveX, please refer to FAQ Q8. 

 
After installing ActiveX successfully, it will pop up the login box. 


Serial No: 

The MAC address of the NVR (Go to Main Menu

Information

Network to check the MAC address of the NVR). 

User Name:

 The login username of NVR. The default username is 

admin

Password: 

The login password of NVR. The default password is 

123456


9.2 IE Remote Surveillance via LAN & WAN 

In order to view the NVR from a network it must be connected to a LAN/WAN or internet. The network setup should be done accordingly. 
Please refer to 5.6 Network Setup. 

9.2.1 Via LAN 


    Go to the NVR’s Main Menu

Setup

Network tab to input IP address, Subnet Mask, etc. If using DHCP, please enable DHCP in both the 

NVR and the router.   


    Enter Record Setup to set network video parameters like resolution, frame rate etc. 


Open IE on a computer on the same network. Input the IP address of the NVR in IE address bar and press enter. 


IE will download ActiveX component automatically. Enter the username and password in the subsequent window. 


Notice:  If  HTTP  port is  not  80, add  the  port  number after  IP  address.  For  example,  set  HTTP  port  as  82,  input  IP 
address  like  192.168.0.25:82.

  User  name  and  password  here  are  the  same  with  that  used  on  the  NVR.  The  default  is  admin  and 

123456.


9.2.2 Via WAN 

There are two ways for the NVR to connect to internet. 

1. Connect the NVR to internet through router or virtual server 


Go to the NVR’s Main Menu

Setup

Network interface to input IP address, Subnet Mask, etc. If using DHCP, please enable DHCP in 

both the NVR and router. 


Forward IP address and port number in Virtual Server setup of the router or virtual server. Configure the firewall to allow accessing the 

NVR.   

Note: Port forwarding settings may be different in different routers and server. Please refer to the router’s manual for details. 


Summary of Contents for NVR5008

Page 1: ...www tbkvision com TBK VISION PLUS TBK NVR5016P8 User manual v1 0 Please read this manual carefully for correct use of the product and preserve it for reference purposes Network Video Recorder...

Page 2: ...ith a dry cloth Do not block any ventilation openings and ensure proper ventilation around the machine Do not power off the device at normal recording condition This machine is for indoor use only Do...

Page 3: ...u Setup Guide 12 5 1 BASIC CONFIGURATION 13 5 1 1 System 13 5 1 2 Date Time 13 5 1 3 DST 14 5 2 LIVE CONFIGURATION 14 5 2 1 Live 14 5 2 2 Main Monitor 15 5 2 3 Mask 15 5 3 RECORD CONFIGURATION 16 5 3...

Page 4: ...8 1 5 Online Information 29 8 1 6 Record Information 30 8 1 7 QRCODE 30 8 2 MANUAL ALARM 30 8 3 DISK MANAGEMENT 30 8 4 UPGRADE 30 8 5 LOGOFF 30 9 Remote Surveillance 31 9 1 IE REMOTE SURVEILLANCE BY...

Page 5: ...rd modes Manual Schedule Motion detection and Sensor alarm recording Support recycle after HDD full Resolution frame rate and picture quality are adjustable Two record search mode time search and even...

Page 6: ...er the machine and secure the HDDs with the screws and then install back the top cover Note For this series products you shall connect the power and data cables first and then put the HDDs onto the bo...

Page 7: ...ease take the real object as standard Rear Panel for TBK NVR5016P8 Name Description DC12VAudio In Power inputFor two way talk connect to active pickups Audio out Audio output connect to the sound box...

Page 8: ...the alarm out port Then insert the signal wires of the alarm output devices into the port of NO and COM separately Finally tighten the screws Provided that the external alarm output devices need powe...

Page 9: ...ut Capital letters and symbols click Shift button again to return It supports mouse drag Take setting up motion detection area for example Click customized hold down the left button and drag to set mo...

Page 10: ...f the VGA HDMI output 3 1 2 Shutdown You can power off the device by using remote controller or mouse By remote controller Press Power button This will take you to a Shut down window The unit will pow...

Page 11: ...R TBK NVR5016P8 TBK PLUS 9 www tbkvision com 3 4 Live playback Click Playback button to playback the record Refer to Figure 3 3 You can do complete operation by clicking the buttons on screen Fig 3 3...

Page 12: ...efault IP 010 151 151 001 Once displayed on the monitor connected to the NVR we can see they are added from Menu Camera IP as next screen Column indicate Connected state The picture below is a guide T...

Page 13: ...d device and click Setup button to modify channel IP address of the device as shown in Fig 4 5 Fig 4 4 Search Devices Fig 4 5 Modify Devices To add IP cameras via WAN Please go to Main Menu IP Camera...

Page 14: ...s may be displayed as a single channel or in a grid fashion from different cameras Dwell mode is enabled only when the chosen display mode is not able to display all the available cameras Color If thi...

Page 15: ...orresponding operations Show System Time If selected displays the current time during live monitoring Max Online Users To set the maximum number of concurrent user logins in the NVR Show wizard If sel...

Page 16: ...can set up camera name To set up camera name Go to Main Menu Setup Live Live Refer to Fig 5 6 Fig 5 6 Live Configuration Live A software keyboard will pop up by clicking camera name area Click the le...

Page 17: ...ere is something you don t want to display in the live image You can set mask For a given channel a maximum of three areas can be masked If the mask function is not available in the added IP camera th...

Page 18: ...settings for all channels Click Apply button to save the setting Fig 5 11 Record Configuration Record Bitrate If the value of the parameter is set to exceed the maximum resources of the system the sy...

Page 19: ...Record Stamp interface Refer to Fig 5 13 Fig 5 13 Record Configuration Stamp Checkmark camera name and time stamp Click Setting button to set up the position of the stamp You can drag the camera name...

Page 20: ...n click to save Select other days and add schedule or copy settings from one schedule to the others under the Apply Settings To item Fig 5 15 Schedule Week Schedule 5 4 2 Motion Schedule This tab allo...

Page 21: ...f selected the local buzzer would be activated on an alarm Show Full Screen If selected there will pop up the chosen channel on the monitor on an alarm trigger To Alarm Out If selected this would trig...

Page 22: ...re details After clicking Area button a dialog box will pop up as Fig 5 20 Fig 5 20 Motion Area In the Area interface you can drag slide bar to set the sensitivity value 1 8 The higher the value is th...

Page 23: ...the setting 5 5 4 Alarm Out Alarm out includes three sub menus alarm out schedule and buzzer To set up alarm out Go to Main Menu Setup Alarm Alarm Out Alarm Out Refer to Fig 5 22 Input relay name and...

Page 24: ...address subnet mask and gateway IP and DNS server If you want to configure your own settings disable Obtain an IP address automatically item and input the IP address subnet mask gateway IP and DNS ser...

Page 25: ...nsfer media server in the TBK VMS 3000 The default server port for auto report is 2009 If it is modified please go to the transfer media interface to check Enable the auto report in the TBK VMS 3000 w...

Page 26: ...the server supplier to register a user name and password and then apply for a domain name online After the successful application user can access the device from the IE client by inputting that domain...

Page 27: ...0 Click OK to save the setting Fig 5 30 Add User Authority To delete user Go to Main Menu Setup Users interface Select the added user you want to delete and then click Delete button To modify user Go...

Page 28: ...allow computer users within a certain IP address range to access NVR E g if an admin user doesn t want computer users within IP address range from 192 168 000 002 to 192 168 000 004 to access the NVR...

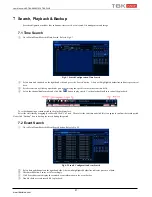
Page 29: ...de and click Play button to play record Use the playback toolbar to control the playback To set backup during a certain period in the playback interface Select the start time by dragging the slider an...

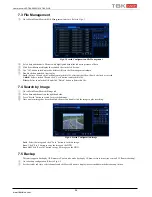
Page 30: ...this file Delete Select an unlocked file and click Delete button to delete this file 7 4 Search by Image Go to Main Menu Search Image tab Select data and channels on the right hand side Press Search b...

Page 31: ...nline user record and QRCODE 8 1 1 System Information In this interface user can check the hardware version MCU version kernel version device ID etc 8 1 2 Event Information In this tab you can search...

Page 32: ...e at the bottom of screen All recorded files in the hard disk will be lost once it is formatted 2 Advanced User may check model S N firmware health status of the disk in this interface User also can m...

Page 33: ...Name The login username of NVR The default username is admin Password The login password of NVR The default password is 123456 9 2 IE Remote Surveillance via LAN WAN In order to view the NVR from a n...

Page 34: ...ctly user can go to Main Menu Information Network interface to check IP address If users want to utilize dynamic domain name please apply for a domain name in a DNS server supported by the NVR or rout...

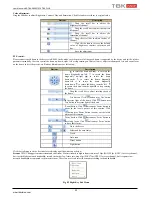
Page 35: ...otate the dome downwards to rotate the dome diagonally down left to rotate the dome diagonally down down to rotate the dome towards left to rotate the dome towards right to stop rotating the dome Drag...

Page 36: ...back interface Refer to Fig 8 3 Select the record date and channels and double click the file name in the record file list box Then user can play that file and preview the picture Fig 8 3 Play Record...

Page 37: ...Search button Double click certain item to playback File Management Go to Search File management Refer to Fig 8 7 Select highlighted date and channels Click Search button to search the recorded files...

Page 38: ...should select an option from the menu list on the left and then set up the relative parameters Only one user can do configuration setup at a given point of time Click Config tab to go to the below in...

Page 39: ...PLUS 37 www tbkvision com Fig 8 10 Remote Information Search Note There may be slight differences with respect to functions of remote surveillance between through IE and through Apple PC Here we only...

Page 40: ...a The power from the adapter may be not enough for operating the NVR Please use the power adaptor supplied along with the NVR b It could be a wiring issue Please check the power and data cables of th...

Page 41: ...ks from one NVR to another is not recommended Q12 What is the minimum configuration required for remote monitoring PC Module Parameters CPU Intel Celeron 2 4G Motherboard Intel 845 HDD 80G RAM 512M VG...

Page 42: ...MB h coverage rate of hard disk recording time hour channel numbers For instance one customer sets resolution to1080P frame rate to 30fps bitrate to 1 5M and enables total 4 channels He wants the unit...

Page 43: ...Encode CBR Quality 6 levels Mode Manual timer motion sensor File manager Lock unlock Playback Playback 4 CH Search Time calendar search event motion Function Play Pause FF FB Digital Zoom Alarm Mode...

Reviews: