background image

E-18

VIDEO

S-VIDEO

Connecting Personal Computers and Video Equipment

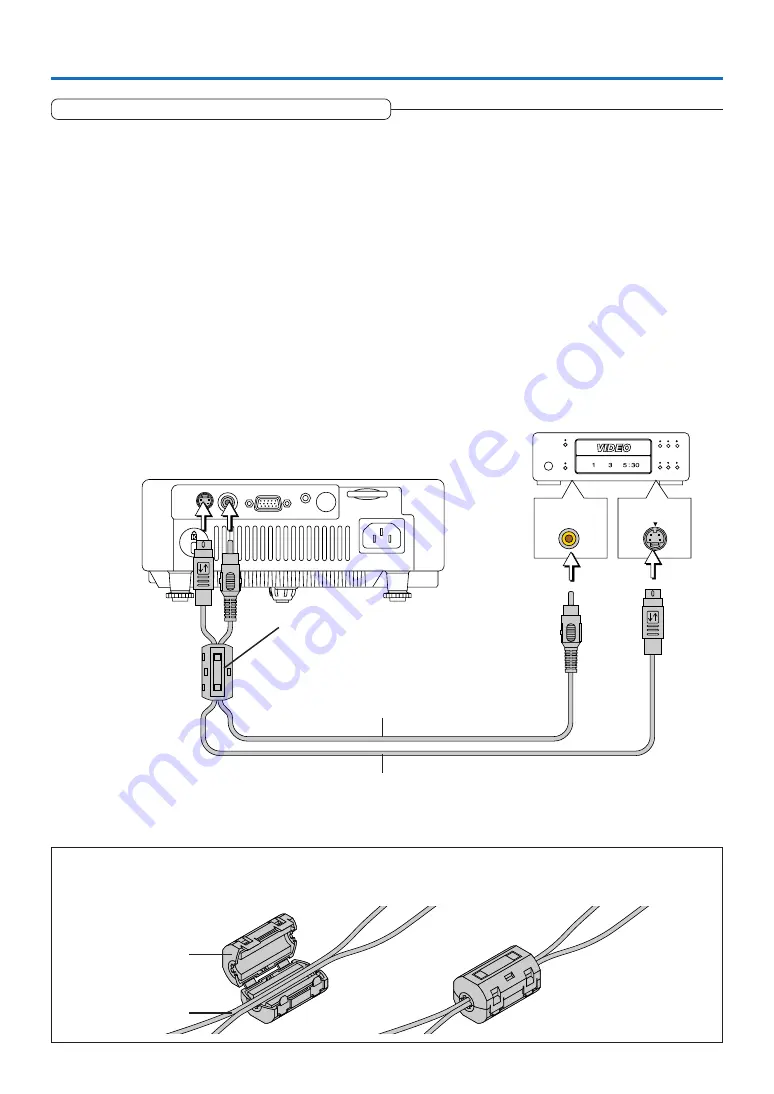
Connections with Composite Signals

Video Equipment with VIDEO Connectors

• Connect to the projector’s VIDEO connector using a commercially available video cable.
• The input setting of the VIDEO connector has been set to “Auto” at the factory; however, if the projector does not project, please

change the input setting to “Your Country’s Television Broadcast System” using the menu sequence of [Setup] 

 [Input Format]

 [Video].

See “Input Format” on Page E-49.

Video Equipment with S-VIDEO Connectors

• Connect to the projector’s S-VIDEO connector using a commercially available S-Video cable.
• The input setting of the S-VIDEO connector has been set to “Auto” at the factory; however, if the projector does not project,

please change the input setting to “Your Country’s Television Broadcast System” using the menu sequence of [Setup] 

 [Input

format] 

 [S-Video].

See “Input Format” on Page E-49.

Video deck, DVD player, document
camera, etc.

Video cable (RCA pin plug)
(Commercially available)

S-Video cable (Mini DIN 4-pin plug)
(Commercially available)

Cable

Ferrite core

Attaching the Ferrite Core

Gather the commercially-available video cable and S-video cable as illustrated in the diagram and attach the supplied ferrite
core.

Ferrite core (Supplied item)

Summary of Contents for KG-PS100S

Page 1: ...egistered trademarks of Microsoft Corporation U S A and other countries Macintosh is a trademark of Apple Computer Inc U S A Note that even in the absence of explanatory notes serious attention is pai...

Page 2: ...erence received including interference that may cause undesired operation U S Responsible Party Address Tel No PLUS Vision Corp of America 9610 SW Sunshine Court Suite 500 Beaverton OR 97005 503 748 8...

Page 3: ...s The above cautions are given on the bottom of the product WARNING TO PREVENT FIRE OR SHOCK DO NOT EXPOSE THIS UNIT TO RAIN OR MOISTURE DO NOT USE THIS UNIT S GROUNDED PLUG WITH AN EXTENSION CORD OR...

Page 4: ...igned to provide reasonable protection against harmful interfer ence when the equipment is operated in a commercial environment This equipment generates uses and can radiate radio frequency energy and...

Page 5: ...riodically using a vacuum cleaner If accumulated dust blocks the ventilation slots the unit will overheat which may cause the unit to malfunction Use a soft brush attachment when using the vacuum clea...

Page 6: ...in this projector makes possible an astonishing 2000 1 high contrast ratio By widening the difference of brightness between black and white you can see a degree of sharpness that is greater than just...

Page 7: ...YCbCr Connector or YPbPr Connector E 19 Connections with the AUDIO Jack E 20 Power Cable Connections and Switching the Power On Off E 21 Operating E 21 Finishing E 23 Adjustment of the Projection Scre...

Page 8: ...on Timer E 50 Volume E 50 Option E 51 Language E 51 On Screen E 51 Background E 51 Startup Screen E 52 Security Lock E 52 Network Password E 52 Info E 53 Status E 53 Factory Default E 53 Lamp Timer Re...

Page 9: ...E M U T E E C O W IR E L E S S V IE W E R V O L K S T N Z O O M C A N C E L Q U IC K M E N U E N T E R Q Wireless remote control unit without wireless LAN includes one button battery 1 Applicable Pro...

Page 10: ...tion 1 Security Sheet 1 Security Label 1 S O U R C E K E Y S T O N E A U TO K E Y S T O N E PO W ER ST AN DB Y ST AT US M EN U QU IC K M EN U COM PUT ER POW ER STA NDB Y QUI CK COL OR ADJ VID EO FRE E...

Page 11: ...K E Y S T O N E P O W E R S T A N D B Y S T A T U S M E N U Q U I C K M E N U Adjuster button E 25 Focus ring E 25 Exhaust vents Front adjuster E 25 Lamp cover E 59 Remote control sensor E 13 Lens Ven...

Page 12: ...tment button E 29 SOURCE button E 26 AUTO button E 26 ENTER button E 34 SELECT buttons Buttons used in menu and quick menu operations E 33 34 AC IN connector E 21 Built in security slot See descriptio...

Page 13: ...to the STANDBY mode 3 Buttons used for input selection E 26 COMPUTER button and VIDEO button Video S Video 4 MUTE button E 28 Temporarily cancels the video and audio 5 Input buttons E 31 Used for the...

Page 14: ...Control 30 50 50 4m 13 1 feet 7m 23 0 feet 7m 23 0 feet 20 20 30 3 m 9 8 f e e t 6m 19 7 feet 4 m 1 3 1 f e e t Remote Control Range Point the infrared transmitter of the remote control toward the re...

Page 15: ...at with DLP type projectors in rare cases there may be black spots or bright spots among the picture elements Note Please purchase a screen A component cable which is commercially available is require...

Page 16: ...2 h1 300 S O U R CE K E Y S T ONE A U T O KEYS T O N E POWER STAND BY STAND BY STATUS MENU QUICK MENU Height from center of lens to bottom edge of the projection Height from center of lens to top edge...

Page 17: ...lease check the following before making connections with the personal computer An appropriate resolution for the KG PS100S is 800 x 600 dots S VGA and the maximum displayable resolution is XGA 1024 x...

Page 18: ...ge E 64 2 Should a sign not be output from the notebook computer please try the operation described below For an IBM PC AT compatible computer press the Fn key plus any one of the F1 to F10 keys See t...

Page 19: ...Connectors Connect to the projector s S VIDEO connector using a commercially available S Video cable The input setting of the S VIDEO connector has been set to Auto at the factory however if the proj...

Page 20: ...put setting to Compo nent using the menu sequence of Setup Input Format Computer See Input Format on Page E 49 When projecting the YCbCr signal or YPbPr signal if the color of the overall image strong...

Page 21: ...he projector provides monaural audio To enjoy convincing audio reproduction please connect the audio output of the video equipment to your audio system The built in speaker outputs the audio of the eq...

Page 22: ...on the POWER indicator starts flashing green then stops flashing after about 60 seconds If the STATUS indicator lights green at this time the lamp mode is set to Eco See E 28 and 49 for instructions...

Page 23: ...deep blue cursor with English Cursor 2 Press the ENTER button to set This will set the language and Menu Language Select will close This completes the selection of the display language Caution Menu L...

Page 24: ...inking green Approximately 90 seconds Lit green Standby mode 3 Unplug the power cable When the Quick Off function is not used check that the STANDBY indicator is lit and then unplug the power cable Th...

Page 25: ...e diagram is the result of the projector not being perpendicular to the screen Set the projector so that it is pointing straight toward the screen 5 The vertical keystone distortion of the projection...

Page 26: ...to align the image with the screen then release your fingers Turn the left and right front adjusters for fine adjustment Adjust so that there is no shaking of the projector Lowering the projection ima...

Page 27: ...tion the projector will assume the input selec tion condition that was previously used See Auto Source on Page E 48 for information about the Auto Source on and off conditions Automatic Adjustment VID...

Page 28: ...ions extend beyond the boundaries of the screen The top and bottom of the 16 9 image becomes black Wide Projects to fill the full width with the entire image at 16 9 This feature is used to project a...

Page 29: ...o approximately 80 extending the lamp s service life Off STATUS indicator is off The lamp brightness is set to 100 and the screen is bright Note Frequent switching this mode can degrade the lamp Eco M...

Page 30: ...me and the button decreases the volume VIDEO FREEZE MUTE ECO VOL KSTN ZOOM CANCEL QUICK MENU ENTER COMPUTER QUICK COLOR ADJ ASPECT AUTO POWER STANDBY 1 2 2 Press the CANCEL button to immediately close...

Page 31: ...gement Approximately 2 times enlargement The image can also be moved in the following circumstances When Aspect Ratio is set to Real by the signal of the personal computer and the input resolution is...

Page 32: ...FREEZE button 1 MUTE button 2 ECO button 3 QUICK COLOR ADJ button 4 1 When input button ECO is pressed an asterisk is entered for the first digit Continuing pressing the MUTE MUTE FREEZE input button...

Page 33: ...r the first digit Continuing pressing the MUTE MUTE FREEZE input buttons will enter as terisks in the remainder of the four digits If the password matches the window turns off and the projector can be...

Page 34: ...e of either the SELECT or button 2 Press the cursor or button to make the adjustment 3 To close the display immediately press the CANCEL button In the absence of operations for a period of about 10 se...

Page 35: ...e adjustment setting items and contents will differ depending on the input selection and the adjustment setting items that can be used with the input signal are displayed on the menu VIDEO FREEZE MUTE...

Page 36: ...ment of the item located at the cursor position Item Name This is the name of the adjustment or setting Icon A press of the ENTER button the button on the main unit will display the sub menu or the se...

Page 37: ...in which the Keystone item name is selected 1 Press the MENU button to display the menu Menu Display The menu name that existed when the menu was closed previously will be displayed Note Please check...

Page 38: ...align the cursor with the desired item name There are also some items for which the setting display or the verification display will appear Please see the various item descriptions VIDEO FREEZE MUTE...

Page 39: ...gain to delete the cursors of the various items Press the SELECT button and select the menu name Menu names cannot be selected when the item name cursor is displayed Note A press of the QUICK button w...

Page 40: ...lection V i d e o S V i d e o W i r e l e s s Menu name Image Color View Brightness E 41 Item Name Sub Menu Item Name Contrast E 41 Picture Adj Fine Picture E 41 H Position E 42 V Position E 42 E 42 R...

Page 41: ...Screen Background Startup Screen Option E 51 E 51 E 51 E 52 Security Lock E 52 Status E 53 Factory Default E 53 Lamp Timer Reset E 53 Resolution E 54 Frequency E 54 Lamp Timer E 54 Eco Mode E 49 Netw...

Page 42: ...he SELECT buttons so that the vertical bands disappear and brightness becomes uniform across the screen Note When the image extends beyond the boundaries of the screen or is smaller than the screen ch...

Page 43: ...sition Adjust this when the picture is shifted up or down Select the V Position item name and adjust with the SELECT buttons Reset This function resets i e returns to the standard settings the adjust...

Page 44: ...ode Selects the optimum colors when the projection surface is a blackboard Custom Allows the selection and adjustment of the gamma color temperature and white level adjustment items Input Source Color...

Page 45: ...he component signal undergoes conversion processing to red green and blue which express the image of the projector the correct color cannot be reproduced unless a system compliant with the color diffe...

Page 46: ...d personal computer will be set to black 3 Press the ENTER button The display will change to Adjusting Black and the black level will be adjusted 4 The adjustment of the black level is completed and t...

Page 47: ...omatically enlarges or reduces the image to project a full screen in a ratio of 4 3 Direct Maintains the aspect ratio and projects a picture of the maximum displayable size Real Projects the input sig...

Page 48: ...pending on the projected picture and the projection conditions it may not be possible to eliminate keystone distortion completely When the Auto Keystone function is OFF the keystone adjustment setting...

Page 49: ...of the projector enters a no signal condition Select item name Auto Power Off and select the setting contents with the SELECT buttons On The power is switched off when there is no signal Off The power...

Page 50: ...be set to Auto When identification is not possible with Auto make the setting Select the item name Input Format press the ENTER button and the sub menu will open Select the connector that is to be cha...

Page 51: ...sition of the Timer Display The SELECT buttons on the remote control permit movement within the movable range of the timer display The blue gauge indicates the remaining time When the gauge disappears...

Page 52: ...tons On Screen This function switches on off the messages displayed with a black frame such as the input signal information and the aspect ratio Select item name On Screen and select the setting conte...

Page 53: ...to prevent unauthorized use of the projector For instructions on using the security function see Protecting the Projector with the Security Lock on E 31 Select item name Security Lock and select the...

Page 54: ...tments and settings of all the in put sources to the standard factory default values Select item name Factory Default and press the ENTER button There is a change to the display Press ENTER to Factory...

Page 55: ...e has been switching between the modes When Lamp Life Has Been Reached Replace the Lamp Cartridge is displayed on the screen for 10 seconds in a 1 minute interval Please replace the lamp with a new on...

Page 56: ...urn the power back on If the prob lem persists unplug the power cable and contact a store that sells the KG PS100S KG PS120X KG PS125X for repairs Should an indicator be in a condition other than norm...

Page 57: ...ool storage area to a warm place and the power is turned on condensation may form on the lens or internal optical parts If this happens wait until the condensation has evaporated before using the proj...

Page 58: ...ils or other hard object since this will cause scratches Dirty Lens Clean using the same method you would use to clean a camera lens Use a commercial blower for camera use or cleaning paper for eye gl...

Page 59: ...fe is reached the power is set to the standby mode and no longer turns on Contact a store that sells the KG PS100S KG PS120X KG PS125X for a replacement lamp Indicate you need a KG LPS1230 replacement...

Page 60: ...er cord 2 Turn the projector upside down 3 Remove the lamp cover 1 Loosen the lamp cover locking screw by turning it counter clockwise until it turns freely The screw will not come out 4 Remove the la...

Page 61: ...rvice life if the lamp is used for more than another 100 hours it will not be possible to switch on the power Should this happen while the projector is in the standby mode simultaneously holding down...

Page 62: ...bCr NTSC PAL YPbPr 480p 576p 1080i 720p automatic or manual switching RGB Horizontal 15 to 80 kHz Vertical 50 to 85 Hz Color Reproduction Full color 16 770 000 colors Resolution VGA 640 480 expansion...

Page 63: ...bPr 480p 576p 1080i 720p automatic or manual switching RGB Horizontal 15 to 80 kHz Vertical 50 to 85 Hz Color Reproduction Full color 16 770 000 colors Resolution VGA 640 480 expansion true S VGA 800...

Page 64: ...bPr 480p 576p 1080i 720p automatic or manual switching RGB Horizontal 15 to 80 kHz Vertical 50 to 85 Hz Color Reproduction Full color 16 770 000 colors Resolution VGA 640 480 expansion true S VGA 800...

Page 65: ...37 9 37 5 43 3 35 2 37 9 46 9 48 1 53 7 48 4 56 5 60 0 68 7 64 0 35 0 49 7 60 2 68 7 33 8 28 1 45 0 31 3 31 5 31 3 31 5 60 0 50 0 70 1 70 1 70 0 70 0 85 1 85 1 85 0 60 0 72 8 75 0 85 0 56 3 60 3 75 0...

Page 66: ...E 65 Cabinet Dimensions S O U R C E K E Y S T O N E A U T O K E Y S T O N E POWER STANDBY STATUS MENU QUICK MENU Unit mm inch 195 7 7 58 2 3 262 10 3...

Page 67: ...2007 KAGA COMPONENTS CO LTD...

Reviews: