background image

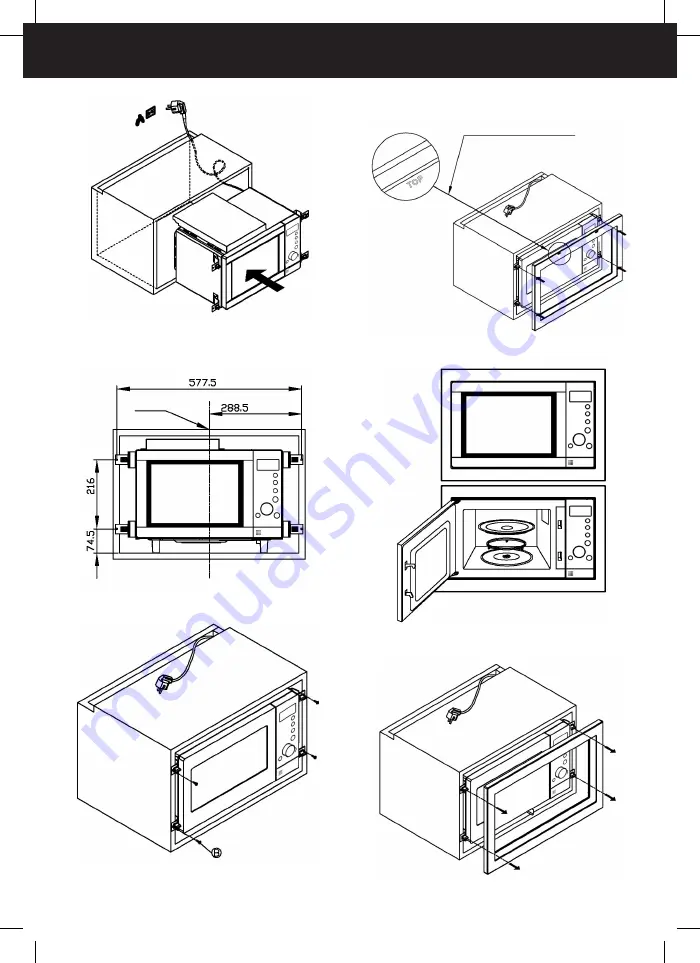
Insert the microwave into the cupboard.

Fit the frame onto the supports

Warning: The word “TOP” is 

marked on the back of the frame 

indicated the upper part.

Fix the microwave screwing the supports to the front 

part of the cupboard.

Remove the frame    

Place the microwave in the middle of the cupboard.

Installation complete

6

9

7

10

8

11

Central.

Summary of Contents for Elbrus

Page 1: ...Elbrus Marco encastrable Marc encastable Removable frame Cadre d encastrement Einbaurahmen f r Cornice per l incasso Moldura de encastrar Inbouwkader Rama z zachodzeniem Ram ncorporabil...

Page 2: ......

Page 3: ...A B...

Page 4: ...tas en el manual del microondas al que va asociado este marco encastrable Si desea remover el marco del microondas proceda tal como se describe en el paso 11 Espacio para ventilaci n Fijar 2 soportes...

Page 5: ...Atenci n la palabra TOP esta marcada en la parte de atr s del marco indicando su parte superior Fijar el microondas atornillando los soportes en la parte frontal del armario Quitar el marco Ubicar el...

Page 6: ...s advertiments descrits al manual del microones al qual s associa aquest marc encastable Si voleu treure el marc del microones feu el que es descriu al pas 11 Espai per a ventilaci Fixeu 2 suports al...

Page 7: ...orts Atenci la paraula TOP est marcada a la part de darrere del marc i n indica la part superior Fixeu el microones cargolant els suports a la part frontal de l armari Treure el marc Ubiqueu el microo...

Page 8: ...crowave manual that are associated with the removable frame are valid If you wish to remove the microwave frame follow the instructions given in step 11 Space for ventilation Fit 2 supports onto the l...

Page 9: ...ts Warning The word TOP is marked on the back of the frame indicated the upper part Fix the microwave screwing the supports to the front part of the cupboard Remove the frame Place the microwave in th...

Page 10: ...gurant dans la notice d instructions du micro ondes associ ce cadre d encastrement sont valables Si vous souhaitez retirer le cadre d encastrement du micro ondes proc dez comme indiqu l tape 11 Espace...

Page 11: ...le mot TOP est marqu sur la partie arri re du cadre d encastrement indiquant sa partie sup rieure Fixer le micro ondes en vissant les supports de la partie frontale de la niche Retirer le cadre d enc...

Page 12: ...er Bedienungsanleitung f r die Mikrowelle mit Einbaurahmen sind g ltig Um den Rahmen von der Mikrowelle zu entfernen gehen Sie zu Anweisung 11 Bel ftungsraum Befestigen Sie 2 Halterungen an der linken...

Page 13: ...der Hinterseite des Rahmes markiert und zeigt die Oberseite an Befestigen Sie die Mikrowelle indem Sie die Halterungen an der Vorderseite des Schranks schrauben Entfernung des Rahmen Entfernung des R...

Page 14: ...ono valide le avvertenze contenute nel manuale di istruzioni fornito con questa cornice Per rimuovere la cornice del forno a microonde seguire il passo 11 Spazio per la ventilazione Fissare 2 supporti...

Page 15: ...posteriore della cornice c scritta la parola TOP per indicare la parte superiore della cornice Fissare il forno a microonde avvitando i supporti alla parete frontale dell armadio Togliere la cornice C...

Page 16: ...dvert ncias descritas no manual do microondas ao qual est associado esta moldura de encastrar Se desejar remover a moldura do microondas proceda como se descreve no passo 11 Espa o para ventila o Fixa...

Page 17: ...uportes Aten o a palavra TOP est marcada na parte posterior da moldura indicando a sua parte superior Fixar o microondas aparafusando os suportes na parte frontal do arm rio Retirar a moldura Situar o...

Page 18: ...n de handleiding van de magnetron waarmee het inbouwkader samengaat Als u het kader van de magnetron wilt verwijderen ga dan te werk zoals beschreven in pas 11 Ruimte voor de verluchting Bevestig 2 st...

Page 19: ...on in de kast door de steunen aan de voorkant van de kast vast te schroeven Het kader verwijderen Plaats de magnetron in het midden van de kast Volledige installatie 6 9 7 10 8 11 Midden Opgelet het w...

Page 20: ...a s ostrze enia opisane w instrukcjach obs ugi kuchenki mikrofalowej kt rej dotyczy niniejsza rama z zachodzeniem Je li pragnie si przemie ci ram kuchenki mikrofalowej post powa nale y tak jak opisano...

Page 21: ...podstawach Przymocowa kuchenk mikrofalow przykr caj c rubami podstawy w przedniej cz ci szafy Zdj ram Umie ci kuchenk mikrofalow po rodku szafy Instalacja zako czona 6 9 7 10 8 11 rodkowo Uwaga s owo...

Page 22: ...Elbrus 1 2 4 3 1 10 11 2 4 4 2 4 1 4 3 5 2...

Page 23: ...6 9 7 10 8 11 TOP...

Page 24: ...Elbrus 1 2 4 3 1 10 11 2 4 4 2 4 1 4 3 5 2...

Page 25: ...6 9 7 10 8 11 TOP...

Page 26: ...ismente men ionate n manualul cuptorului cu microunde c ruia i apar ine aceast ram pentru ncorporare Dac dori i s deta a i rama cuptorului proceda i dup cum se indic n pasul 11 Spa iu pentru ventila i...

Page 27: ...i Fixa i cuptorul n urub nd supor ii n partea frontal a dulapului Scoate i rama Situa i cuptorul n centrul dulapului Instalare terminat 6 9 7 10 8 11 Centrare Aten ie pe spatele ramei este marcat cuv...

Page 28: ...Elbrus 1 2 4 3 1 10 11 2 4 4 2 4 1 4 3 5 2...

Page 29: ...6 9 7 10 8 11 TOP...

Page 30: ...6 7 8 9 10 11...

Page 31: ...Elbrus 1 4 3 5 2...

Page 32: ...Avda Barcelona s n E 25790 Oliana Spain www taurus es...

Reviews: