


16
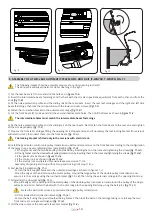
5. INSTALLATION
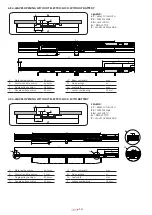
5.1
REAR CROSSPIECE ANCHORING
The crosspiece must be fixed to a flat surface, solid enough for the weight of the leaves that will be used. If the wall or support you
are using does not meet these characteristics, a suitable iron tube must be adopted as the
crosspiece is not self-supporting.
We recommend you use a spirit level to avoid an assembly not level with the crosspiece.
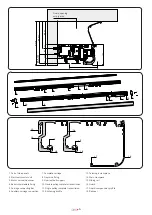
- Fasten the anchoring profile
(fig. 1)
to the wall or support using M8 steel plugs and equivalent. The fixing points must be
distributed
every 600 mm.
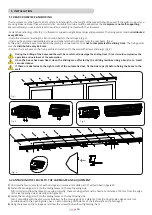
- Undo the screws connecting the transmission belts to the carriages.
(fig. 2)
- Unscrew the end and intermediate screws and separate the front beam from the rear beam.
(fig. 3)
At this point, drill the beam from behind by placing it on two trestles so as
not to compromise the sliding track
. The fixing points
must be
distributed every 600 mm
.
- Position the rear beam on the fixing profile and anchor it to the wall with screws and plugs.
(fig. 4)
During the drilling of the beam and the wall, be careful not to damage the sliding track (C) as it would compromise the
operation and quietness of the automation.
Once the beam has been fixed, clean the sliding area affected by the drilling residues using a brush or a small
vacuum cleaner.
If there are obstacles to the right or left of the automatic door, fit the side caps (D) before fixing the beam to the
wall.
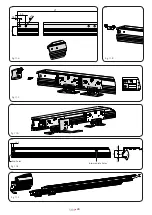
Fig. 1
Fig. 2
Fig. 3
Fig. 4
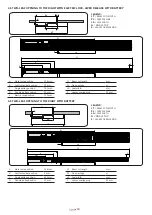
5.2
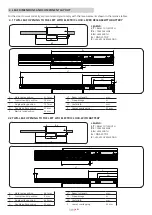
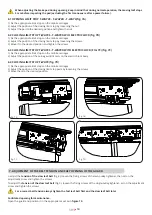
ANCHORING THE LEAVES TO THE CARRIAGES AND ADJUSTMENT
1)
Unscrew the two screws (A) of each carriage and remove its mobile part (C) as described in
figure 5A.
2)
Fasten the moving parts (C) to the sliding leaves on the leaf opening side.
N.B.: In order to allow the leaves to overlap correctly, these moving parts must be fixed at a distance of 95 mm from the edge
of the leaf opening side as described in figure 5B.
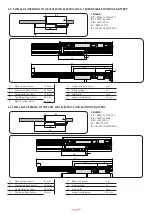
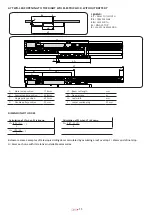
3)
Fasten the moving parts (C) to the sliding leaves on the leaf-closing side.
N.B.: Compatibly with the accessories installed, fix the moving parts at a distance from the closing side edge as much as
possible equal to the opening side ones, so as to obtain a good balance of the leaf weight on the carriages;
4)
Hang the leaves on the carriages and screw the screws (A) in without tightening them.


