background image

TATUNG TDR series Digital Recording System 


Page 

20 


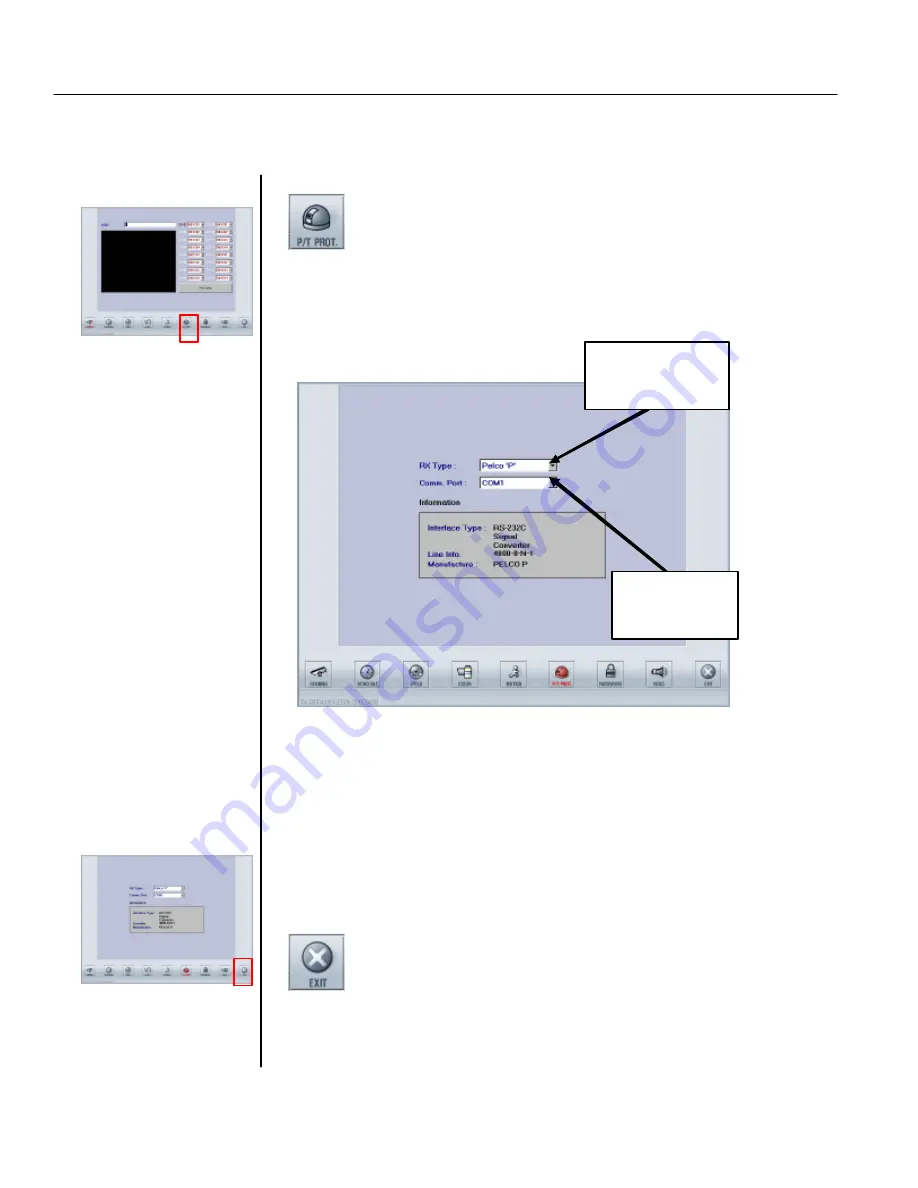
3.6 P/T/Z Protocol 


This function button (as shown below) is used to setup P/T/Z Protocol.  


Please select the same protocol as that of your camera.


EXIT 


You may click any other icon to exit Protocol Setup Mode and go directly into  


  other setup mode. Click EXIT button to go back to Watch Mode. 


Click on this button to setup the P/T/Z Protocol, the screen display as the 
below  

Click to choose a 
manufacturer 
brand from list 


Click to assign 
communication 
port. 


Summary of Contents for TDR-2204-040

Page 1: ...ording System Page 0 TDR 22XX series Digital Recording System Installation and Operation Manual V 1 01 TATUNG COMPANY OF AMERICA INC 2850 El Presidio St Long Beach CA 90810 USA Tel 310 637 2105 Fax 31...

Page 2: ...TATUNG TDR series Digital Recording System Page 0...

Page 3: ...1 3 2 Schedule 13 3 3 Speed 15 3 4 Color 17 3 5 Motion 18 3 6 P T Z Control 20 3 7 Password 21 3 8 Voice 24 3 9 Exit 25 Chapter 4 Search Mode 26 4 1 Channel Play back window 28 4 2 Buttons on Play Bac...

Page 4: ...TATUNG TDR series Digital Recording System Page 0...

Page 5: ...C Monitor Output 13 Mouse PS 2 14 Keyboard PS 2 15 Network port RJ 45 16 AC Power Input 17 115 230 VAC Power Switch option 18 Power Supply Switch option CHAPTER 1 INSTALLATION Place the Digital Record...

Page 6: ...wer by push the power button on the front panel Audio In Audio Out Camera In Camera Out CCTV Monitor Out Alarm In Out Protect Socket and LPT PC Monitor Output Network Port Power In Reset Power Removab...

Page 7: ...be displayed at the same time The sequential dwell time can be adjusted in SETUP mode 5 9 Sequence Button Click to select the 9 window 3x3 format Up to 9 cameras can be displayed at the same time The...

Page 8: ...n to get the recorded images within seconds The images found may either print out or save to a floppy disk for your emergency needs The usage of the storage can be found by STORAGE button 11 Backup Bu...

Page 9: ...name Identify the name for each channel You may assign the channel name in SETUP mode 2 Image Display window This area displays the image comes from the camera 3 Recording status lamp This lamp turns...

Page 10: ...cons and enlarge the display windows to FULL screen You must right click on mouse or touch pad to go back to the normal Note You can always use right click on mouse to switch between these Full screen...

Page 11: ...of a moving object from one channel to another All image windows this object passed by will be enlarged Therefore the object will always display on an enlarged window Click on this button to enable t...

Page 12: ...e images found may either be printed out or saved to a floppy disk for your emergency needs The usage of the storage can be found by STORAGE button BACKUP Click to switch to BACKUP mode It can backup...

Page 13: ...ely set up for your application Alarm output can also be set up separately 3 Speed Click to assign the recording speed and other options The recording speeds include speeds on normal recording motion...

Page 14: ...s DVR and the camera connected 7 Password Click on this button to setup the user name and password for access security The passwords are divided in SETUP VIEWER SHUTDOWN and REMOTE four levels Hiding...

Page 15: ...ck on the setup will be executed automatically Manual Setting Select the Board B01 B04 and Channel C01 C04 from the list to setup the Channel Name CH01 This is the first Board and first Camera Click t...

Page 16: ...Click the channel number 2 Key in the name of the channel 3 Limited to 14 characters and number including space 3 EXIT You may click any other icon to exit Channel Setup Mode and go directly into oth...

Page 17: ...Start Time and End Time by using military time system 00 00 to 00 00 means 24 hours If you want to assign the shutdown time check the box of Shutdown Time and setup the time Click on this button to st...

Page 18: ...ing modes 6 Setup Alarm Out Alarm Output may setup when either a sensor is triggered or motion is detected 7 Set up another group Repeat the step from 1 to 5 if you want to set up another group 8 Exit...

Page 19: ...otion recording speed frame rate for each camera or all cameras Separate frame rate for each camera is available Sensor Recording Speed Dragging the cursor can designate sensor recording speed frame r...

Page 20: ...2900 9300 byte 6 0 KB 30 3500 10300 byte 7 0 KB 40 4100 12000 byte 8 0 KB 50 5000 14000 byte 9 5 KB 60 6000 16000 byte 11 0 KB 70 6600 17000 byte 12 0 KB 80 8200 20000 byte 14 0 KB 90 9200 22000 byte...

Page 21: ...the cursor to adjust the followings for each channel 3 EXIT You may click any other icon to exit Color Setup Mode and go directly into other setup mode Click EXIT button to go back to Watch Mode Brig...

Page 22: ...luded in the system can be activated inactivated by checking the box or not Beep time can be also be adjusted by dragging the cursor Click on this button to setup the motion the screen display as the...

Page 23: ...e motion detection At highest sensitivity even very trivial motion will be detected Clear all block All of the detecting zones for a specific channel 4 EXIT You may click any other icon to exit Motion...

Page 24: ...ct the same protocol as that of your camera EXIT You may click any other icon to exit Protocol Setup Mode and go directly into other setup mode Click EXIT button to go back to Watch Mode Click on this...

Page 25: ...elow Click on this button to setup the Password Note See next page for the remote access password 1 Select the password type 2 Key in the new password From keyboard mouse or touch screen 3 Click on Ap...

Page 26: ...ssword o Then click Entry button o Click Exit button to leave above window Delete o Click on the user s name in the Registered ID window above o Click on Delete button o Click Exit button to leave abo...

Page 27: ...to restart the system EXIT You may click any other icon to exit Password Setup Mode and go directly into other setup mode Click EXIT button to go back to Watch Mode Note For TDR 2209 the Hide Camera f...

Page 28: ...e chosen This means the two playbacks need to be coordinated more frequently However if the image recording speed is slow we may choose longer time large number to coordinate the two playbacks 3 Check...

Page 29: ...System Page 25 3 9 Exit Click on EXIT button to switch back to WATCH MODE after you complete all the setting in the SETUP mode Note You can always click on the EXIT to switch back to watch mode no ma...

Page 30: ...ames are selectable in this function 4 Print Click to print the specific image on the system printer as an immediately data retrieve Channels and frames are selectable in this function no matter the p...

Page 31: ...lick this button to exit the Search Mode and back to the Watch Mode 8 Mute Box Check this box to disable the audio playback 9 Channel playback window This is the area to display the playback images al...

Page 32: ...by right clicking Back to normal only need right clicking again You can also check the digital zoom box and enlarge the image step by step by continuously right clicking on the image or shrink the ima...

Page 33: ...LAY PLAYBACK the images with normal speed QUICK PLAY PLAYBACK with faster speed STOP STOP the playback NEXT FRAME NEXT one frame from the current playback time NEXT 1 MIN FORWARD one minute from the c...

Page 34: ...r drag the scroll bar Date selection Please click on the date with a red mark to select From Time selection Key in the From Time may also accomplish by clicking on the arrows or drag scroll bar To Tim...

Page 35: ...time selection click on Start button to search or playback the recorded images after clicking the selection window will disappear 5 EXIT If you want to cancel this date and time selection click EXIT t...

Page 36: ...ct the time you want to search 4 List item Click on a specific item you want to search 5 Playback or Close Click Play Back button to review the image you searched or Close the function Click here to r...

Page 37: ...ber of frames you want to save for all channels If you choose a specific channel then only one frame can be saved 4 Image type Select the image type JPG or BMP 5 O K or NO Click OK button to save or N...

Page 38: ...nnel to retrieve 3 Cut Print Assign the number of frames you want to print for all channels If you choose a specific channel then only one frame can be printed 4 Print or Cancel Click Print button whe...

Page 39: ...on of the removable HDD 4 8 EXIT Click on this button to have the prompt out window of storage information Note If the sound recording function is disabled the sound storage space reserved will be con...

Page 40: ...ck to Watch Mode CHAPTER 5 BACKUP MODE After clicking the Backup button the following window is prompted out Auto backup Function Windows explorer AVI file immediately backup Cancel Backup operation N...

Page 41: ...ckup Check the box if you want to enable the auto backup function 2 Scheduled Backup Option a Check the box of the days to backup Sunday to Saturday b Assign the starting time and ending time c Assign...

Page 42: ...option If you want to immediately backup some images skip steps 1 2 and follow the steps below a Assign the backup date b Assign the starting time and ending time c Select the backup device d Executio...

Page 43: ...the camera channel to backup 2 Backup Date Assign the date of the data to backup 3 Date Start Time Assign the start time of the data for backup of this day 4 Date End Time Assign the End time of the...

Page 44: ...ystem Page 40 5 3 Explorer This function is to call out the WINDOWS explorer which let the operator control this system The screen will prompt out the Windows explorer as below 5 4 Cancel Cancel this...

Page 45: ...l turn RED when activated PAN TILT CONTROL Panel Pan Tilt and Autopan control for the camera CHAPTER 6 CONTROL MODE The main screen of the control mode is as the following picture Camera selection pan...

Page 46: ...tal Recording System Page 42 ZOOM FOCUS PRESET Panel Zoom Focus Preset panel 6 2 EXIT ZOOM FOCUS control Load the default setting for selected camera Click on this button to exit the control mode and...

Page 47: ...raditional cctv monitor can be connected to view above images also On top of displaying live video or playing back recorded files while recording at the same time DVR also features multiple remote sit...

Page 48: ...D 8MB AGP Video Card 10 MBPS LAN 28800 MODEM PSTN mode MS Windows 98 98SE ME NT 4 0 2000 XP MODELS HDD 16 CH 9 CH 4 CH 40 GB TDR 2216 040 TDR 2209 040 TDR 2204 040 80 GB TDR 2216 080 TDR 2209 080 TDR...

Page 49: ...2204 Hours 120 FPS 60 FPS 30 FPS 4 FPS 120 FPS 60 FPS 30 FPS 4 FPS 120 FPS 60 FPS 30 FPS 4 FPS 40 GB 8 16 32 240 12 24 48 360 16 32 64 480 80 GB 16 32 64 480 24 48 96 720 32 64 128 960 120 GB 24 48 96...

Page 50: ...NO 2 NC 3 CM 3 NO 3 NC 4 CM 4 NO 4 NC 5 CM 5 NO 5 NC 6 CM 6 NO 6 NC 7 CM 7 NO 7 NC 8 CM 8 NO 8 APPENDIX B Connector Configuration Camera In Camera Out CH 01 CH 16 Alarm In Sensor Ground Common Alarm O...

Reviews: