Tasco 5TN Owner'S Manual Download Page 12

12

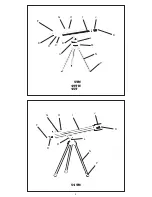
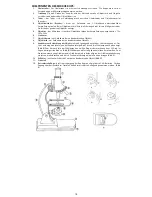
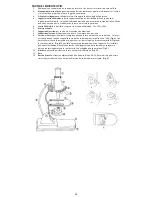
MICROSCOPE COMPONENTS:

1. 

Ocular Barrel

—a protective cover is provided for the ocular barrel.  This should be removed 

before use.

2. 

Focusing knob

—This knob is twisted to adjust the distance between the slide and the lens 

in order to bring the object being viewed into focus.

3. 

Connection barrel

—This connects the ocular barrel to the multiple objective lens holder.

4. 

Objective lens holder

—This holder contains 3 objective lenses of varying magnifying power.  

The objective lenses can be changed by rotating the disc until a click is heard indicating that 

the lens is locked in place.

5. 

Objective lenses

—There are 3 objective lenses to choose from.  75x, 300x, 900x

6. 

Vertical arm

7. 

Slide support

—to support the specimen being studied.

8. 

Slide clip

—used to support the specimen being studied.
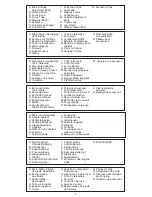
9. 

Spotlight

—Used to light specimen when there is not enough natural light available.  The 

light is switched on when the unit is turned over so that the bulb points upward 

(A)

.

  If the 

bulb needs replacing, push the white collar downwards and twist it through 90 degrees 

counterclockwise 

(B)

.

  The bulb and its holder can then be removed.  To install a new bulb, 

align two notches on the bulb seat, push downward, and twist is slightly clockwise 

(C)

. Then 

it is positioned.

10.  Reflector

—Used to reflect natural light onto specimen 

(D)

.

11.  Base

12.  Anti-slip base

—The spotlight is powered by 2xAA type batteries.  The bottom base can be 

pulled off to allow access to the battery box inside the base of the microscope 

(E)

.

Summary of Contents for 5TN

Page 1: ...OWNER S MANUAL MANUEL DU PROPRI TAIRE MANUAL DEL USUARIO MANUALE DELL UTENTE BENUTZERHANDBUCH HANDLEIDING MANUAL DO UTILIZADOR 5TN 49TN 49TNW 45T 54TN 54TN 5TN 45T 49TN 49TNW 04 14...

Page 2: ...2 G H I J K P N L B D F 54TN 5TN 49TN 45T K I H G F E P N A B C D M L J...

Page 3: ...ocalisation E Miroir diagonal F Oculaire G Support viseur H Viseur I Tube du t lescope J Pare soleil K Lentille t l objectif L Monture du t lescope M Bouton de r glage pour l azimut N Pieds du tr pied...

Page 4: ...4 Fig 1 Fig 2 Fig 3 Fig 4 Fig 6 Fig 7 Fig 5 b a d e c k m n l F...

Page 5: ...e by tightening small retaining screw NOTE 5TN 49TN 45T In all astronomical telescopes the image appears upside down With the use of the diagonal the image appears erect but with a left to right inver...

Page 6: ...roduisez l oculaire Fig 4k dans le miroir diagonal Fig 4m Serrez l aide des petites vis NOTE 5TN 49TN 45T Tous les t lescopes astronomiques rendent une image invers e Le miroir diagonal r tablit cette...

Page 7: ...ue os tornillos de sujeci n OBSERVACION 5TN 49TN 45T En todos los telescopios astron micos la imagen aparece al rev s Con al utilizaci n de la diagonal la imagen aparece recta pero con una inversi n d...

Page 8: ...4k nella diagonale Fig 4m Assicuratela stringendo la piccola vite di sostegno NOTA 5TN 49TN 45T In tutti i telescopi astronomici l immagine appare sotto sopra Con l uso della diagonale l immagine app...

Page 9: ...Sie es durch Anziehen der kleinen Anschlagschraube ANMERKUNG 5TN 49TN 45T In allen astronomischen Teleskopen erscheint das Bild auf dem Kopf stehend Bei Verwendung des Diagonalspiegels erscheint das B...

Page 10: ...roefjes vast te draaien N B 5TN 49TN 45T Bij alle astronomische telescopen verschijnt het beeld ondersteboven Door gebruik te maken van de diagonaal verschijnt het beeld in de juiste richting maar in...

Page 11: ...TN 45T Em todos os telesc pios astron micos a imagem aparece invertida Com a utiliza o do espelho diagonal a imagem aparece direita mas com uma invers o da esquerda para a direita como num espelho Par...

Page 12: ...from 75x 300x 900x 6 Vertical arm 7 Slide support to support the specimen being studied 8 Slide clip used to support the specimen being studied 9 Spotlight Used to light specimen when there is not en...

Page 13: ...er on the slide and place a cover glass over the drop of water The particles of starch from the potato can then be viewed through the microscope 6 Some specimens such as onion skins need to be colored...

Page 14: ...vertical 7 Porte lame Pour soutenir l chantillon tudier 8 Barrette pince lame Sert tenir l chantillon tudi 9 Projecteur Sert clairer un chantillon lorsque la lumi re naturelle est insuffisante La lumi...

Page 15: ...mise au point du microscope Pour plus de d tails il est possible de d finir une seule lentille d objectif ce qui conf rera un meilleur grossissement en tournant le porte lentille d objectif et en eff...

Page 16: ...la muestra objeto de estudio 8 Pinzas de la platina se utilizan para sujetar la muestra objeto de estudio 9 Iluminador se utiliza para iluminar una muestra cuando no hay suficiente luz natural La luz...

Page 17: ...n la muestra al enfocar el microscopio Si se necesita m s detalle la lente del objetivo se puede cambiar por una que ampl e m s girando el soporte de las lentes del objetivo y volviendo a enfocar 3 Lo...

Page 18: ...7 Objektklemme zur Aufnahme des zu beobachtenden Objekts 8 Objekttisch zur Aufnahme des zu beobachtenden Objekts 9 Kondensor zur Beleuchtung des Objekts falls nicht gen gend nat rliches Licht vorhande...

Page 19: ...bjekts gew nscht kann durch Drehen des Revolvers ein Objektiv mit st rkerer Vergr erung ausgew hlt werden Anschlie end erneut scharfstellen 3 Das vom Mikroskop gezeigte Bild ist seitenverkehrt M chten...

Page 20: ...el vetrino per contenere il campione da esaminare 8 Graffetta del vetrino utilizzata per contenere il campione da esaminare 9 Faretto utilizzato per illuminare il campione quando la luce naturale non...

Page 21: ...mpione durante la messa a fuoco del microscopio Se necessario vedere pi nel dettaglio possibile sostituire la lente dell obiettivo con una dall ingrandimento maggiore ruotando il supporto lenti dell o...

Page 22: ...2014 B O P 9200 Cody Overland Park Kansas 66214 800 423 3537 www tasco com...

Reviews: