background image

60 

TASCAM  DR-60DMKII

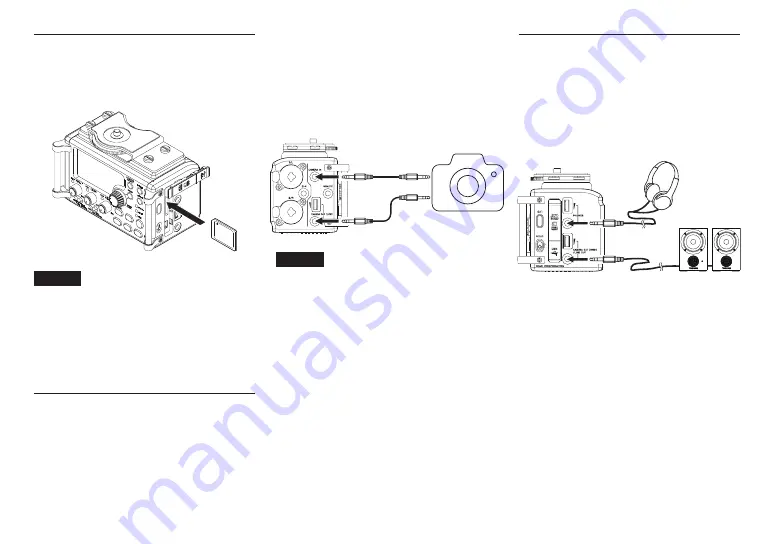
Inserción de tarjetas SD

1.  Abra la tapa de la ranura de tarjetas SD/puerto 

USB del panel derecho de la unidad.

2.  Introduzca la tarjeta SD tal como le mostramos 

aquí hasta que haga clic.

NOTA

En la página web global de TEAC puede 

encontrar un listado de las tarjetas SD 

que hemos verificado que funcionan 

correctamente con esta unidad. 
Vaya a la página de este producto en la web 

global de TEAC (http://teac-global.com) para 

localizar dicho listado o si necesita ponerse 

en contacto con el servicio técnico TASCAM

.

Conexión y fijación de cámara

Para poder enviar el sonido desde esta unidad a una 

cámara DSLR y monitorizar el sonido de la cámara 

con esta unidad, deberá conectar ambas a través de 

cables con conectores mini de 3.5 mm disponibles 

en la mayoría de comercios del ramo.
1.  Si quiere grabar audio enviado desde esta 

unidad en una cámara, conecte la toma 

CAMERA OUT (LOW)

 del panel izquierdo de 

esta unidad a la entrada de micro externo de la 

cámara.
Si quiere dar entrada a la señal audio 

procedente de la cámara y monitorizarla con 

esta unidad, conecte la toma 

CAMERA IN

 del 

panel izquierdo de esta unidad a la salida de 

audio de la cámara.

Cámara DSLR

Salida 

audio

Entrada de micro 

externa

NOTA

 • Si la salida no es lo suficientemente potente 

incluso cuando tenga el volumen 

CAMERA 

OUT (LOW)

 al máximo, conéctela a la toma 

CAMERA OUT (HIGH)

/

LINE OUT

 y use el 

volumen 

CAMERA OUT (HIGH)

/

LINE OUT


para ajustar el nivel de salida.

 • Consulte en el manual de instrucciones 

de la cámara la información relativa a los 

conectores de la misma.

2.  Use el control de volumen 

CAMERA OUT 

(LOW)

 que está en el panel izquierdo de esta 

unidad para ajustar el nivel de salida de la 

cámara.

3.  Para montar la cámara en esta unidad, utilice 

el tornillo de fijación de cámara en la parte 

superior de esta unidad.

Conexión de monitores y 

auriculares

Para escuchar el sonido a través de auriculares, 

conéctelos a la salida 

PHONES

.

Para usar un sistema de monitorización externo 

(monitores autoamplificados o amplificador y 

altavoces), conéctelo a la salida 

CAMERA OUT 

(HIGH)/LINE OUT

.

Auriculares

Monitores autoamplificados o 

amplificador y altavoces

Summary of Contents for DR-60D MK II

Page 1: ...D01230700C DR 60D Linear PCM Recorder ENGLISH FRAN AIS ESPA OL DEUTSCH ITALIANO OWNER S MANUAL MODE D EMPLOI MANUAL DEL USUARIO BEDIENUNGSANLEITUNG MANUALE DI ISTRUZIONI...

Page 2: ...ctive owners TEAC CORPORATION https tascam jp jp 1 47 Ochiai Tama shi Tokyo 206 8530 Japan TEAC AMERICA INC https tascam com us Phone 1 323 726 0303 10410 Pioneer Blvd Suite 1 and 4 Santa Fe Springs C...

Page 3: ...S A For Canada THIS CLASS B DIGITAL APPARATUS COMPLIES WITH CANADIAN ICES 003 CET APPAREIL NUMERIQUE DE LA CLASSE B EST CONFORME A LA NORME NMB 003 DU CANADA Declaration of Conformity Model Number DR...

Page 4: ...re or excessive heat CAUTION for products that use replaceable lithium batteries there is danger of explosion if a battery is replaced with an incorrect type of battery Replace only with the same or e...

Page 5: ...office waste disposal service or the shop where you purchased the equipment Disposal of batteries and or accumulators a Waste batteries and or accumulators should be disposed of separately from the m...

Page 6: ...ft side panel 8 Right side panel 9 Rear panel 9 Top panel 9 Bottom Panel 9 Home Screen 10 Preparation 11 Powering the unit 11 Starting up the unit 11 Setting the built in clock 11 Shutting down puttin...

Page 7: ...nearby to make calls or send or receive signals If this occurs increase the distance between this unit and those devices or turn them off Beware of condensation If the unit is moved from a cold to a w...

Page 8: ...ut switch 1 L e 2 R knob and PEAK indicator r Input switch 2 R t 3 4 knob and PEAK indicator y button u Stop 8 HOME button i button o 7 playback button p SLATE button Press and hold during playback to...

Page 9: ...n of unintended force could result in damage to the device l SD card slot button z HOLD switch x USB port c PHONES volume control v PHONES jack 3 5mm stereo mini jack b CAMERA OUT HIGH LINE OUT volume...

Page 10: ...ound input 4 M Right channel of dual recording mode main file 4 S Right channel of dual recording mode sub file 2 Repeat playback setting Single playback Single file repeat playback All file repeat pl...

Page 11: ...ring the unit 8 8 Using AA batteries 1 Remove the battery compartment cover on the back of the unit 2 Install 4 AA batteries with their and marks as shown in the battery compartment 3 Close the batter...

Page 12: ...t on the camera If you want to input audio from the camera and monitor it with this unit connect the CAMERA IN jack on the left side of this unit with the audio output jack on the camera DSLR camera A...

Page 13: ...8 HOME button Menu structure MENU REC MODE Make recording settings INPUT SETTING Make input settings REC SETTING Make recording settings AUTO REC Set the auto recording function PLAY SETTING Make pla...

Page 14: ...tion status No icon Auto tone off Auto tone on 8 Recorder operation status This icon shows the recorder operation status Indicator Meaning 09 Recording standby or Recording paused 0 Recording Self tim...

Page 15: ...MID HIGH HI PLUS 5 When finished making the setting press the stop 8 HOME button to return to the Home Screen 6 Press the record 0 button to begin recording standby The record indicator flashes red an...

Page 16: ...ETTINGscreen 4 Turn the DATA dial to select the cut off frequency of the low cut filter for mic input Options OFF default value 40Hz 80Hz 120Hz 5 When finished making the setting press the stop 8 HOME...

Page 17: ...you can also set MS mic decoding To use a mid side mic turn the DATA dial to select MS MODE and press the DATA dial or button 10 Turn the DATA dial to set the decoding mode when using a mid side mic...

Page 18: ...the current position 8 8 Stopping When the Home Screen is open and a file is playing back press the stop 8 HOME button to pause playback and press the stop 8 HOME button to return to the beginning of...

Page 19: ...to the computer USB connected will appear on the display 3 This unit appears on the computer screen as an external volume named DR 60DMK2 Exchanging files with a computer Click the DR 60DMK2 drive on...

Page 20: ...many files using the browse function might be more convenient Recording Change the file format Home Screen w MENU w REC SETTINGw FORMAT Set the recording file format to BWF WAV etc Using the low cut...

Page 21: ...s you to repeat playback of a specific file Use the playback equalizer Playback equalizer Home Screen w QUICK w PLAY EQ This function allows you to increase or decrease the levels of the high or low f...

Page 22: ...lly turns the unit off when it is not used for some time Change the backlight setting Home Screen w MENU w OTHERSw SYSTEMw BACKLIGHT Use this to change the display backlight setting Adjust the display...

Page 23: ...s press the DATA dial to automatically create a system file File Protected The file is read only and cannot be erased Message Meaning and response Format Error Format CARD The SD card might not be for...

Page 24: ...ot set in the direction of the arrow Is the unit connected to a computer by a USB cable Does USB connected appear on the display 8 8 The SD card is not recognized Confirm that the SD card is inserted...

Page 25: ...ance Frequency response 20 20kHz 0 5 2dB LINE IN or MIC IN to LINE OUT Fs44 1k 48kHz JEITA 20 40kHz 0 5 3dB LINE IN or MIC IN to LINE OUT Fs96kHz JEITA Distortion 0 02 or less LINE IN or MIC IN to LIN...

Page 26: ...elected phantom power not used Continuous operating time when using batteries and a TASCAM BP 6AA sold separately When using Alkaline batteries EVOLTA and TASCAM BP 6AA EVOLTA Format Operation time No...

Page 27: ...Une fiche polaris e a deux broches l une plus large que l autre Une fiche de terre a deux broches identiques et une troisi me broche pour la mise la terre La broche plus large ou la troisi me broche s...

Page 28: ...es attention aux indications de polarit orientation plus moins et installez les correctement dans le compartiment des piles comme indiqu Les installer l envers peut entra ner la rupture ou la fuite de...

Page 29: ...quipements lectriques et lectroniques veuillez contacter votre mairie le service d ordures m nag res ou le magasin dans lequel vous avez achet l quipement Mise au rebut des piles et ou accumulateurs...

Page 30: ...lat rale droite 33 Face arri re 33 Face sup rieure 33 Face inf rieure 33 cran d accueil 34 Pr paration 35 Alimentation de l unit 35 Allumage de l unit 35 R glage de l horloge int gr e 35 Extinction mi...

Page 31: ...roximit pour passer des appels ou envoyer ou recevoir des signaux Dans ce cas augmentez la distance entre cette unit et les autres appareils ou teignez les Attention la condensation Si l unit est d pl...

Page 32: ...e 1 L q Bouton 2 R et voyant PEAK r S lecteur d entr e 2 R t Bouton 3 4 et voyant PEAK y Touche u Touche Stop 8 HOME i Touche o Touche 7 lecture p Touche SLATE Maintenez la press e durant la lecture p...

Page 33: ...carte SD Touche z Commutateur HOLD x Port USB c Commande de volume PHONES v Prise PHONES mini jack 3 5 mm st r o b Commande de volume CAMERA OUT HIGH LINE OUT n Prise CAMERA OUT HIGH LINE OUT mini ja...

Page 34: ...u son du canal 4 4 M Canal droit du fichier principal du mode double enregistrement 4 S Canal droit du second fichier du mode double enregistrement 2 R glage de lecture en boucle Lecture simple Lectur...

Page 35: ...fich num riquement Pr paration Alimentation de l unit 8 8 Emploi avec des piles AA 1 Ouvrez le compartiment des piles au dos de l unit 2 Installez 4 piles AA dans le compartiment avec leurs rep res et...

Page 36: ...Si vous voulez recevoir l audio venant de l appareil photo et le contr ler avec cette unit branchez la prise d entr e CAMERA IN sur le c t gauche de cette unit la prise de sortie audio de l appareil...

Page 37: ...sez la touche Stop 8 HOME Structure du menu MENU REC MODE R glages d enregistrement INPUT SETTING R glages d entr e REC SETTING R glages d enregistrement AUTO REC R glage de la fonction d enregistreme...

Page 38: ...ction de tonalit automatique Pas d ic ne tonalit automatique d sactiv e tonalit automatique activ e 8 Statut de fonctionnement de l enregistreur Cette ic ne affiche le statut de fonctionnement de l en...

Page 39: ...r d faut MID HIGH HI PLUS 5 Une fois le r glage fini pressez la touche Stop 8 HOME pour revenir l cran d accueil 6 Pressez la touche Enregistrement 0 pour armer l enregistrement Le voyant d enregistre...

Page 40: ...e du canal 1 Ch1INPUTSETTING 4 Tournez la molette DATA pour s lectionner la fr quence de coupure du filtre coupe bas sur l entr e micro Options OFF valeur par d faut 40 Hz 80 Hz 120 Hz 5 Une fois le...

Page 41: ...i r gler le d codage MS Pour utiliser un micro MS mid side tournez la molette DATA afin de s lectionner MSMODEet pressez la molette DATA ou la touche 10 Tournez la molette DATA pour r gler le mode de...

Page 42: ...our mettre la lecture en pause sur la position actuelle 8 8 Arr t Avec l cran d accueil ouvert et un fichier en lecture pressez la touche Stop 8 HOME pour mettre en pause la lecture et pressez encore...

Page 43: ...ed appara t l cran 3 Cette unit appara t sur l cran de l ordinateur comme un volume externe intitul DR 60DMK2 change de fichiers avec un ordinateur Cliquez sur le disque DR 60DMKII sur l cran de l ord...

Page 44: ...urir peut tre plus commode Enregis trement Changer le format de fichier cran d accueil w MENU w RECSETTINGw FORMAT R gle le format de fichier d enregistrement sur BWF WAV etc Emploi du filtre coupe ba...

Page 45: ...le un m me fichier Utiliser l galiseur de lecture galiseur de lecture cran d accueil w QUICK w PLAYEQ Cette fonction vous permet d augmenter ou de diminuer le niveau des hautes ou basses fr quences du...

Page 46: ...it si elle reste inutilis e pendant un certain temps Changer le r glage de r tro clairage cran d accueil w MENU w OTHERSw SYSTEMw BACKLIGHT Utilisez cela pour changer le r glage de r tro clairage de l...

Page 47: ...e fichier est uniquement destin la lecture et ne peut pas tre effac Message Signification et r ponse Format Error Format CARD La carte SD n est pas correctement format e ou bien elle est endommag e Ce...

Page 48: ...n est pas pouss dans la direction de la fl che L unit est elle connect e un ordinateur par un c ble USB USB connected appara t il l cran 8 8 La carte SD n est pas reconnue V rifiez que la carte SD est...

Page 49: ...e ligne F 96 kHz JEITA 20 Hz 40 kHz 0 5 3 dB entr e ligne micro vers sortie ligne F 96 kHz JEITA Distorsion 0 02 ou moins entr e ligne micro vers sortie ligne F 44 1 48 96 kHz JEITA Rapport signal bru...

Page 50: ...44 1kHz 16 bits Environ 6 heures Entr e MIC s lectionn e sans alimentation fant me Autonomie de fonctionnement en continu avec des piles et un BP 6AA TASCAM vendu s par ment Avec des piles alcalines...

Page 51: ...salida de corriente o regleta diferente a la que est conectado el receptor d Consultar a su distribuidor o a un t cnico especialista en radio TV para que le ayuden PRECAUCI N Cualquier cambio o modif...

Page 52: ...o recibe corriente nominal no operativa de la salida de corriente AC aun cuando su interruptor POWER o STANDBY ON no est en la posici n ON Dado que el cable de alimentaci n es el sistema de desconexi...

Page 53: ...sos recursos y evitar a la vez todos los efectos negativos potenciales tanto para la salud como para el entorno c Una eliminaci n incorrecta de este tipo de aparatos junto con la basura org nica puede...

Page 54: ...ial 58 Preparativos 59 Encendido de la unidad 59 Puesta en marcha de la unidad 59 Ajuste del reloj interno 59 Apagado cambio a modo standby 59 Inserci n de tarjetas SD 60 Conexi n y fijaci n de c mara...

Page 55: ...ese caso trate de separar ambas unidades todo lo posible Esta unidad puede producir ruidos si utiliza un tel fono m vil u otro dispositivo inal mbrico cerca de ella durante una llamada o recepci n de...

Page 56: ...ando 1 L e indicador PEAK w Interruptor Input 1 L e Mando 2 R e indicador PEAK r Interruptor Input 2 R t Mando 3 4 e indicador PEAK y Bot n u Bot n Stop 8 HOME i Bot n o Bot n 7 reproducci n p Bot n S...

Page 57: ...da ar la unidad l Ranura para tarjetas SD Bot n z Interruptor HOLD x Puerto USB c Control de volumen PHONES v Conector PHONES 3 5 mm stereo mini b Control de volumen CAMERA OUT HIGH LINE OUT n Conect...

Page 58: ...ncipal de modo de grabaci n dual 4 S Canal derecho de fichero sub de modo de grabaci n dual 2 Ajuste de reproducci n repetida Reproducci n nica Reproducci n repetida de fichero nico Repr repetida de t...

Page 59: ...imo que se produce en un periodo de tiempo determinado Preparativos Encendido de la unidad 8 8 Uso de pilas AA 1 Abra la tapa del compartimento de las pilas de la parte trasera de la unidad 2 Instale...

Page 60: ...c mara Si quiere dar entrada a la se al audio procedente de la c mara y monitorizarla con esta unidad conecte la toma CAMERA IN del panel izquierdo de esta unidad a la salida de audio de la c mara C...

Page 61: ...cial pulse el bot n Stop 8 HOME Estructura de men MENU REC MODE Ajustes de modo de grabaci n INPUT SETTING Ajuste de entrada REC SETTING Ajustes de grabaci n AUTO REC Funci n de grabaci n autom tica P...

Page 62: ...icono Auto tone desactivado Auto tone activo 8 Estado operativo de la grabadora Este icono le muestra el estado operativo de la grabadora Indicador Significado 09 Espera o pausa de grabaci n 0 Grabaci...

Page 63: ...ID HIGH HI PLUS 5 Cuando haya terminado con el ajuste pulse el bot n Stop 8 HOME para volver a la pantalla inicial 6 Pulse el bot n Record 0 para activar la espera de grabaci n El indicador de grabaci...

Page 64: ...orte para el filtro de corte de graves de la entrada de micro Opciones OFF valor por defecto 40Hz 80Hz 120Hz 5 Cuando haya terminado con el ajuste pulse el bot n Stop 8 HOME para volver a la pantalla...

Page 65: ...a usar un micro centro lateral gire el dial DATA para elegir MS MODEy pulse el dial DATA o el bot n 10 Gire el dial DATA para ajustar el modo de descodificaci n a usar con un micro centro lateral Opci...

Page 66: ...pulse el bot n Stop 8 HOME para activar la pausa de reproducci n en la posici n activa 8 8 Parada Con la pantalla inicial activa y un fichero en reproducci n pulse el bot n Stop 8 HOME para dejar en...

Page 67: ...d al ordenador En la pantalla aparecer USB connected 3 Esta unidad aparecer en la pantalla del ordenador como un volumen externo con el nombre DR 60DMK2 Intercambio de ficheros con un ordenador Haga c...

Page 68: ...cheros le resultar m s til usar la funci n de b squeda o BROWSE Grabaci n Cambio del formato de fichero Pantalla inicial w MENU w REC SETTINGw FORMAT Ajuste el formato del fichero a BWF WAV etc Uso de...

Page 69: ...Uso de ecualizador de reproducci n Ecualizador de reproducci n Pantalla inicial w QUICK w PLAY EQ Esta funci n le permite aumentar o reducir el nivel de las frecuencias graves o agudas durante la repr...

Page 70: ...icamente tras un periodo sin actividad Ajuste de retroiluminaci n Pantalla inicial w MENU w OTHERSw SYSTEMw BACKLIGHT Use esto para cambiar el ajuste de retroiluminaci n de la pantalla Ajuste de contr...

Page 71: ...mente un fichero de sistema File Protected El fichero es solo de lectura y no puede ser borrado Mensajes Significado y respuesta Format Error Format CARD El formateo de la tarjeta es anormal o est da...

Page 72: ...la 8 8 La tarjeta SD no es reconocida Compruebe que la tarjeta SD est totalmente introducida 8 8 La reproducci n no funciona Si est tratando de reproducir un fichero WAV compruebe que su frecuencia de...

Page 73: ...uencia 20 20 kHz 0 5 2 dB LINE IN o MIC IN a LINE OUT Fs44 1k 48kHz JEITA 20 40 kHz 0 5 3 dB LINE IN o MIC IN a LINE OUT Fs96kHz JEITA Distorsi n 0 02 o inferior LINE IN o MIC IN a LINE OUT Fs44 1k 48...

Page 74: ...Tiempo de funcionamiento continuo al usar pilas y un pack TASCAM BP 6AA opcional Cuando use pilas alcalinas EVOLTA y TASCAM BP 6AA EVOLTA Formato Tiempo time Notas Grabaci n 2 canales ficheros WAV 44...

Page 75: ...r und am Netzkabelausgang des Ger ts und verlegen Sie es so dass man nicht dar ber stolpern kann Ziehen Sie den Netzstecker bei Gewitter oder wenn Sie das Ger t l ngere Zeit nicht benutzen Zum Schutz...

Page 76: ...ie die betroffenen Stellen mit klarem Wasser ab und suchen Sie dann sofort einen Arzt auf Bevor Sie Batterien Akkus wechseln schalten Sie das Ger t aus Nehmen Sie die Batterien heraus wenn Sie das Ger...

Page 77: ...esetze schreiben vor dass Elektro und Elektronik Altger te sowie Batterien und Akkus nicht in den Hausm ll Restm ll gelangen d rfen Um die fachgerechte Entsorgung Aufbereitung und Wiederverwertung sic...

Page 78: ...globale TEAC Website nutzen 79 Informationen zum Kundendienst von Tascam 79 Die Bedienelemente und ihre Funktionen 80 Ger tevorderseite 80 Linke Ger teseite 80 Rechte Ger teseite 81 Ger ter ckseite 8...

Page 79: ...e auf dem Recorder auftreten Versuchen Sie in einem solchen Fall den Abstand zwischen dem Recorder und dem anderen Ger t zu vergr ern oder schalten Sie das andere Ger t aus Kondensation vermeiden Wenn...

Page 80: ...aufnahme ausgef hrt wird 0 REC L mpchen W hrend der Aufnahmebereitschaft blinkt es w hrend der Aufnahme leuchtet es stetig rot q 1 L Regler und PEAK L mpchen w Eingangswahlschalter 1 L e 2 R Regler un...

Page 81: ...SICHT ben Sie keine berm ige Kraft aus wenn Sie Kopfh rer und externe Ger te mit dem DR 60DMKII verbinden Seien Sie insbesondere vorsichtig wenn Sie Adapter von Standard auf Miniklinke verwenden da di...

Page 82: ...1 2 3 4 Mischung der Kan le 3 4 CAM Signal an der CAMERA IN Buchse CH1 Eingangssignal der Spur 1 Symbol Bedeutung 1 M Linker Kanal der bergeord neten Datei einer Zweifachauf nahme 1 S Linker Kanal der...

Page 83: ...gen den Eingangs oder Wiedergabepegel an 9 Statusanzeige der Spuren Was hier angezeigt wird h ngt davon ab in welchem Modus die entsprechende Datei aufgezeichnet wurde Die Erkennung erfolgt ber den Da...

Page 84: ...s seite TASCAM DR 60DMKII erscheint Sobald der Recorder betriebsbereit ist erscheint auf dem Display die Hauptseite Datum und Uhrzeit der einge bauten Uhr einstellen Wenn Sie den Recorder zum ersten M...

Page 85: ...zen Sie Ihren Kopfh rer ab bevor Sie diese anschlie en Sie vermeiden dadurch H rsch den oder Sch den an Ihren Ger ten infolge pl tzlicher Lautst rkespr nge Um mit einem Kopfh rer abzuh ren verbinden S...

Page 86: ...nal der bergeordneten Datei einer Zweifachaufnahme 1 S Linker Kanal der untergeordneten Datei einer Zweifachaufnahme CH2 Eingangssignal der Spur 2 Symbol Bedeutung 2 M Rechter Kanal der bergeordneten...

Page 87: ...nden dargestellt Sie ist abh ngig vom gew hlten Aufnahmemodus der Abtastrate und dem Aufnahmeformat e Statusanzeige des Trittschallfilters Trittschallfilter ausgeschaltet Trittschallfilter eingeschalt...

Page 88: ...n sind mit einer Marke b versehen die einen Pegel von 12 dB kennzeichnet Stellen Sie den Pegel so ein dass sich die Mitte der h chsten Ausschl ge in etwa bei der Markierung befindet wobei jedoch das P...

Page 89: ...ahme STEREO Voreinstellung Erstellt eine Stereoaufnahme mit zwei unabh n gigen Kan len L R DUAL MONO Erstellt aus einer Mono Eingangsquelle zwei Aufnahmedateien mit unterschiedlichen Einstel lungen f...

Page 90: ...Dr cken Sie die MENU Taste Die MENU Seite erscheint 2 W hlen Sie mit dem Rad den Eintrag BROWSE und dr cken Sie auf das Rad oder die Sprungtaste rechts Die BROWSE Seite erscheint 3 W hlen Sie auf der...

Page 91: ...chaltet anschlie end auf Wiedergabe pause Eine Datei mit den Sprungtasten ausw hlen W hlen Sie auf der Hauptseite mit den Sprung tasten und die Datei aus die wieder gegeben werden soll Wenn Sie die Sp...

Page 92: ...rdner MUSIC und UTILITY anzuzeigen 2 Um Dateien auf den Computer zu bertragen ffnen Sie den MUSIC Ordner und ziehen Sie die zu bertragenden Dateien auf das gew nschte Kopierziel auf dem Computer 3 Um...

Page 93: ...e Wiedergabelautst rke anpassen PHONES Regler CAMERA OUT HIGH LINE OUT Regler Die Lautst rke auf dem Kopfh rer oder angeschlossenen Lautsprechern wird angepasst Eine Datei f r die Wiedergabe ausw hlen...

Page 94: ...Hauptseite w MENU w REC SETTINGw SIZE Diese Funktion setzt die Aufnahme in einer neuen Datei fort sobald die gew hlte Dateigr e erreicht ist Die Aufnahme vor dem Dr cken der RECORD Taste starten lass...

Page 95: ...kgesprungen wird Die Lautst rke w hrend der Wiedergabe angleichen Pegelabgleich Hauptseite w QUICK w LEVEL ALIGN Diese Funktion sorgt f r eine h here empfundene Lautst rke bei der Wiedergabe Den Wiede...

Page 96: ...die Helligkeit der Display Hintergrundbeleuchtung Den Displaykontrast einstellen Hauptseite w MENU w OTHERSw SYSTEMw CONTRAST ndern Sie hier den Kontrast der Displayanzeige Den Batterietyp w hlen Haup...

Page 97: ...n m ssen Sie den Recorder mit einem Computer verbinden und den Dateinamen so bearbeiten dass er weniger als 198 Zeichen enth lt Meldung Bedeutung und Abhilfe File Not Found Eine Datei kann nicht gefun...

Page 98: ...st sich nicht einschalten Vergewissern Sie sich dass die Batterien Akkus noch gen gend Kapazit t haben Haben Sie beim Einlegen auf die richtige Polung geachtet Falls Sie den optionalen Wechselstromada...

Page 99: ...rde 8 8 Die Aufnahme l sst sich nicht weit genug aussteuern Vergewissern Sie sich dass die Eingangsverst rkung ausreichend hoch eingestellt ist siehe Seite 88 Vergewissern Sie sich dass der Ausgangspe...

Page 100: ...kroklinkenbuchse 2 5 mm 3 polig Leistungsdaten Audio Frequenzbereich 20 Hz 20 kHz 0 5 2 dB LINE IN oder MIC IN bis LINE OUT Fs 44 1 48 kHz JEITA 20 Hz 40 kHz 0 5 3 dB LINE IN oder MIC IN bis LINE OUT...

Page 101: ...ngen 2 Spur Aufnahme 44 1 kHz 16 Bit WAV Format 6 00 Mikrofoneing nge Phantomspeisung nicht verwendet Ungef hre Betriebszeit mit Batterien und Batteriepack Tascam BP 6AA als Zubeh r erh ltlich Alkalin...

Page 102: ...102 TASCAM DR 60DMKII Benutzerhandbuch...

Page 103: ...the user s authority to operate this equipment For U S A For Canada THIS CLASS B DIGITAL APPARATUS COMPLIES WITH CANADIAN ICES 003 CET APPAREIL NUMERIQUE DE LA CLASSE B EST CONFORME A LA NORME NMB 003...

Page 104: ...on appoggiare alcun oggetto riempito d acqua come vasi sopra l apparecchio Non installare questo apparecchio in spazi ristretti come una vetrina per libri o luoghi simili L apparecchio dovrebbe essere...

Page 105: ...niche d Il simbolo barrato della pattumiera indica che le apparecchiature elettriche ed elettroniche devono essere raccolte e smaltite separatamente dai rifiuti domestici e I sistemi di raccolta sono...

Page 106: ...Uso del sito TEAC Global Site 107 Informazioni sul servizio di assistenza clienti TASCAM 107 Nomi e funzioni delle parti 108 Pannello frontale 108 Pannello laterale sinistro 108 Pannello laterale dest...

Page 107: ...o spegnere il dispositivo Attenzione alla condensa Se l unit viene spostata da un ambiente freddo a uno caldo o usata subito dopo che un ambiente freddo viene riscaldato o altrimenti esposta a un imp...

Page 108: ...re di ingresso 1 L e Manopola 2 R e indicatore PEAK r Interruttore di ingresso 2 R t Manopola 3 4 e indicatore PEAK y Pulsante u Pulsante Stop 8 HOME i Pulsante o Pulsante 7 playback p Pulsante SLATE...

Page 109: ...ebbe provocare danni al dispositivo l Alloggiamento della card SD Pulsante z Interruttore HOLD x Porta USB c Controllo del volume PHONES v Presa PHONES minipresa stereo 3 5 mm b Controllo del volume C...

Page 110: ...canale 4 4 M Canale destro del file principale in modalit di registrazione duale 4 S Canale destro del file secondario in modalit di registrazione duale 2 Impostazione riproduzione ripetuta Riproduzio...

Page 111: ...ento del livello spenta Funzione di allineamento del livello accesa r Stato dell equalizzatore in riproduzione Equalizzatore in riproduzione spento Equalizzatore in riproduzione acceso t Valore di pic...

Page 112: ...gio a una fotocamera Per poter mandare il suono di questa unit ad una fotocamera DSLR e monitorare il suono di una fotocamera con questa unit necessario connettere due cavi da 3 5 mm con minipresa ste...

Page 113: ...o stazione 6 Premere il selettore DATA o il pulsante per impostare una voce differente nello stesso menu Ci consente di selezionare una nuova voce Ruotare nuovamente il selettore DATA per selezionare...

Page 114: ...dalit di registra zione duale 2 Stato della funzione di preregistrazione o di registrazione automatica appare quando la funzione di preregistra zione attivata e durante l attesa di registra zione appa...

Page 115: ...azione rapidamente In attesa di registrazione appare l indicatore REC lampeggiante e la schermata di registrazione Struttura del menu possibile effettuare varie impostazioni con la voce REC SETTING ne...

Page 116: ...e alla pagina principale Uso del filtro Low Cut Usare il filtro Low Cut se si vuole tagliare il rumore e altri suoni a bassa frequenza Questa funzione pu essere utilizzata per ridurre il rumore di ari...

Page 117: ...la decodifica microfonica MS Per usare un microfono mid side ruotare il selettore DATA per selezionare MS MODEe premere il selettore DATA o il pulsante 10 Ruotare il selettore DATA per impostare la mo...

Page 118: ...HOME per mettere in pausa nella posizione corrente 8 8 Mettere in stop Quando la schermata principale aperta e un file in riproduzione premere il pulsante Stop 8 HOME per mettere in pausa e premere il...

Page 119: ...nare STORAGEe premere il pulsante 7 per collegare l unit al computer Apparir sul display USB connected 3 Questa unit viene visualizzata sullo schermo del computer come volume esterno denominato DR 60D...

Page 120: ...do la funzione browse potrebbe essere pi conveniente Registra zione Modificare il formato di file Schermata principale w MENU w REC SETTINGw FORMAT Impostare il formato del file di registrazione BWF W...

Page 121: ...zione di un file specifico Usare l equalizzatore in ripro duzione Equalizzatore in riproduzione Schermata principale w QUICK w PLAY EQ Questa funzione consente di aumentare o diminuire il livello dell...

Page 122: ...viene utilizzata per un certo tempo Cambiare l impostazione della retroilluminazione Schermata principale w MENU w OTHERSw SYSTEMw BACKLIGHT Utilizzare questa funzione per modificare l impostazione d...

Page 123: ...le di sistema File Protected Il file di sola lettura e non pu essere cancellato Messaggio Significato e risposta Invalid SysFile Make Sys File Il file di sistema necessario per il funzionamento di que...

Page 124: ...la freccia L unit collegata a un PC con il cavo USB appare la scritta USB connected sul display 8 8 La card SD non viene riconosciuta Assicurarsi che la card SD sia inserita completamente 8 8 La ripro...

Page 125: ...IN su LINE OUT Fs44 1k 48 kHz JEITA 20 40 kHz 0 5 3 dB LINE IN o MIC IN su LINE OUT Fs96 kHz JEITA Distorsione 0 02 o meno LINE IN o MIC IN su LINE OUT Fs44 1k 48k 96 kHz JEITA Rapporto S N 92 dB o p...

Page 126: ...1kHz 16 bit Circa 6 00 Ingresso selezionato MIC Phantom non usata Tempo operativo continuo con batterie e un TASCAM BP 6AA venduto separatamente Quando si usano batterie alcaline EVOLTA e TASCAM BP 6A...

Page 127: ...TASCAM DR 60DMKII 127 V P AC AC AC AC AC AC AC 100 100 DC V N AC AC 1 AC Y V P AC AC AC N AC AC AC...

Page 128: ...128 TASCAM DR 60DMKII V AC AC O AC V 5 1 V V N V V Y V...

Page 129: ...x1 0 0 x1 127 128 129 129 130 130 130 130 130 131 131 131 132 132 132 132 133 134 134 134 134 134 SD 135 135 135 136 136 136 136 138 138 138 138 139 139 MONO STEREO 140 141 141 141 141 141 142 QUICK...

Page 130: ...130 TASCAM DR 60DMKII 0 0 0 40 0 0 0 0 0 0 0 0 0 0 0 0 0 0 i i DR 60DMKII i i Serial No i i i i i i 0 0 0 0 1 2 TASCAM https tascam jp jp login 0 0 0 0 1...

Page 131: ...ITOR SELECT 5 MENU 6 MIXER 7 QUICK 8 DUAL 9 4CH 4 0 REC q 1 L PEAK w 1 L e 2 R PEAK r 2 R t 3 4 PEAK y u 8 HOME i o 7 p SLATE a 0 w s 1 L XLR TRS d 3 4 3 5mm f 2 R XLR TRS g CAMERA IN 3 5mm h REMOTE 2...

Page 132: ...132 TASCAM DR 60DMKII w l SD z HOLD x USB c PHONES v PHONES 3 5mm b CAMERA OUT HIGH LINE OUT n CAMERA OUT HIGH LINE OUT 3 5mm m 1 4 1 4 VIDEO PIN...

Page 133: ...R 60DMKII 133 1 MIX CH1 4 SUB 1 2 CH1 2 3 4 CH3 4 CAM CAMERA IN CH1 CH1 1 M L 1 S L CH2 CH2 2 M R 2 S R CH3 CH3 3 M L 3 S L CH4 CH4 4 M R 4 S R 2 1 3 ALL MUSIC FOLDER 4 5 6 AC TASCAM PS P520E USB 7 8...

Page 134: ...134 TASCAM DR 60DMKII 9 MONO STEREO MONO STEREO DUAL MONO DUAL ST 4CH 0 q w e r t dB 3 1 2 3 4 3 0 0 SYSTEM BATTERY TYPE ALKAL TASCAM DR 60D DATE TIME LINEAR PCM RECORDER...

Page 135: ...1 SD USB 2 SD i i SD SD SDHC SDXC i i TASCAM https tascam jp jp SD 3 5mm 1 CAMERA OUT LOW CAMERA IN i i CAMERA OUT LOW CAMERA OUT HIGH LINE OUT CAMERA OUT HIGH LINE OUT i i 2 CAMERA OUT LOW 3 PHONES...

Page 136: ...A 5 DATA 6 DATA DATA 7 3 6 8 MENU MENU OTHERS 8 HOME MENU REC MODE INPUT SETTING REC SETTING AUTO REC PLAY SETTING BROWSE OTHERS INFORMATION FILE NAME DATE TIME SYSTEM 1 MIX CH1 4 SUB 1 2 CH1 2 3 4 CH...

Page 137: ...TASCAM DR 60DMKII 137 CH3 CH3 3 M L 3 S L CH4 CH4 4 M R 4 S R 2 ON ON 3 WAV16 WAV24 BWF16 BWF24 4 44 1k 48k 96kHz 5 6 ST MONO 7 8 09 0 9 DUAL 0 12 4 0 q w SD e r t SLATE SLATE y dB...

Page 138: ...4MB 128MB 256MB 512MB 1GB 2GB SELF TMR OFF 2sec 10sec MONITOR OFF ON 1 MENU MENU 2 DATA INPUT SETTING DATA INPUT SETTING 3 DATA GAIN DATA INPUT SETTING Ch1 4 DATA MUTE LOW MID HIGH HI PLUS 5 8 HOME 6...

Page 139: ...4 DATA OFF MONO LINK 5 8 HOME 1 MENU MENU 2 DATA INPUT SETTING DATA INPUT SETTING 3 DATA LOW CUT DATA INPUT SETTING Ch1 4 DATA OFF 40Hz 80Hz 120Hz 5 8 HOME 5 REC MODE REC MODE MONO STEREO DUAL MONO 1...

Page 140: ...TA MONO STEREO STEREO 5 DATA 6 DATA SOURCE DATA 7 DATA REC MODE SOURCE MONO CH1 CH1 CH2 CH2 CH3 CH3 CH4 CH4 STEREO CH1 2 CH1 2 CH3 4 CH3 4 8 DATA 9 REC MODE STEREO MS MS DATA MS MODE DATA 10 DATA MS O...

Page 141: ...ME 0 0 7 8 HOME PHONES CAMERA OUT HIGH LINE OUT PHONES CAMERA OUT HIGH LINE OUT 7 8 HOME 8 HOME 8 HOME DATA 1 MENU PLAY SETTING PLAY SETTING AREA ALL FILES FOLDER REPEAT CONTINUOUS SINGLE 1 REPEAT ALL...

Page 142: ...142 TASCAM DR 60DMKII QUICK QUICK BROWSE MENU OTHERS MIXER SD USB 1 USB 2 USB SELECT STORAGE 7 USB connected 3 DR 60DMK2 DR 60DMK2 MUSIC UTILITY MUSIC MUSIC USB SYSTEM SD 1 MENU w OTHERS w SYSTEM 7 2...

Page 143: ...EC w MENU w REC SETTING w PRE REC 0 0 8 HOME w 0 w 0 w 7 PHONES CAMERA OUT HIGH LINE OUT w w MENU w REC SETTING w FORMAT BWF WAV w MENU w INPUT SETTING w LOW CUT w MENU w INPUT SETTING w GAIN w RECORD...

Page 144: ...0 3 w MENU w REC SETTING w SELF TMR w SLATE w MENU w PLAY SETTING w REPEAT w QUICK w PLAY EQ w 7 w MENU w PLAY SETTING w JUMPBACK w QUICK w LEVEL ALIGN w MENU w PLAY SETTING w AREA w MENU w BROWSE w D...

Page 145: ...NU w OTHERS w SYSTEM w AUTO PWR SAVE w MENU w OTHERS w SYSTEM w BACKLIGHT w MENU w OTHERS w SYSTEM w CONTRAST w MENU w OTHERS w SYSTEM w BATTERY TYPE w MENU w OTHERS w SYSTEM w PHANTOM VOLT w MENU w O...

Page 146: ...e ERR DIVIDE 200 DIVIDE a b DIVIDE 198 File Not Found File Not Found Make Sys File DATA File Protected Format Error Format CARD SD SD USB DR 60DMKII SD DATA SD Invalid Card Change Card SD SD Invalid S...

Page 147: ...l Battery USB Write Timeout SD 0 0 0 0 0 0 AC TASCAM PS P520E USB 0 0USB USB 0 0USB USB 0 0HOLD w 10 i i ErP AC OFF 30 0 0HOLD 0 0USB USB Connected SD 0 0SD 0 0WAV 0 0 0 0 0 0 0 0 0 0 0 0 0 0SD 0 0 0...

Page 148: ...8 USB Mini B USB2 0 HIGH SPEED REMOTE 2 5mmTRS 20 20kHz 0 5 2dB LINE IN or MIC IN to LINE OUT Fs44 1k 48kHz JEITA 20 40kHz 0 5 3dB LINE IN or MIC IN to LINE OUT Fs96kHz JEITA 0 02 LINE IN or MIC IN t...

Page 149: ...6AA 5 4W 0 0 EVOLTA 2ch WAV 44 1kHz 16bit 4 30 MIC 0 0 eneloop 2ch WAV 44 1kHz 16bit 5 MIC 0 0 eneloop pro 2ch WAV 44 1kHz 16bit 6 MIC TASCAM BP 6AA 0 0 EVOLTA BP 6AA EVOLTA 2ch WAV 44 1kHz 16bit 10 3...

Page 150: ...M DR 60DMKII 206 8530 1 47 206 8530 1 47 0570 000 809 10 00 12 00 13 00 17 00 0 0 042 356 9137 FAX 042 356 9185 358 0026 858 0570 000 501 9 30 17 00 0 0 04 2901 1033 FAX 04 2901 1036 TASCAM https tasc...

Page 151: ...y repairs are covered by the warranty we will pay return surfaceshippingchargestoanydestinationwithintheUnitedStates LIMITATIONOFIMPLIEDWARRANTIES Any implied warranties INCLUDING WARRANTIES OF MERCHA...

Page 152: ...r s name Nom du possesseur Name des Eigent mers Nome del proprietario Nombre del propietario Address Adresse Adresse Indirizzo Direcci n Dealer s name Nom du d taillant Name des H ndlers Nome del comm...

Reviews: