TASCAM DR-40X
7
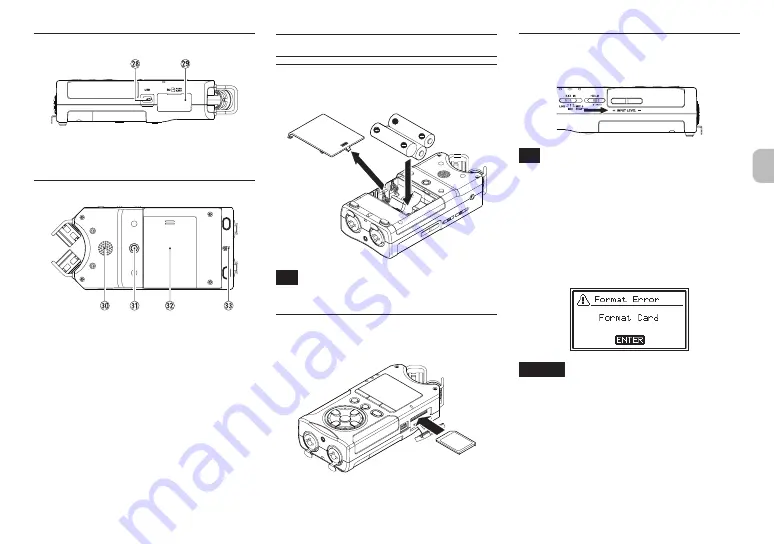
Right side panel
k
USB port
l
microSD card slot
Bottom Panel
;
Mono speaker
z
Tripod or tilt foot mounting threads
(1/4-inch)
x
Battery compartment cover
c
Strap attachment
v
Battery compartment
Making preparations
Installing batteries
While pressing the battery compartment cover on the back
of the unit, slide it open. Then, install batteries.
TIP
The TASCAM PS-P520E AC adapter can also be used
with this unit.
Inserting a card
Open the microSD slot cover on the right side panel, and
insert a microSD card.
Turning the unit on
1.
Slide the HOLD switch in the direction of the arrow to
unlock it.
TIP
By sliding it toward HOLD, button operations can be
disabled, preventing misoperation during recording.
2.
Press and hold the
¤
(HOME) [
8
] button for several
seconds.
The first time the power is turned on after purchase,
setting screens like the following will open.
Formatting cards
Press the ENTER/MARK button to to execute.
CAUTION
Execution of formatting erases all data currently on the
card.
This message will not appear for cards that have already
been formatted.
Summary of Contents for DR-40X
Page 78: ...78 TASCAM DR 40X 10 11 12 13 14 POWER STANDBY ON OFF TEAC...
Page 79: ...TASCAM DR 40X 79 8 8 a b c d e a b c d Pb Hg Cd 2006 66 EC Pb Hg Cd e Pb Hg Cd...
Page 81: ...TASCAM DR 40X 81 1 AA 3 1 1 0 40 C microSD SD TEAC Global http teac global com TASCAM...
Page 85: ...TASCAM DR 40X 85 8 8 X Y X Y...
Page 90: ...90 TASCAM DR 40X 3 ENTER MARK 1 PC Mac iOS PC Mac 2 44 1k 48k 3 USB AUDIO I F PC Mac Mac...
Page 94: ...94 TASCAM DR 40X...
Page 95: ...TASCAM DR 40X 95 V P AC AC AC AC AC AC AC 100 100 DC V N AC AC 1 AC Y V P AC AC AC N AC AC...
Page 96: ...96 TASCAM DR 40X V N AC AC AC O AC V 5 1 V V N V N V Y V...
Page 101: ...TASCAM DR 40X 101 A B A B L R L R X Y X Y R L R L 2...
Page 102: ...102 TASCAM DR 40X 1 2 3 4 5 6 7 8 9 0 q w e 1 2 3 4 5 6 7 8 9 0 q w e r 1 MENU 2 ENTER MARK 3...


