TASCAM DR-22WL
11
3 – Preparation
Turning the power on and off (standby
mode)
CAUTION
•
When you turn the power switch off while supplying power
from the dedicated AC adapter (TASCAM PS-P515U; sold
separately) or the USB bus power connected to a computer,
the unit will go to a standby mode.
•
Before turning the power switch on and off, turn the volume
down for the sound system connected to the unit.
•
Do not wear headphones when turning the power switch
on and off (standby mode); the noise may cause damage to
your ears and/or headphones.
Starting up the unit
In power off mode, slide and hold the HOLD/
switch
(located at left-side of the panel) toward the
direction, and
release the switch when the
TASCAM
DR-22WL
(start-up
screen) appears.
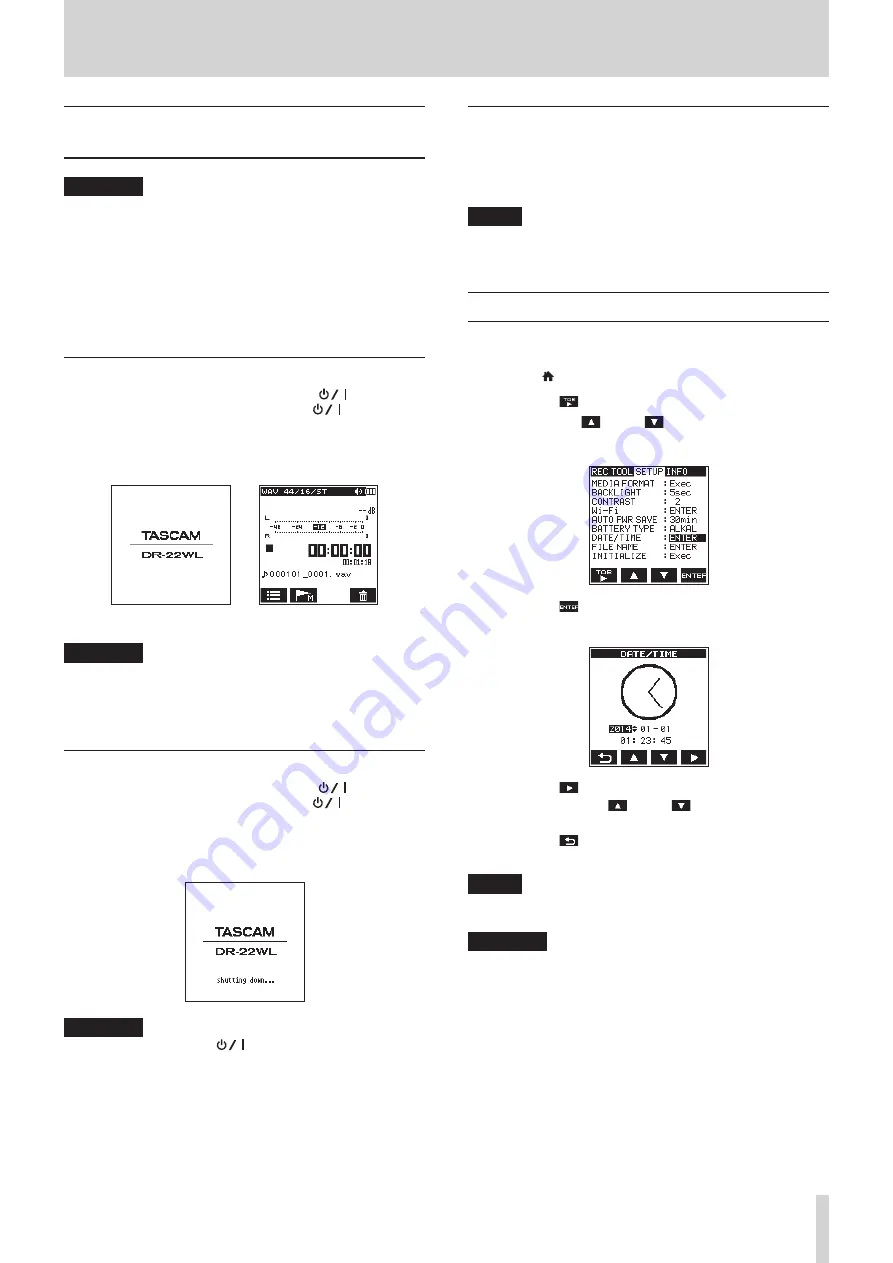
The DR-22WL starts up and the home screen is displayed.
Start-up screen Home screen
CAUTION
When turn the power on for the first time (or when the
built-in clock is reset due to no battery power), the
DATE/
TIME
screen will appear before the home screen to set
date/time. (See “Setting the date/time” on page 11.)
Shutting down (standby mode)
In power on mode, slide and hold the HOLD/
switch
(located at left-side of the panel) toward the
direction,
and release the switch when the
TASCAM
DR-22WL
shutting
down
appears.
The power turns off when the shut-down process is completed.
CAUTION
Always use the
HOLD/
switch to turn the power off.
In power on mode, all recorded data and settings will be
lost if you remove the batteries, disconnect the power
cable of the dedicated AC adapter (TASCAM PS-P515U; sold
separately), or plug-off the USB cable for USB bus power.
Any lost data and/or settings cannot be restored.
Resume function
The DR-22WL is equipped with a resume function to locate the
previous position (or time) when the power was turned off.
Turn the power on and press the PLAY button to playback from
the previous file position (time) when the power was turned off.
NOTE
The position is recorded in the microSD card. The resume
function does not work if the microSD card is replaced or
formatted.
Setting the date/time
The DR-22WL uses its internal clock to record the date and time
to the recorded files.
1. Press the /MENU/
8
button to display the menu screen.
2. Press the F1
button to display the
SETUP
page.
3. Use both the F2
and F3
buttons to select (highlight)
the
DATE/TIME
item parameters.
4. Press the F4
button to display the
DATE/TIME
screen.
5. Press the F4
button to move the cursor (highlighted
area), and use the F2
and F3
buttons to change
settings.
6. Press the F1
button to finalize the settings. The screen
will return to the
SETUP
page.
NOTE
The file name will include the set date/time. (See “Setting
the file name type” on page 40.)
CAUTION
Without the use of the batteries, the dedicated AC adapter
(TASCAM PS-P515U; sold separately) or USB bus power, the
date and time setting can be made only for a few minutes.
When using batteries, we recommend to replace them
before they are completely drained.


