background image

52

  TASCAM DR-05

Mark function

Adding marks manually to a 

recording

You can manually add marks to a recording where 

you want them. 
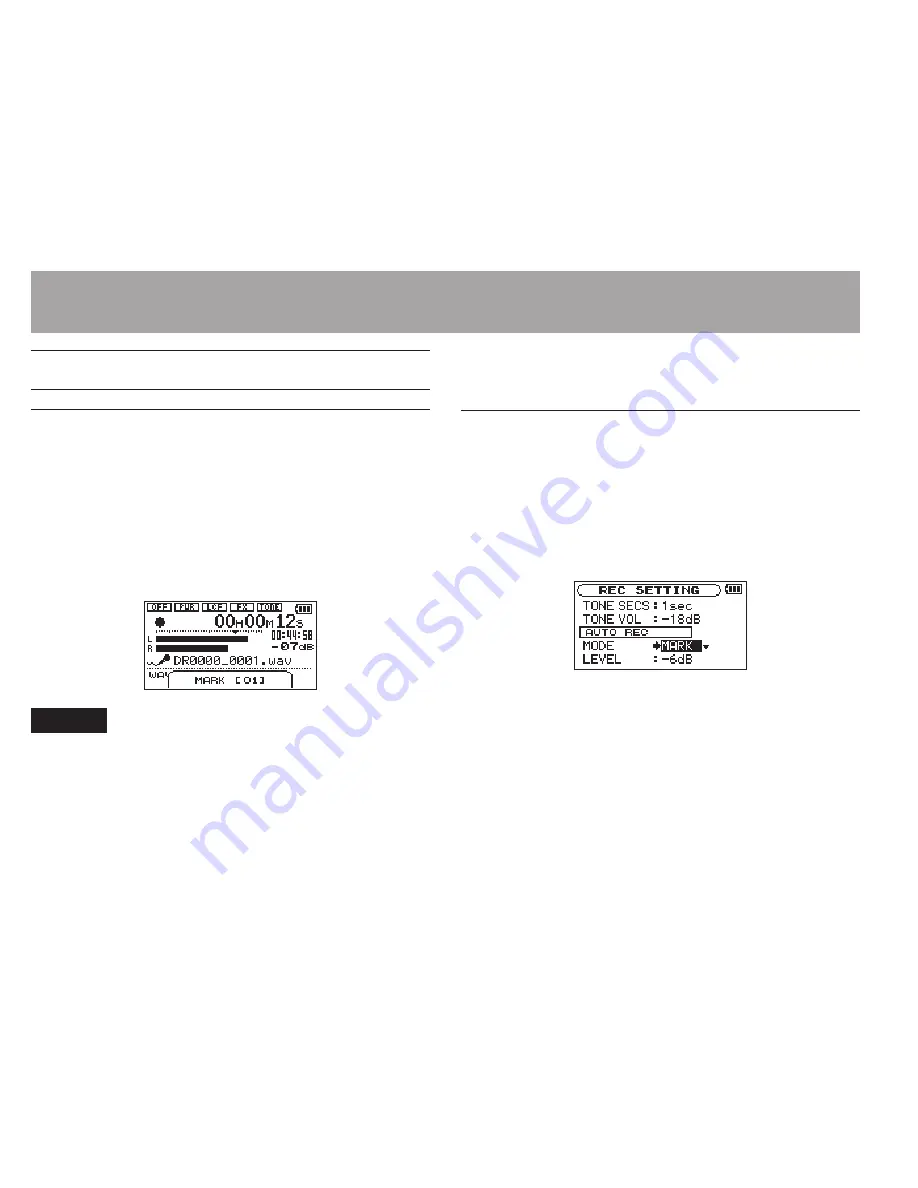
  Press the MARK button while recording to 

add a mark.
Mark number pull-up appears.

NOTE

•  Mark information is stored in the file with numbers 

between 01–99. The maximum number of marks in a 
file is 99.

•  As the unit is compatible with the BWF format for WAV 

files, marks added to a WAV file during recording are 
stored in the file. Marks stored in the file are available 

when playing back the file using a BWF compliant 
software, etc.

Adding marks automatically to a 

recording

This function allows the unit to add marks 

automatically using 

AUTO REC

.

  Set the 

MODE

 to 

MARK

 on the 

AUTO REC


screen.

See “Recording automatically (AUTO REC)” on 

page 48.

4–Recording

Summary of Contents for DR-05

Page 1: ...inear PCM Recorder D01139520A OWNER S MANUAL This device has a serial number located inside the battery compartment Please record it and retain it for your records Serial number _______________________________ ...

Page 2: ... receptacles and the point where they exit from the apparatus 11 Only use attachments accessories specified by the manufacturer 12 Use only with the cart stand tripod bracket or table specified by the manufacturer or sold with the apparatus When a cart is used use caution when moving the cart apparatus combination to avoid injury from tip over 13 Unplug this apparatus during lightning storms or wh...

Page 3: ...other batteries or metallic objects When throwing used batteries away follow the disposal instructions indicated on the batteries and the local disposal laws Do not use batteries other than those specified Do not mix and use new and old batteries or different types of batter ies together The batteries could rupture or leak causing fire injury or stains around them Do not carry or store batteries t...

Page 4: ...e instruction manual may cause harmful interference to radio communications However there is no guarantee that interference will not occur in a particular installation If this equipment does cause harmful interference to radio or television reception which can be determined by turning the equipment off and on the user is encouraged to try to correct the interference by one or more of the following...

Page 5: ...icates that electrical and electronic equipment must be collected and disposed of separately from household waste e Return and collection systems are available to end users For more detailed information about the disposal of old electrical and electronic equipment please contact your city office waste disposal service or the shop where you purchased the equipment Disposal of batteries and or accum...

Page 6: ...or those elements will be indicated beneath the WEEE symbol e Return and collection systems are available to end users For more detailed information about the disposal of waste batteries and or accumulators please contact your city office waste disposal service or the shop where you purchased them Safety Information 铅 汞 镉 六价铬 多溴联苯 多溴二苯醚 Pb Hg Cd Cr VI PBB PBDE 1 CHASSIS部份 2 PCB Assy部份 3 线材部份 4 附属品...

Page 7: ...Control screen 30 Menu item list 31 Using menus 32 Basic operation 33 3 Preparation 34 Powering the unit 34 Using AA batteries 34 Using an AC adaptor sold separately 34 Using USB bus power 35 Start up shutdown 36 Starting up the unit 36 Shutting down 37 Resume function 37 Setting the date and time 38 Inserting and removing microSD cards 39 Inserting the microSD card 39 Removing the card 40 Prepari...

Page 8: ...7 Recording duration 58 5 Working with Files and Folders BROWSE screen 59 Screen navigation 59 Icons on the BROWSE screen 60 File operations 61 Folder operations 62 Creating a new folder 63 6 Playback 64 Adjusting playback volume 64 Setting the playback area AREA 64 Selecting a folder for the playback area 1 66 Selecting a folder for the playback area 2 67 Playlist 68 Adding tracks to the playlist...

Page 9: ...les to a computer 90 Transferring files from a computer 91 Disconnecting from a computer 91 10 Settings and Information 92 Viewing File Information 92 File information page 92 Card information page 93 System information page 93 System Settings and Formatting 94 Turning the unit power OFF automatically 94 Setting the backlight 94 Adjusting the display contrast 95 Setting the type of AA batteries 95...

Page 10: ... 1 Install batteries in the battery compartment on the back of the unit Fit them to the and marks shown in the compartment 2 Turn on and various setting information will be displayed Press the HOME ª button until the unit is turned on and then release it CAUTION The first time you use the unit a built in clock setting screen will appear Press the  or button to move the cursor highlighted portion ...

Page 11: ...k 7 Press the Á button for playback If you use a headphone or amplifier speaker set connect it to the LINE OUT socket on the left side panel REC indicator For playback over the built in speaker set enable it on the speaker settings screen See Using the built in speaker on page 41 8 Use the or button to control the playback volume 9 Press the HOME ª button to stop playback NOTE If you have made sev...

Page 12: ...ormat recording possible Compatible with WAV files in BWF format 32 320 kbps MP3 format recording possible compatible with ID3 tag v2 4 Built in 0 3 W monaural output speaker Can start recording a new file automatically when a maximum file size set in advance is reached without interrupting recording A QUICK button is available for easy access to various functions Track incrementing function allow...

Page 13: ... the last several seconds of the currently played file to be replayed again by simply pressing a button REC DELAY function can be used to avoid recording the sound of pressing the RECORD button Playlist function DIVIDE function allows files to be split where desired only for WAV files MARK function convenient for moving to specific locations Equalizers function for playback and level alignment fun...

Page 14: ... AA alkaline batteries 2 USB cable 80 cm 1 Warranty card 1 Owner s Manual this document 1 Conventions used in this manual The following conventions are used in this manual When we refer to a button or connector or control on the DR 05 the typeface looks like this MENU When we show messages for example that appears on the screen the typeface looks like this ON microSD memory card is sometimes abbre...

Page 15: ...demand applications and the like or on physical media compact discs digital versatile discs semiconductor chips hard drives memory cards and the like An independent license for such use is required For details please visit http mp3licensing com MPEG Layer 3 audio coding technology licensed from Fraunhofer IIS and Thomson Microsoft Windows Windows XP Windows Vista and Windows 7 are either registere...

Page 16: ...elated to the use of such data and or information This product is designed to help you record and reproduce sound works to which you own the copyright or where you have obtained permission from the copyright holder or the rightful licensor Unless you own the copyright or have obtained the appropriate permission from the copyright holder or the rightful licensor your unauthorized recording reproduc...

Page 17: ...ling them Do not leave them in extremely hot or cold places Do not leave them in extremely humid places Do not let them get wet Do not put things on top of them or twist them Do not hit them Precautions for placement The environmental temperature operation range of this unit is 0 40 C 32 104 F Do not install in the following types of places Doing so could degrade the sound quality and or cause mal...

Page 18: ...this occurs let the unit sit for one or two hours at the new room temperature before using Cleaning the unit Use a dry soft cloth to wipe the unit clean Do not clean the unit with a chemically treated cloth or substances such as benzene thinner and alcohol because they might cause damage to the surface of the unit Product Registration Customers in the USA please register your product online at tas...

Page 19: ...lume is too high 3 Display Shows a variety of information 4 HOME ª button Press this button during playback to cause the playback to pause at the current position Press this button during pause time to return to the beginning of the track Press this button during recording or recording standby to cause the recording to stop When any other screen is open press this button to return to the Home Scre...

Page 20: ...tting screens When the MENUScreen is displayed press this button to return to the Home Screen When the IN and OUT points are set in the track and the Playback Control screen is displayed press this button to turn on or off loop playback 7 Â button Press this button to return to the beginning of a track that is playing or stopped in the middle When the IN and OUT points are set between the current ...

Page 21: ...ator will be displayed in a pull up window When the Playback Control screen is open press this button to decrease the playback speed When a setting screen is open use the button to change the setting of the selected item 0 REC indicator The indicator flashes during recording standby The indicator lights while recording q RECORD º button When stopped press this button to put the unit into recording...

Page 22: ...button to move the cursor right Press this button while pressing and holding the MARK button to move to the next mark On the Browse Screen press this button to move down a level If a file is selected the file is loaded and the unit returns to the Home Screen Press this button during recording or recording standby to increase the input level from the built in microphone or MIC EXT IN jack During ad...

Page 23: ...that you want to set for loop playback When the IN and OUT points are already set press this button to cancel loop playback and clear the IN and OUT points Front panel y Strap attachment Use this to attach a strap Rear panel u MIC EXT IN jack Usethisinputjacktoconnectastereomini jack microphoneoranexternalinputdevice Thisjack providesplug inpowerwhensettodosoonthe InputSettingScreen Thebuilt inmic...

Page 24: ...ction of the arrow to engage the hold function All buttons are inoperative when hold is ON Right side panel p USB port Use the included USB cable to connect with a computer USB port Power can be supplied through the USB cable provided with the unit or an AC adaptor sold separately TASCAM PS P515U a microSD card slot Insert a microSD card into this slot 2 Names and Functions of Parts ...

Page 25: ...led d Tripod attachment screw hole 1 4 inch Use this to attach the unit to a tripod or mic stand CAUTION Tighten the unit securely to the tripod or microphone stand to prevent it from falling off Place the tripod or microphone stand on a level surface when using it with this unit f Battery compartment cover g Battery compartment Install batteries 2 AA in this compartment to power the unit See Usin...

Page 26: ...r Mix setting status On off status of Monitor Mix is shown Monitor Mix off Monitor Mix on 4 Power supply status When a battery is being used a battery icon shows the amount of power remaining in bars The battery is almost dead and the power will soon turn off if the icon has no bars When using the PS P515U AC adaptor sold separately or USB bus power appears NOTE Sometimes a Battery Low warning app...

Page 27: ...available for an MP3 file being played NOTE ID3 tag information includes the titles and artists names that can be saved in MP3 files 8 Playback position display The current playback position is shown by a bar As playback progresses the bar extends to the right 9 Elapsed time Shows the elapsed time hours minutes seconds of the currently playing track 0 Remaining time Shows the remaining playback ti...

Page 28: ...sition when the starting point is set The icon appears at the playback position when the ending point is set t Playback file number total number of files The total number of files in the playback area and the number of the current file are shown Recording Screen This screen appears when recording or in recording standby 1 Level control function status Level control off Peak reduction on Automatic ...

Page 29: ... name The file name that will automatically be given to recorded files is shown 8 Recording mode Recording file format sampling frequency and stereo mono ST MONO status are shown 9 Elapsed recording time The elapsed recording time of the track appears as hours minutes seconds 0 Remaining recording time The remaining recording time appears in hours minutes seconds q Peak value in decibels dB Peak r...

Page 30: ...on is enabled 3 Playback position display Thecurrentplaybackpositionisshownbyabar As playbackprogresses thebarextendstotheright 4 Loop playback IN starting and OUT ending points The set starting and ending points of the loop are shown The icon appears at the playback position on the bar when the starting point is set The icon appears at the playback position on the bar when the ending point is set...

Page 31: ...elected in the MENUscreen The menu items contained are as follows INFORMATION Information about the file microSD card and system 92 MONITOR MIX Monitor Mix settings 79 TUNER Tuner settings 88 FILE NAME File name settings 97 DATE TIME Date and time settings 38 SYSTEM Various system settings 94 CAUTION When recording in recording standby only MIC POWERand LOWCUTare shown on the REC SETTINGscreen The...

Page 32: ...INGscreen 3 Use the or button to select a menu item highlighted to be set Example AREAis selected 4 Use the or Á button to move the cursor to highlight the value of the setting 5 Use the or button to change the setting 6 Press the  button to set a different item in the same menu Thisenablesyoutoselectanewitem Usethe or buttonagaintoselectanitemtobeset 7 Repeatstep3to6asnecessarytoseteachitem 8 To...

Page 33: ...rmation message button Use this to move the cursor the highlighted area to the right on the screen and to open folders on the BROWSEscreen  button Use this to move the cursor the highlighted area to the left on the screen and to close folders on the BROWSEscreen button Use this to move the cursor the highlighted area upward on the screen or increase values button Use this to move the cursor the h...

Page 34: ...n order to accurately show the amount of power remaining and allow the unit to accurately determine whether power is available for proper operation See Setting the type of AA batteries on page 95 NOTE Manganese dry cell batteries R6 cannot be used with this unit This unit cannot recharge Ni MH batteries Use a commercially available recharger The included alkaline batteries are for confirming opera...

Page 35: ... adaptor Using USB bus power Connect the unit to a PC using the attached USB cable as shown in the illustration The USBSELECTscreen appears to choose between USB bus power for power supply or connection with a PC through the USB cable when USB cable is connected after the unit is turned on or when the unit is turned on after connecting the USB cable Use the or button to select BUSPOWERand press th...

Page 36: ... a large noise would cause damage to headphones or your ears Starting up the unit To start up the unit from the stopped state press and hold the HOME ª button until TASCAM DR 05 start up screen is displayed on the display The Home Screen appears when the unit starts up Start Up Screen Home Screen CAUTION When the unit is started up for the first time or when the built in clock is reset after being...

Page 37: ...ies or disconnect the power cable AC adapter TASCAM PS P515U or USB cable accidently while the unit is operating If you do so the unit cannot shut down properly and all recordings settings and other data will be lost Lost data cannot be restored Resume function The unit has resume function When started up the unit is located to the position time where it left off when shut down previously If the P...

Page 38: ...ton to select the OTHERS menu item highlighted and press the Á button The OTHERSscreen is displayed 3 Use the or button to select the DATE TIMEmenu item and press the Á button The DATE TIMEscreen is displayed 4 Press the  or button to move the cursor highlighted area and use the or button to change values 5 Press the Á button to confirm the change and return to the OTHERSscreen 3 Preparation ...

Page 39: ... or the USB cable When using batteries replace them before they completely lose power Inserting and removing microSD cards Inserting the microSD card NOTE A microSD card is already installed when the unit is shipped from the factory If you want to use this card to record and play tracks there is no need to reinstall it 1 Open the microSD slot cover on the right side panel 2 Insert the microSD Card...

Page 40: ...ave been confirmed to work with this unit can be found on our website http tascam com Preparing a microSD card for use In order to use a microSD card in this unit you must format it first 1 Confirm that a microSD card is installed and turn the power ON 2 The following message appears when a new card or a card formatted for use with another device is installed in the unit 3 Press the Á button to st...

Page 41: ...the MENUscreen to allow the unit to play over the built in speaker 1 Press the MENU button to open the MENU screen 2 Use the or button to select the SPEAKER and press the Á button The SPEAKERscreen is displayed 3 Use the or button to select ON 4 When finished press the HOME ª button to return to the Home Screen NOTE Even if SPEAKERis enabled the unit will not play through the speaker when the unit...

Page 42: ...g monitors and headphones To listen with headphones connect them to the LINE OUT jack To listen with an external monitoring system to the LINE OUT jack 3 Preparation Headphones Powered monitor speakers or amplifier and speakers ...

Page 43: ...ing frequency type andmaximumfilesize Select the audio file type that you want to record before you start recording 1 PresstheMENUbuttontoopentheMENUScreen 2 Use the or button to select REC SETTING and press the Á button RECSETTINGscreen appears 3 Use the or button to select FORMAT and press the or Á button Set the file format with the or button to from the following WAV 16bit default WAV 24bit MP...

Page 44: ...s and output channels If sound is recorded in MONOin WAV format the file size will be half that recorded in STEREO allowing long time recording 6 Press the  button to show settings 7 Use the or button to select SAMPLE and press the or Á button Set the sampling frequency with the or button to one of the following options 44 1k default 48k 96k NOTE 96kcannot be selected if FORMATis set to MP3 8 Pre...

Page 45: ...ll differ for the same file size The amount of recording time is shown on the right of the setting value in parentheses Recording automatically stops if recording time exceeds 24 hours 10 Press the HOME ª button to return to the Home Screen Set where to save the file Set the folder where recorded files are saved The created sound file will be saved in the currently selected folder For details see ...

Page 46: ...e low cut filter is OFF but you can also select 40Hz 80Hzor 120Hzas the cut off frequency for a low cut filter CAUTION Set MICPOWERto OFFwhen using the built in mic or connecting a dynamic microphone or microphone with a built in battery If set to ON the plug in power may damage such microphones Use headphones to monitor when you are recording with a microphone If you use speakers to monitor the s...

Page 47: ...ng an external device EXT IN Use a stereo miniplug cable to connect to the output of an external audio device Other audio equipment or external sound source CAUTION Reduce the output level of the external audio device if the input sound is distorted even when reducing the input gain level on the unit When an external audio device with a fixed output line level is connected it would be impossible t...

Page 48: ...tance and angle between the microphone and the sound source The angle and distance of the microphone can also change the character of the recorded sound Manually adjusting the input level The following procedures explain how to use the Record Screen to set the levels CAUTION Manual adjustment cannot be performed when the automatic level control mode is selected as a level control function lighted ...

Page 49: ...o and fro with this mark at about the center without causing the PEAK indicator to light red when the loudest sounds occur NOTE Press the HOME ª button to exit recording standby When in recording standby or during recording the speaker does not output sound even if the SPEAKER setting is enabled Connect headphones to the LINE OUT jack if you want to adjust the level or record while monitoring the ...

Page 50: ...Quick menu screen will appear 3 Select highlight LEVEL CTRL and press the Á button The level control setting screen will appear Options OFF default PEAK REDUCTION AUTO LEVEL LIMITER 4 Use the or button to select highlight a mode and press the Á button to enable the mode and return to the recording screen The selected mode is shown with an icon in the recording screen PEAK REDUCTION The input volum...

Page 51: ...tically during recording It is also possible to store the recording in the limiter mode after automatically setting the recording level in the peak reduction mode AUTO LEVEL The recording level is controlled automatically to increase or decrease the input level when the input signals are too small or too large respectively This mode is useful for recording at meetings In this mode the recording le...

Page 52: ...irm that these are as desired before starting recording 2 To start recording press the RECORD º button again When recording starts the REC indicator lights continuously and the display shows the elapsed recording time and the remaining recording time 3 Press the HOME ª button to end recording and create the audio file To pause recording press the RECORD º button Press the RECORD º button again to ...

Page 53: ...incrementing You can manually or automatically split a recording by creating a new file Track incrementing Manual track incrementation during recording You can manually split a recording by creating a new file 1 Press the QUICK button while recording NOTE When new files are created incremental numbers are added to the end of each file name CAUTION A new file cannot be created if the total number o...

Page 54: ...lect SIZE and press the or Á button Use the or button to set the maximum file size at which track incrementing takes place by selecting highlighting from the following 64M 128M 256M 512M 1G 2G default 4 Press the HOME ª button to return to the Home Screen CAUTION A new file cannot be created if the total number of files and folders would exceed 5000 NOTE For the same file size the possible recordi...

Page 55: ...F format for WAV files marks added to a WAV file during recording are stored in the file Marks stored in the file are available when playing back the file using a BWF compliant software etc Moving to a mark position You can move to marks in the currently selected file when paused and during playback You can use this function to identify points to create shortcuts to the beginning of songs for exam...

Page 56: ...hed to start recording 1 Press the MENU button to open the MENU screen 2 Use the or button to select REC SETTING and press the Á button 3 Use the or button to select PRE REC and press the or Á button 4 Use the or button to select ON 5 Press the HOME ª button to return to the Home Screen NOTE If the amount of time in record standby is less than two seconds the sound for that amount of time is recor...

Page 57: ...d press the PB CONT button 2 The self timer icon appears in the recorder status screen and time is shown on the right Each time you press the PB CONT button the setting changes as follows OFF œ 5S 5 seconds œ 10S 10 seconds œ OFF 3 Set the time period and press the RECORD º or Á button Recording will start after the set time period NOTE This function cannot be used when recording is paused in the ...

Page 58: ...ereo mono 32 kbps 44 1 kHz 48 kHz 74 32 149 04 298 08 596 16 64 kbps 44 1 kHz 48 kHz 37 16 72 32 149 04 298 08 96 kbps 44 1 kHz 48 kHz 24 50 49 40 99 20 198 40 128 kbps 44 1 kHz 48 kHz 18 38 37 16 74 32 149 04 192 kbps 44 1 kHz 48 kHz 12 25 24 50 49 40 99 20 256 kbps 44 1 kHz 48 kHz 9 19 18 37 37 16 74 32 320 kbps 44 1 kHz 48 kHz 7 27 14 54 29 48 59 36 Therecordingtimesshownaboveareestimates Theym...

Page 59: ...MENUscreen Use the or button to select BROWSEand press the Á button The contents of the folder that contains the file that was selected on the Home Screen before the BROWSEScreen was opened appears on the display Screen navigation On the BROWSEScreen folders and music files appear in a hierarchical structure much like they would appear on a computer On the DR 05 folders can only be used to two lev...

Page 60: ...s folder Regardless of the previous setting the playback area is set to FOLDER and this folder becomes the new playback area Icons on the BROWSE screen The meanings of icons that appear on the BROWSEScreen are as follows Root Music Folder MUSIC The MUSICFolder is the highest root level folder in the hierarchy shown on the BROWSE Screen Audio file This icon appears before the names of music files P...

Page 61: ...pears Press the Á button again or press the HOME ª button to return to the BROWSEscreen ADD LIST Adds the selected file to the playlist See Playlist on page 68 DELETE A message appears to confirm that you want to delete the file Press the Á button to erase the file and the HOME ª button to cancel the deletion operation CANCEL The operation for the selected highlighted file is canceled and the pop ...

Page 62: ...rea is set to FOLDER and this folder becomes the new playback area When recording files are created in this folder ALL DEL A pop up message appears to confirm that you want to delete all the files in the selected folder at once Press the Á button to erase the files or press the HOME ª button to cancel NOTE You cannot erase read only files and files that are not recognized by this unit CANCEL The o...

Page 63: ...t to create a new folder Press the Á button to create a new folder or press the HOME ª button to cancel Note that the unit supports only a two level folder structure and accordingly NEWFOLDER does not exist in the second level folders A newly created folder becomes the current one and new recorded files are saved in this folder If the playback area has been set to FOLDER this folder becomes the pl...

Page 64: ...You can also use the BROWSE Screen to set a folder as the playback area TIP On the BROWSEScreen regardless of the playback area setting you can select any file on the card that you want Adjusting playback volume The volume of output through the built in speaker or the LINE OUT connector can be adjusted using the or button while the Home Screen is shown A pull up volume indicator appears Setting th...

Page 65: ... card FOLDER default Set the playback area as all the files in the currently selected folder PLAYLIST Set the playback area as the tracks in the playlist See Playlist on page 68 If there is no playlist defined a No PLAYLISTpop up appears 5 Press the HOME ª button to return to the Home Screen NOTE The current playback area setting appears in the lower left of the Home Screen Playback area indicatio...

Page 66: ...s displayed 3 Use the  or button to select a folder level and use the or button to select a folder For an explanation of how to use the Browse Screen see Screen navigation on page 59 4 Press the QUICK button to open the following pop up window 5 Use the or button to select SELECT and press the Á button The display returns to the Home Screen The first file in the folder is selected and the unit is...

Page 67: ... displayed 3 Use the  or button to select a folder level and use the or button to select the folder that contains the track file you want to play For an explanation of how to use the BROWSE Screen see Screen navigation on page 59 4 Press the button 5 Usethe or buttontoselectthedesiredfile 6 Press the Á button The display returns to the Home Screen and the selected track starts playing This folder...

Page 68: ...rs NOTE For an explanation of how to use the BROWSEScreen see Screen navigation on page 59 3 Use the or button to select the file you want to add to the playlist and press the QUICK button NOTE For details about how to select the file see Screen navigation on page 59 A pop up window appears 4 Use the or button to select ADDLIST 5 Press the Á button The track is added to the playlist and the popup ...

Page 69: ...tton BROWSEscreen appears 3 Use the  button to move to the top folder level 4 Use the or button to select PLAYLIST and press the button PLAYLISTscreen appears 5 Use the or button to select the file you want to edit and press the QUICK button A pop up window appears 6 Use the or button to select an item and press the Á button to cause the unit to work as follows ALL CLR A confirmation message appe...

Page 70: ...st The file is removed from the playlist but it is not erased from the microSD card MOVE Select this to change the order of tracks in the playlist In addition to the file name the track number also appears highlighted in inverse Use the or button to move the selected track to a different position in the playlist In the above example the 4th track has been moved to the 3rd track position Press the ...

Page 71: ...k name file number and other file information for the currently playing track appear on the display The ª icon appears on the display when playback is stopped at the beginning a track and the π icon appears when playback is stopped in the middle of a track paused When the IN and OUT points are set in the file pressing the  or button skips to those points Press the button repeatedly until the file...

Page 72: ...and hold the  or button to rewind or fast forward and search the playback track NOTE Press and hold the  or button to accelerate the search speed Repeat playback REPEAT You can repeatedly playback one file or multiple files within a designated area 1 Press the MENU button to open the MENU screen 2 Use the or button to select PLAY SETTING and press the Á button PLAY SETTINGscreen appears 3 Use th...

Page 73: ...creen NOTE If you start loop playback the REPEAT item automatically switches to OFF if it is in a different mode 5 Press the HOME ª button to return to the Home Screen Special Playback Control Functions The unit has some special playback control functions For example you can playback a selected section of a track repeatedly or change the tempo of music without changing the pitch You can also enhan...

Page 74: ...button or press the PB CONT button to return to the Home Screen Repeated Playback of Selection Loop Playback With this function you can continuously repeat loop the playback of a selection that you make 1 When the Home Screen is open press the PB CONT button to open the Playback Control screen 2 Press the Á button to start playback and press the MARK button at the start point of the section that y...

Page 75: ...corresponding to the IN and OUT points under the playback indicator bar NOTE The pop up message of I O Too Short appears if the section between the IN and OUT points is too short Set them again The section should be 1 second or longer Press the MARK button again to clear the IN and OUT points To stop loop playback press the MENU button when the Playback Control screen is open Press the MENU button...

Page 76: ... the adjustment of playback speed select a file recorded with a sampling frequency of 44 1 kHz or 48 kHz by using the  or button Press the or button after opening the Playback Control screen to increase or decrease the playback speed The VSA function can change the playback speed in the range from 0 5 50 to 1 5 150 times in 0 1 increments the normal speed Press the PB CONT button to the Home Scre...

Page 77: ...G and press the Á button PLAY SETTINGscreen appears 3 Use the or button to select PLAY EQ and press the or Á button 4 Use the or button to set the equalizer TREBLE MIDDLE and BASS indicate that adjustment in the high middle or low frequency range is enabled and and indicate that the sound level in that range is increased or decreased respectively Options OFF factory setting TREBLE TREBLE MIDDLE MI...

Page 78: ... The jump back time is set as a JUMPBACKsetting 1 Press the MENU button to open the MENU screen 2 Use the or button to select PLAY SETTING and press the Á button PLAY SETTINGscreen appears 3 Use the or button to select JUMPBACK and press the or Á button 4 Use the or button to set the jump back time The setting options include 1 sec 1 second to 10 sec 10 seconds in increments of 1 second and 20 sec...

Page 79: ...3 Use the or button to select MONITOR MIX and press the Á button MONITOR MIXscreen appears 4 Use the or button to select INPUT and press the or Á button 5 Use the or button to select ON Monitoring of input sound is now enabled 6 Press the  button to highlight the item 7 Use the or button to select PB INPUT and press the or Á button 8 Use the or button to adjust the playback volume level in a rang...

Page 80: ...  or button when the unit is in recording standby See Adjusting the input level on page 48 1 Press the QUICK button while the Home Screen is open during playback or when stopped The Quick menu screen appears 2 While listening to the input sound use the  or button to adjust the input level When the  or button is pressed a pull up window showing input level settings appears in the display CAUTION...

Page 81: ...reen will not appear in this case A pop up menu to work with a selected file or folder appears if the BROWSEscreen or the PLAYLISTscreen is open Switches CALIBand INPUTLEVELon the TUNERscreen NOTE TheQUICKbuttonisdisablediftheMENUscreen OTHERSsubmenu RECSETUPscreen orasettingsscreenisopenforvarioussettings Actions of the QUICK button for different screens and states are as follows Screen State Act...

Page 82: ...deleted See Deleting the selected file Quick Delete on page 84 DIVIDE The current track can be divided See Dividing the selected file Divide on page 85 LEVEL ALIGN The perceived overall sound pressure can be increased to enhance listenability See Increasing the perceived overall sound pressure to enhance listenability Level Alignment on page 86 During playback with the Home Screen open or while th...

Page 83: ... prevents distortion of sound due to sudden excessive input For details of the level control function see Using the Level Control Function on page 50 When Monitor Mix is enabled the input level can be adjusted in a simple way using the  or button Press the  or button to open the input level setting pull up window Adjust the input level while checking the input sound See Adjusting the input level...

Page 84: ... file can be deleted without using the BROWSEscreen 1 To delete a file select it using the  or button or the BROWSEscreen 2 Open the Quick menu screen by pressing the QUICK button while the Home Screen is open when stopped 3 Use the or button to select DELETE 4 Press the Á button A confirmation screen for file deletion appears Press the Á button to delete the file or press the HOME ª button to ca...

Page 85: ...button to select to specify the position for file division and press the RECORD º button The following pop up window appears 5 Press the Á button to divide the file Or press the HOME ª button to return to the DIVIDEscreen without dividing the file NOTE When the DIVIDEscreen is open you can press the Á button and set the divide position while playing the track When the DIVIDEscreen is open press th...

Page 86: ...ble if the file name would become more than 200 characters long Division is not possible if a file that already exists has the same name as the name that would be given to a new file created by division TIP Add marks during recording at positions where you want to divide a file See Markfunction onpage55 Increasing the perceived overall sound pressure to enhance listenability Level Alignment If the...

Page 87: ...button to select ON and press the Á button to enable the level alignment function Or select OFFand press the Á button to disable the level alignment function NOTE The level alignment function may not be able to achieve sufficient effect depending on the source of the sound example a music file whose sound pressure has been already adjusted 7 Quick Operations ...

Page 88: ... fundamental frequency Setting range 435Hz 445Hz in 1Hz increments default 440Hz Tuning a musical instrument 1 Open the TUNERscreen and sound a note near the unit 2 Tune the instrument so that the target pitch name appears and the center of the tuner lights A bar appears on the left or right of the center if the sound is lower or higher than the target pitch The bar becomes longer as the sound shi...

Page 89: ...R 05 and connecting it directly to a computer that has a built in microSD card slot or by using a card reader CAUTION You cannot use this unit s other functions when it is connected to a computer by USB The unit should be connected directly with the computer instead of via a USB hub When the unit is connected through USB after being turned on or when the unit is turned on after being connecting th...

Page 90: ... not properly inserted before making the USB connection Can t Save Data appears on the screen This unit appears on the computer screen as external volume named DR 05 Transferring files to a computer 1 Click the DR 05 drive on the computer screen to show the MUSIC and UTILITY folders 2 Open the MUSIC folder and drag and drop the files that you want to transfer to the computer to destinations of you...

Page 91: ...dio files on the third level or below Since you can set the DR 05 to only play the contents of a specific folder you can organize tracks into genres artists or other categories as you like If you name the subfolders and music tracks these names will appear on the screen of this unit Disconnecting from a computer Before disconnecting the USB cable use the proper procedures for your computer to unmo...

Page 92: ...rmation about the currently loaded file Card information page CARD Shows the use status of the currently inserted microSD card System information page SYSTEM Shows the unit s system setting information and firmware version File information page The FILEpage shows information about the currently selected file WAV or MP3 Shows the audio file type For WAV files bit length stereo mono and sampling fre...

Page 93: ...SD card capacity REMAIN SIZE USED SIZE Shows the amount of unused used capacity on the microSD card Press the  or button to switch between REMAINSIZEand USEDSIZE System information page The SYSTEM page shows information about the DR 05 s system settings and firmware version AUTO OFF Shows the automatic power OFF setting BACKLIGHT Shows the automatic backlight OFF setting BATTERY Shows the battery...

Page 94: ...STEMscreen appears The following settings can be made for the items on the SYSTEMscreen Use the  or button and the or button to set each item Turning the unit power OFF automatically Use the AUTOOFFitem to set the time before the unit power automatically turns OFF after the last activity or use when powered by the battery Options OFF factory setting the unit does not automatically turn OFF 3min 5...

Page 95: ...em to restore the various settings of this unit to their factory settings 1 Use the or button to select INITIALIZE and press the Á button to highlight Exec 2 Press the Á button again to open a confirmation pop up window 3 Press the Á button to initialize the unit Press HOME ª to cancel initialization Using QUICK FORMAT Using QUICKFORMATerases all music files on the card and automatically creates n...

Page 96: ...LITY folders as well as the dr 1 sys file that is necessary to use the microSD card with the DR 05 1 Use the or button to select FULL FORMAT and press the Á button to highlight Exec 2 Press the Á button to open a pop up confirmation window 3 Press the Á button to execute the full formatting or press the HOME ª button to cancel formatting CAUTION When formatting a card the unit should be operating ...

Page 97: ...een you can make the following settings for each item File name format The TYPEitem can be set to either WORD default setting or DATE WORD When set to WORD a 6 character file name is used as the beginning of each file name Example DR0000_0000 wav DATE The date is used as the file name in yymmdd format Example 110101_0000 wav NOTE The date is set using the unit s internal clock See Setting the date...

Page 98: ...he file name Before choosing the DIVIDE function connect the unit to a computer and edit the file name File Not Found The file added to the playlist cannot be found or a file could be damaged Please check the file in question Non Supported The audio file is not a supported format Please see 9 Connecting with a Computer for file formats that this unit can use Battery Empty The battery is almost out...

Page 99: ... FAT format CAUTION Execution of FAT formatting erases all data currently on the card File Not Found Make Sys File The system file is missing This unit requires a system file for operation When this message appears press the Á button to automatically create a system file Invalid SysFile Make Sys File The system file required to operate this unit is invalid When this message appears press the Á but...

Page 100: ... total number of folders and files exceeds 5000 Erase unnecessary files or move them to your computer Card Error The card could not be handled properly Replace the card Current File MP3 MP3 files cannot be divided File Protected The file is read only and cannot be erased No Card No card is in the unit so recording is not possible No PB File There is no file that can be played back The file might b...

Page 101: ...C adaptor TASCAM PS P515U and or disconnect the USB cable for bus power supply If the error message continues to appear frequently please contact a TEAC Repair Center File Error Can t Save Data Player Error Device Error Writing Failed Sys Rom Err Remote Cmd Remote Rx System Err 50 System Error 1 System Error 2 System Error 3 System Error 4 System Error 5 System Error 6 System Error 7 System Error ...

Page 102: ...ower supply is firmly connected Confirm that the USB cable if used for USB bus power supply is not connected via a USB hub The unit does not function ª ª Confirm that the HOLD switch is not set in the direction of the arrow Is the unit connected to a PC with the USB cable Is USBconnectedshown on the display The microSD card is not recognized ª ª Confirm that the microSD card is inserted completely...

Page 103: ... too low The sound I am trying to record ª ª sounds distorted Confirm that the input level setting for recording REC LEVEL is not too high The playback sounds unnatural ª ª Confirm that the playback speed is not being adjusted Confirm that the playback equalizer is not enabled Confirm that the level alignment function is not enabled I cannot erase a file ª ª Confirm that you are not trying to eras...

Page 104: ...input output ratings MIC EXT IN jacks supporting plug in power Connector 1 8 3 5 mm stereo mini Input impedance 25 kΩ Nominal input level 20 dBV Maximum input level 4 dBV LINE OUT Connector 1 8 3 5 mm stereo mini Output impedance 12Ω Nominal output level 14 dBV 10 kΩ load Maximum output level 2 dBV 10 kΩ load Maximum output 20 mW 20 mW 32Ω load Built in speaker 0 3 W monaural Control input output ...

Page 105: ... LINE OUT Fs 44 1 48 96kHz JEITA S N ratio 92dB or higher EXT IN to LINE OUT Fs 44 1 48 96kHz JEITA Note JEITA Conforming to JEITA CP 2150 Computer compatibility Windows Pentium 300 MHz or faster 128 MB or more memory USB port USB 2 0 recommended Macintosh Power PC iMac G3 G4 266 MHz or faster 64 MB or more memory USB port USB 2 0 recommended Recommended USB host controller Intel chipset Supported...

Page 106: ...t About 17 hours Headphones Playback WAV 96KHz 24bit About 17 hours Built in Speaker Recording playback Format Operation time Note Playback WAV 44 1KHz 16bit About 19 5 hours Headphones Playback WAV 44 1KHz 16bit About 19 5 hours Built in Speaker Playback MP3 44 1KHz 128Kbps About 19 5 hours Headphones Playback MP3 44 1KHz 128Kbps About 18 5 hours Built in Speaker Playback MP3 48 KHz 320Kbps About...

Page 107: ... Headphones Playback MP3 44 1KHz 128Kbps About 15 hours Built in Speaker Playback MP3 48 KHz 320Kbps About 16 hours Headphones Playback MP3 48 KHz 320Kbps About 15 hours Built in Speaker Dimensions W x H x D 61 x 141 x 26 mm 2 3 8 x 5 9 16 x 1 Weight 116 g 4 1 16 oz not including batteries Operating temperature range 0 40 C 32 F 104 F Dimensional drawings 61mm 26mm 141mm Illustrations and other de...

Page 108: ...939 Wallace Street Mississauga Ontario L4Z 1Z8 Canada TEAC MEXICO S A de C V Phone 52 55 5010 6000 http www teacmexico net Río Churubusco 364 Colonia Del Carmen Delegación Coyoacán CP 04100 México DF México TEAC UK LIMITED Phone 44 8451 302511 http www tascam co uk Suites 19 20 Building 6 Croxley Green Business Park Hatters Lane Watford Hertfordshire WD18 8TE U K TEAC EUROPE GmbH Phone 49 611 7158...

Page 109: ...DR 05 Linear PCM Recorder D01231720A REFERENCE MANUAL ...

Page 110: ... Resume function 29 Setting the date and time 29 Inserting and removing microSD cards 31 Inserting the microSD card 31 Removing the card 31 Preparing a microSD card for use 32 Using the built in speaker 32 Connecting monitors and headphones 33 4 Recording 34 Selecting file format sampling frequency type and maximum file size 34 Set where to save the file 36 Setting the input functions 36 Placing t...

Page 111: ...ion 53 Recording the moment before pushing RECORD PRE REC 53 Self timer function 54 Using the AUTO TONE function 55 Setting the AUTO TONE function 56 Setting the AUTO TONE length 56 Adjusting the AUTO TONE volume 57 Recording duration 58 5 Working with Files and Folders BROWSE screen 59 Screen navigation 59 Icons on the BROWSE screen 60 File operations 61 Folder operations 62 Creating a new folder...

Page 112: ...eset List 87 9 Tuning a Musical Instrument Tuner 88 Using the tuner 88 Setting the tuner 88 Tuning a musical instrument 89 Adjusting the input level for tuning 89 10 Connecting with a Computer 90 Transferring files to a computer 91 Transferring files from a computer 92 Disconnecting from a computer 92 11 Settings and Information 93 Viewing File Information 93 File information page 93 Card informat...

Page 113: ...13 Troubleshooting 104 14 Specifications 107 Ratings 107 Input output ratings 107 Analog audio input output ratings 107 Control input output ratings 107 Audio performance 108 Computer compatibility 108 Other specifications 109 Dimensional drawings 111 ...

Page 114: ...files in BWF format 32 320 kbps MP3 format recording possible compatible with ID3 tag v2 4 Overdubbing allows playback and input signals to be mixed and recorded together as a new file Built in 0 3 W monaural output speaker Built in effect reverb can be used during recording and playback Auto record function starts recording automatically when a set sound input level is detected Automatic tone ins...

Page 115: ... is available to show settings screens for playback speed control and IN OUT loop Tuner function to tune musical instruments Self timer function to start recording after a set period of time Jump back and play function allows the last several seconds of the currently played file to be replayed again by simply pressing a button REC DELAY function can be used to avoid recording the sound of pressing...

Page 116: ...llowing conventions are used in this manual When we refer to a button or connector or control on the DR 05 the typeface looks like this MENU When we show messages for example that appears on the screen the typeface looks like this ON microSD memory card is sometimes abbreviated as microSD card Additional information is introduced in the styles below when needed TIP We give hints and tips on using ...

Page 117: ...s a variety of information 4 HOME ª button Press this button during playback to cause the playback to pause at the current position Press this button during pause time to return to the beginning of the track Press this button during recording or recording standby to cause the recording to stop When any other screen is open press this button to return to the Home Screen Use this button to answer NO...

Page 118: ...splayed press this button to turn on or off loop playback 7 Â button Press this button to return to the beginning of a track that is playing or stopped in the middle When the IN and OUT points are set between the current position and the beginning of the track pressing this button skips to those points If you press this button when a track is stopped at its beginning the unit will skip to the begi...

Page 119: ...ording standby REC indicator starts to flash When INPUT is ON on the MONITOR MIX screen MONITOR MIX is ON a pop up menu appears to ask whether overdubbing is ON OFF w QUICK button When playing back stopped paused or in recording standby in the Home Screen or when the Playback Control screen is displayed press this button to display the Quick Menu screen The function to be shown depends on the stat...

Page 120: ...en the Home Screen is displayed and playback is stopped press this button to start playback During playback press this button to start jump back playback When a setting screen is open use this to confirm selections When a file or folder is selected in the BROWSE screen press this button to return to the Home Screen and play the file or the first file in the folder from the beginning t MARK button ...

Page 121: ...panel u MIC EXT IN jack Usethisinputjacktoconnectastereomini jack microphoneoranexternalinputdevice Thisjack providesplug inpowerwhensettodosoonthe InputSettingScreen Thebuilt inmicrophoneisdisabledifanexternal microphoneisconnectedtotheMIC EXTINjack 2 Names and Functions of Parts ...

Page 122: ...ction of the arrow to engage the hold function All buttons are inoperative when hold is ON Right side panel p USB port Use the included USB cable to connect with a computer USB port Power can be supplied through the USB cable provided with the unit or an AC adaptor sold separately TASCAM PS P515U a microSD card slot Insert a microSD card into this slot 2 Names and Functions of Parts ...

Page 123: ...led d Tripod attachment screw hole 1 4 inch Use this to attach the unit to a tripod or mic stand CAUTION Tighten the unit securely to the tripod or microphone stand to prevent it from falling off Place the tripod or microphone stand on a level surface when using it with this unit f Battery compartment cover g Battery compartment Install batteries 2 AA in this compartment to power the unit See Usin...

Page 124: ... mix function is on or off Monitor Mix off Monitor Mix on 4 Effect status Shows whether the effect function is ON or OFF Effect off Effect on 5 Power supply status When a battery is being used a battery icon shows the amount of power remaining in bars The battery is almost dead and the power will soon turn off if the icon has no bars When using the PS P515U AC adaptor sold separately or USB bus po...

Page 125: ... when available for an MP3 file being played NOTE ID3 tag information includes the titles and artists names that can be saved in MP3 files 9 Playback position display The current playback position is shown by a bar As playback progresses the bar extends to the right 0 Elapsed time Shows the elapsed time hours minutes seconds of the currently playing track q Remaining time Shows the remaining playb...

Page 126: ...sition when the starting point is set The icon appears at the playback position when the ending point is set y Playback file number total number of files The total number of files in the playback area and the number of the current file are shown Recording Screen This screen appears when recording or in recording standby 1 Level control function status Level control off Peak reduction on Automatic ...

Page 127: ...evelisshown Duringoverdubrecording thelevelofthecombined inputandplaybacksoundsisshown A markisgivenatthe 12dBpositiononthescale asaguidemarkforinputleveladjustment 8 File name The file name that will automatically be given to recorded files is shown 9 Recording mode Recording file format sampling frequency and stereo mono ST MONO status are shown 0 Elapsed recording time The elapsed recording tim...

Page 128: ... The Playback Control screen is displayed if the PB CONT button is pressed during playback or when playback is stopped Recording cannot be performed while this screen is displayed Press the  or button to skip to the I O point or the beginning end instead of the previous or next file 1 Loop playback status The icon is displayed when loop playback is enabled 2 Playback speed Playback speed as compa...

Page 129: ...ck Control screen are as follows MARK Creates or deletes an IN or OUT point MENU Switch over between ON and OFF status of the loop playback function NOTE Unlike the other screens the QUICK button in this screen works to display the quick menu containing only the LEVEL ALIGN function and no other functions will be available Menu item list This list provides an overview of the various menu items Men...

Page 130: ...ns and items are shown REC SETTING screen MIC POWER LOW CUT and AUTO REC items AUTO REC setting cannot be changed MONITOR MIX screen INPUT and PB INPUT items INPUT setting cannot be changed EFFECT screen all items The MENU button is disabled in the Playback Control screen but works to change over between ON and OFF status of the loop playback function See Repeated Playback of Selection Loop Playba...

Page 131: ...the same menu This enables you to select a new item Use the or button again to select an item to be set 7 Repeatstep3to6asnecessarytoseteachitem 8 To open the MENUscreen press the MENU button To return to the Home Screen or OTHERS submenu screen press the HOME ª button Basic operation Use the following buttons to operate the various screens MENU button Opens the MENUscreen PB CONT button This open...

Page 132: ... the screen and to open folders on the BROWSEscreen  button Use this to move the cursor the highlighted area to the left on the screen and to close folders on the BROWSEscreen button Use this to move the cursor the highlighted area upward on the screen or increase values button Use this to move the cursor the highlighted area downward on the screen or decrease values QUICK button This opens the Q...

Page 133: ...the type of battery in order to accurately show the amount of power remaining and allow the unit to accurately determine whether power is available for proper operation See Setting the type of AA batteries on page 96 NOTE Manganese dry cell batteries R6 cannot be used with this unit This unit cannot recharge Ni MH batteries Use a commercially available recharger The included alkaline batteries are...

Page 134: ...the unit NOTE When both batteries are installed and the AC adaptor is connected power will be supplied from the AC adaptor Using USB bus power Connect the unit to a PC using the attached USB cable as shown in the illustration PC USB mini B The USBSELECTscreen appears to choose between USB bus power for power supply or connection with a PC through the USB cable when USB cable is connected after the...

Page 135: ...TASCAM PS P515U sold separately or bus power supplied from a USB port of a PC Turn down the volume of the sound system connected to the unit before starting up or shutting down the unit Do not use headphones when starting up or shutting down the unit Otherwise a large noise would cause damage to headphones or your ears Starting up the unit To start up the unit from the stopped state press and hold...

Page 136: ...the cursor highlighted area and use the or button to change values Press the Á button to fix the settings The start up screen is displayed and then the Home Screen appears after the unit has started up Date time adjustment may be skipped by pressing the Á button and made later See Setting the date and time on page 29 Shutting down Press and hold the HOME ª button until LINEAR PCM RECORDERappears o...

Page 137: ...where it left off when shut down previously If the Playback button is pressed after start up the track the unit was playing when shut down previously starts to be played from the position time where the unit left off when shut down NOTE The required data are stored in the microSD card The resume function does not work if the card is exchanged or formatted Setting the date and time Using its intern...

Page 138: ...Á button to confirm the change and return to the OTHERSscreen NOTE You can set the unit to automatically add the date to file names See Setting the format of file names on page 98 CAUTION The date and time setting can only be maintained for a few minutes if the unit is not powered from batteries or through the AC adaptor TASCAM PS P515U or the USB cable When using batteries replace them before the...

Page 139: ...slot as shown in the following illustration until it clicks into place Removing the card 1 Open the microSD slot cover on the right side panel 2 Press the microSD card in gently and then release it to allow it to come out CAUTION Do not remove the microSD card from the unit when it is connected to a computer by USB microSD cards that meet microSD or microSDHC standards can be used with this unit A...

Page 140: ...ormat the card in this unit at any time See System Settings and Formatting on page 95 CAUTION When formatting a card the unit should be operating on AC power supplied through the PS P515U adapter sold separately USB bus power supplied from a computer or batteries with sufficient remaining power Formatting a card erases all the data on it Using the built in speaker Enable SPEAKERon the MENUscreen t...

Page 141: ... through the speaker when the unit is recording sound in recording standby or muted with headphones or external speaker system connected Connecting monitors and headphones To listen with headphones connect them to the LINE OUT jack To listen with an external monitoring system to the LINE OUT jack Headphones Powered monitor speakers or amplifier and speakers 3 Preparation ...

Page 142: ... unit you can mix and record a sound input through the built in mic or one of the input jack with an audio file that is played back using the overdubbing function Selecting file format sampling frequency type and maximum file size Select the audio file type that you want to record before you start recording 1 Press the MENU button to open the MENU Screen 2 Use the or button to select REC SETTING a...

Page 143: ...NO If MONOis selected a mono file is created and the same signals are sent to both L and R level meters and output channels If sound is recorded in MONOin WAV format the file size will be half that recorded in STEREO allowing long time recording 6 Press the  button to show settings 7 Use the or button to select SAMPLE and press the or Á button Set the sampling frequency with the or button to one ...

Page 144: ...rentheses Recording automatically stops if recording time exceeds 24 hours 10 Press the HOME ª button to return to the Home Screen Set where to save the file Set the folder where recorded files are saved The created sound file will be saved in the currently selected folder For details see SELECT popup menu under Folder operations on page 62 If no setting is made new recording files are placed in t...

Page 145: ...ic or connecting a dynamic microphone or microphone with a built in battery If set to ON the plug in power may damage such microphones Use headphones to monitor when you are recording with a microphone If you use speakers to monitor the sound output from the speakers may also be recorded causing a poor recording and even feedback NOTE MICPOWERand LOWCUTcan be set when recording in recording standb...

Page 146: ...ording an external device EXT IN Use a stereo miniplug cable to connect to the output of an external audio device Other audio equipment or external sound source CAUTION Reduce the output level of the external audio device if the input sound is distorted even when reducing the input gain level on the unit When an external audio device with a fixed output line level is connected it would be impossib...

Page 147: ...tance and angle between the microphone and the sound source The angle and distance of the microphone can also change the character of the recorded sound Manually adjusting the input level The following procedures explain how to use the Record Screen to set the levels CAUTION Manual adjustment cannot be performed when the automatic level control mode is selected as a level control function lighted ...

Page 148: ...o and fro with this mark at about the center without causing the PEAK indicator to light red when the loudest sounds occur NOTE Press the HOME ª button to exit recording standby When in recording standby or during recording the speaker does not output sound even if the SPEAKER setting is enabled Connect headphones to the LINE OUT jack if you want to adjust the level or record while monitoring the ...

Page 149: ...nd press the Á button The level control setting screen will appear Options OFF default PEAK REDUCTION AUTO LEVEL LIMITER 4 Use the or button to select highlight a mode and press the Á button to enable the mode and return to the recording screen The selected mode is shown with an icon in the recording screen PEAK REDUCTION The input volume is reduced automatically to an appropriate level when exces...

Page 150: ...ording in the limiter mode after automatically setting the recording level in the peak reduction mode AUTO LEVEL The recording level is controlled automatically to increase or decrease the input level when the input signals are too small or too large respectively This mode is useful for recording at meetings In this mode the recording level cannot be changed manually LIMITER This prevents distorti...

Page 151: ...put a pop up appears that allows you to turn overdubbing ON or OFF For ordinary recording select OFF and continue to step 2 2 To start recording press the RECORD º button again When recording starts the REC indicator lights continuously and the display shows the elapsed recording time and the remaining recording time 3 Press the HOME ª button to end recording and create the audio file To pause rec...

Page 152: ...e prerecording function is disabled if the input monitor is ON for overdubbing Overdub recording is not possible when using the AUTO REC function When overdub recording you cannot start new files manually You cannot pause during overdub recording You cannot use the RECORD º button The sampling frequency of the playback file is preserved regardless of the sampling frequency setting for overdub reco...

Page 153: ...multaneous listening to playback and input sound Monitor Mix This allows you to listen to playback and input sound at the same time Monitor Mix You can use a recorded or copied from a computer audio track for instrument practice or karaoke CAUTION The prerecording function is disabled if the MONITOR MIX is ON 1 PresstheMENUbuttontoopentheMENUscreen 2 Use the or button to select OTHERS and press th...

Page 154: ... cannot change the MONITOR MIX setting during recording or when in recording standby TIP By making the above settings in addition to overdubbing you can use a recorded or copied audio track for instrument practice or karaoke Adjusting the input level simple adjustment If Monitor Mix is enabled INPUTis enabled in the MONITOR MIXscreen the input level can be adjusted in a simple way in the Quick men...

Page 155: ...perleft abovethedisplaywillbeturnedon Adjusttheinputlevelfor recordingsoasnottoallowthePEAKindicatortobeturned on NOTE When input monitoring is ON and during overdub recording the PEAK indicator lights when the combined input and playback signals become higher than the set level Start the overdubbing 1 Press the RECORD º button to set the unit to record standby The overdubbing ON OFF pop up appear...

Page 156: ...cording automatically AUTO REC The unit starts and pauses recording renews files and sets marks automatically depending on the input signal level This function allows the unit to respond to input sound levels and start and pause recording as well as set marks and create new files for example 1 Press MENU to open the Menu Screen 2 Use the or button to select REC SETTING and press the Á button REC S...

Page 157: ...ault 24dB 48dB 8 Press the HOME ª button to return to the Home Screen 9 Press the RECORD º button to put the unit into recording standby Recording starts automatically when the input signal exceeds the LEVEL 10 The recording mode changes according to the setting of the MODE REC If the input signal level falls below the standard level for more than five seconds which is set on LEVEL the unit goes i...

Page 158: ...e when using the AUTO RECfunction Creating and changeover to a new file during continued recording Track incrementing You can manually or automatically split a recording by creating a new file Track incrementing Manual track incrementation during recording You can manually split a recording by creating a new file 1 Press the QUICK button while recording NOTE When new files are created incremental ...

Page 159: ...r button to select REC SETTING and press the Á button REC SETTINGscreen appears 3 Use the or button to select SIZE and press the or Á button Use the or button to set the maximum file size at which track incrementing takes place by selecting highlighting from the following 64M 128M 256M 512M 1G 2G default 4 Press the HOME ª button to return to the Home Screen CAUTION A new file cannot be created if...

Page 160: ...e maximum number of marks in a file is 99 As the unit is compatible with the BWF format for WAV files marks added to a WAV file during recording are stored in the file Marks stored in the file are available when playing back the file using a BWF compliant software etc Adding marks automatically to a recording This function allows the unit to add marks automatically using AUTO REC Set the MODEto MA...

Page 161: ...cannot move to a mark in a different file Recording the moment before pushing RECORD PRE REC By using prerecording when the unit is in recording standby you can record up to two seconds of the signal input before the RECORD º button is pushed to start recording 1 Press the MENU button to open the MENU screen 2 Use the or button to select REC SETTING and press the Á button 3 Use the or button to se...

Page 162: ...you can record events without losing the beginnings of sounds Self timer function Like a camera the unit has a self timer to trigger the start of recording after a set period of time 1 Press RECORD º button when stopped or playing back to set the unit in recording standby and press the PB CONT button 2 The self timer icon appears in the recorder status screen and time is shown on the right Each ti...

Page 163: ... insert a tone signal whenever recording starts and stops When connecting this unit to a digital SLR camera for example connect the attenuator cable included in the AK DR11C accessory kit sold separately to the LINE OUT jack on the left side of the unit and the external mic input jack of the camera If the auto tone function is used when connected the same tone signal will be recorded to the files ...

Page 164: ...F default HEAD recording start only HEAD TAIL recording start and stop 5 After completing the setting press the HOME ª button to return to the Home Screen Setting the AUTO TONE length You can set the length of the AUTO TONE 1 Press the MENU button to open the MENU screen 2 Use the and buttons to select the REC SETTINGmenu and press the Á button to open the REC SETTINGscreen 3 Use the and buttons t...

Page 165: ...utton to open the MENU screen 2 Use the and buttons to select the REC SETTINGmenu and press the Á button to open the REC SETTINGscreen 3 Use the and buttons to select the TONE VOLitem and press the or Á button 4 Use the and buttons to adjust the tone volume Options 12dB 18dB default 24dB 30dB 36dB 5 After completing the setting press the HOME ª button to return to the Home Screen 4 Recording ...

Page 166: ...ereo mono 32 kbps 44 1 kHz 48 kHz 74 32 149 04 298 08 596 16 64 kbps 44 1 kHz 48 kHz 37 16 72 32 149 04 298 08 96 kbps 44 1 kHz 48 kHz 24 50 49 40 99 20 198 40 128 kbps 44 1 kHz 48 kHz 18 38 37 16 74 32 149 04 192 kbps 44 1 kHz 48 kHz 12 25 24 50 49 40 99 20 256 kbps 44 1 kHz 48 kHz 9 19 18 37 37 16 74 32 320 kbps 44 1 kHz 48 kHz 7 27 14 54 29 48 59 36 Therecordingtimesshownaboveareestimates Theym...

Page 167: ...d press the Á button The contents of the folder that contains the file that was selected on the Home Screen before the BROWSEScreen was opened appears on the display Screen navigation On the BROWSEScreen folders and music files appear in a hierarchical structure much like they would appear on a computer On the DR 05 folders can only be used to two levels Use the or button to select files and folde...

Page 168: ... playback area is set to FOLDER and this folder becomes the new playback area Icons on the BROWSE screen The meanings of icons that appear on the BROWSE Screen are as follows Root Music Folder MUSIC The MUSICFolder is the highest root level folder in the hierarchy shown on the BROWSEScreen Audio file This icon appears before the names of music files Plus folder This icon shows folders that contain...

Page 169: ...ears Press the Á button again or press the HOME ª button to return to the BROWSE screen ADD LIST Adds the selected file to the playlist See Playlist on page 68 DELETE A message appears to confirm that you want to delete the file Press the Á button to erase the file and the HOME ª button to cancel the deletion operation CANCEL The operation for the selected highlighted file is canceled and the pop ...

Page 170: ...rea is set to FOLDER and this folder becomes the new playback area When recording files are created in this folder ALL DEL A pop up message appears to confirm that you want to delete all the files in the selected folder at once Press the Á button to erase the files or press the HOME ª button to cancel NOTE You cannot erase read only files and files that are not recognized by this unit CANCEL The o...

Page 171: ...t to create a new folder Press the Á button to create a new folder or press the HOME ª button to cancel Note that the unit supports only a two level folder structure and accordingly NEWFOLDERdoes not exist in the second level folders A newly created folder becomes the current one and new recorded files are saved in this folder If the playback area has been set to FOLDER this folder becomes the pla...

Page 172: ...o use the BROWSE Screen to set a folder as the playback area TIP On the BROWSEScreen regardless of the playback area setting you can select any file on the card that you want Adjusting playback volume The volume of output through the built in speaker or the LINE OUT connector can be adjusted using the or button while the Home Screen is shown A pull up volume indicator appears Setting the playback ...

Page 173: ... card FOLDER default Set the playback area as all the files in the currently selected folder PLAYLIST Set the playback area as the tracks in the playlist See Playlist on page 68 If there is no playlist defined a No PLAYLIST pop up appears 5 Press the HOME ª button to return to the Home Screen NOTE The current playback area setting appears in the lower left of the Home Screen Playback area indicati...

Page 174: ...s displayed 3 Use the  or button to select a folder level and use the or button to select a folder For an explanation of how to use the Browse Screen see Screen navigation on page 59 4 Press the QUICK button to open the following pop up window 5 Use the or button to select SELECT and press the Á button The display returns to the Home Screen The first file in the folder is selected and the unit is...

Page 175: ...splayed 3 Use the  or button to select a folder level and use the or button to select the folder that contains the track file you want to play For an explanation of how to use the BROWSE Screen see Screen navigation on page 59 4 Press the button 5 Use the or button to select the desired file 6 Press the Á button The display returns to the Home Screen and the selected track starts playing This fol...

Page 176: ...ears NOTE For an explanation of how to use the BROWSEScreen see Screen navigation on page 59 3 Use the or button to select the file you want to add to the playlist and press the QUICK button NOTE For details about how to select the file see Screen navigation on page 59 A pop up window appears 4 Use the or button to select ADDLIST 5 Press the Á button The track is added to the playlist and the popu...

Page 177: ...n to select PLAYLIST and press the button PLAYLISTscreen appears 5 Use the or button to select the file you want to edit and press the QUICK button A pop up window appears 6 Use the or button to select an item and press the Á button to cause the unit to work as follows ALL CLR A confirmation message appears to confirm that you want to remove all the files from the playlist Press the Á button to re...

Page 178: ...this to change the order of tracks in the playlist In addition to the file name the track number also appears highlighted in inverse Use the or button to move the selected track to a different position in the playlist In the above example the 4th track has been moved to the 3rd track position Press the Á button The display returns to the PLAYLISTscreen CANCEL The operation for the selected file is...

Page 179: ...k name file number and other file information for the currently playing track appear on the display The ª icon appears on the display when playback is stopped at the beginning a track and the π icon appears when playback is stopped in the middle of a track paused When the IN and OUT points are set in the file pressing the  or button skips to those points Press the button repeatedly until the file...

Page 180: ...and hold the  or button to rewind or fast forward and search the playback track NOTE Press and hold the  or button to accelerate the search speed Repeat playback REPEAT You can repeatedly playback one file or multiple files within a designated area 1 Press the MENU button to open the MENU screen 2 Use the or button to select PLAY SETTING and press the Á button PLAY SETTINGscreen appears 3 Use th...

Page 181: ...creen NOTE If you start loop playback the REPEAT item automatically switches to OFF if it is in a different mode 5 Press the HOME ª button to return to the Home Screen Special Playback Control Functions The unit has some special playback control functions For example you can playback a selected section of a track repeatedly or change the tempo of music without changing the pitch You can also enhan...

Page 182: ...button or press the PB CONT button to return to the Home Screen Repeated Playback of Selection Loop Playback With this function you can continuously repeat loop the playback of a selection that you make 1 While the Home Screen is open when stopped or playing back press the PB CONT button to open the Playback Control screen 2 Press the Á button to start playback and press the MARK button at the sta...

Page 183: ...wn at the points corresponding to the IN and OUT points under the playback indicator bar NOTE The pop up message of I O Too Short appears if the section between the IN and OUT points is too short Set them again The section should be 1 second or longer Press the MARK button again to clear the IN and OUT points To stop loop playback press the MENU button when the Playback Control screen is open Pres...

Page 184: ... the adjustment of playback speed select a file recorded with a sampling frequency of 44 1 kHz or 48 kHz by using the  or button Press the or button after opening the Playback Control screen to increase or decrease the playback speed The VSA function can change the playback speed in the range from 0 5 50 to 1 5 150 times in 0 1 increments the normal speed Press the PB CONT button to the Home Scre...

Page 185: ...NG and press the Á button PLAY SETTINGscreen appears 3 Use the or button to select PLAY EQ and press the or Á button 4 Use the or button to set the equalizer TREBLE MIDDLE and BASS indicate that adjustment in the high middle or low frequency range is enabled and and indicate that the sound level in that range is increased or decreased respectively Options OFF factory setting TREBLE TREBLE MIDDLE M...

Page 186: ... The jump back time is set as a JUMPBACKsetting 1 Press the MENU button to open the MENU screen 2 Use the or button to select PLAY SETTING and press the Á button PLAY SETTINGscreen appears 3 Use the or button to select JUMPBACK and press the or Á button 4 Use the or button to set the jump back time The setting options include 1 sec 1 second to 10 sec 10 seconds in increments of 1 second and 20 sec...

Page 187: ...reen will not appear in this case A pop up menu to work with a selected file or folder appears if the BROWSEscreen or the PLAYLIST screen is open Switches CALIBand INPUTLEVELon the TUNERscreen NOTE TheQUICKbuttonisdisablediftheMENUscreen OTHERSsubmenu RECSETUPscreen orasettingsscreenisopenforvarioussettings Actions of the QUICK button for different screens and states are as follows Screen State Ac...

Page 188: ... Delete on page 82 DIVIDE The current track can be divided See Dividing the selected file DIVIDE on page 83 LEVEL ALIGN The perceived overall sound pressure can be increased to enhance listenability See Increasing the perceived overall sound pressure to enhance listenability Level Alignment on page 84 During playback with the Home Screen open or while the Playback Control screen is open Only level...

Page 189: ...on see Using the Level Control Function on page 41 When Monitor Mix is enabled the input level can be adjusted in a simple way using the  or button Press the  or button to open the input level setting pull up window Adjust the input level while checking the input sound See Adjusting the input level on page 39 NOTE This is a simple adjustment function for Monitor Mix During this adjustment the le...

Page 190: ...he BROWSEscreen 1 To delete a file select it using the  or button or the BROWSEscreen 2 Open the Quick menu screen by pressing the QUICK button while the Home Screen is open when stopped 3 Use the or button to select DELETE 4 Press the Á button A confirmation screen for file deletion appears Press the Á button to delete the file or press the HOME ª button to cancel the deletion 7 Quick Operations...

Page 191: ...ition for file division and press the RECORD º button The following pop up window appears 5 Press the Á button to divide the file Or press the HOME ª button to return to the DIVIDEscreen without dividing the file NOTE When the DIVIDEscreen is open you can press the Á button and set the divide position while playing the track When the DIVIDEscreen is open press the Á button to pause resume playback...

Page 192: ...ore than 200 characters long Division is not possible if a file that already exists has the same name as the name that would be given to a new file created by division TIP Add marks during recording at positions where you want to divide a file See Markfunction onpage52 Increasing the perceived overall sound pressure to enhance listenability Level Alignment If the playback sound is very small and i...

Page 193: ...button to select ON and press the Á button to enable the level alignment function Or select OFFand press the Á button to disable the level alignment function NOTE The level alignment function may not be able to achieve sufficient effect depending on the source of the sound example a music file whose sound pressure has been already adjusted 7 Quick Operations ...

Page 194: ...s the MENU button to open the MENU screen 2 Use the or button to select OTHERS and press the Á button to open the OTHERS submenu 3 Use the or button to select EFFECT and press the Á button The EFFECTscreen appears As shown in the above illustration there are four setting items on the EFFECTscreen Set each item using the  or buttons or or buttons EFFECT Use this to turn the effect on or off The de...

Page 195: ...tting to return to item selection status 7 Press the HOME ª button to return to the Home Screen CAUTION When the sampling frequency is set to 96 kHz or a WAV file with a sampling frequency of 96 kHz is played the built in effects do not work However you can still set the built in effects Effects Preset List Preset name Effects HALL 1 Default This is a bright reverb modeled after a large hall like ...

Page 196: ...the Á button to open the OTHERS submenu 3 Use the or button to select TUNER and press the Á button TUNERscreen appears The TUNERscreen contains the CALIBoption to set the fundamental frequency of the A Press the  or button to decrease or increase the fundamental frequency Setting range 435Hz 445Hz in 1Hz increments default 440Hz NOTE When the TUNERscreen is open you can press the Á button to reve...

Page 197: ... sound is lower or higher than the target pitch The bar becomes longer as the sound shifts away from the target pitch Adjusting the input level for tuning 1 PresstheQUICKbuttontoswitchCALIBtoINPUT LEVELinthebottomoftheTUNERscreen 2 Use the  or button to adjust the input level The pull up display appears to show the input level setting See Manually adjusting the input level on page 39 for the adju...

Page 198: ...g the microSD card from the DR 05 and connecting it directly to a computer that has a built in microSD card slot or by using a card reader CAUTION You cannot use this unit s other functions when it is connected to a computer by USB The unit should be connected directly with the computer instead of via a USB hub When the unit is connected through USB after being turned on or when the unit is turned...

Page 199: ...erly inserted before making the USB connection Can t Save Data appears on the screen If you open the Computer directory this unit will appear as an external drive named DR 05 Transferring files to a computer 1 Click the DR 05 drive on the computer screen to show the MUSIC and UTILITY folders 2 Open the MUSIC folder and drag and drop the files that you want to transfer to the computer to destinatio...

Page 200: ...and audio files on the third level or below Since you can set the DR 05 to only play the contents of a specific folder you can organize tracks into genres artists or other categories as you like If you name the subfolders and music tracks these names will appear on the screen of this unit Disconnecting from a computer Before disconnecting the USB cable use the proper procedures for your computer t...

Page 201: ...loaded file Card information page CARD Shows the use status of the currently inserted microSD card System information page SYSTEM Shows the unit s system setting information and firmware version File information page The FILEpage shows information about the currently selected file WAV or MP3 Shows the audio file type For WAV files bit length stereo mono and sampling frequency Hz also appear For MP...

Page 202: ...SD card capacity REMAIN SIZE USED SIZE Shows the amount of unused used capacity on the microSD card Press the  or button to switch between REMAINSIZEand USEDSIZE System information page The SYSTEM page shows information about the DR 05 s system settings and firmware version AUTO OFF Shows the automatic power OFF setting BACKLIGHT Shows the automatic backlight OFF setting BATTERY Shows the battery...

Page 203: ... the Á button SYSTEMscreen appears The following settings can be made for the items on the SYSTEMscreen Use the  or button and the or button to set each item Setting the automatic power saving function You can use the AUTO PWR SAVEitem to set the amount of time from when the unit last operated or was used until the power turns off automatically Options OFF turned off 3min 5min 10min 30min factory...

Page 204: ...if the unit has enough power for normal operation Values ALKAL alkaline batteries default Ni MH nickel metal hydride batteries Restoring the factory settings Use the INITIALIZEitem to restore the various settings of this unit to their factory settings 1 Use the or button to select INITIALIZE and press the Á button to highlight Exec 2 Press the Á button again to open a confirmation pop up window 3 ...

Page 205: ...ss the HOME ª button to cancel formatting Using FULL FORMAT Use the FULLFORMATitem to completely format the microSD card Full formatting checks the memory for errors while formatting so it takes more time than quick formatting Using FULLFORMATerases all music files on the card and automatically creates new MUSIC and UTILITY folders as well as the dr 1 sys file that is necessary to use the microSD ...

Page 206: ...rmatting the formatting may not occur correctly Setting the format of file names You can select the format of names given to files recorded by this unit 1 PresstheMENUbuttontoopentheMENUscreen 2 Use the or button to select OTHERS and press the Á button to open the OTHERS submenu 3 Use the or button to select FILENAME and press the Á button FILENAMEscreen appears Use the  or button and the or butt...

Page 207: ... DATE The date is used as the file name in yymmdd format Example 110101_0000 wav NOTE The date is set using the unit s internal clock See Setting the date and time on page 29 Setting the WORD item To set the WORDitem use the  and buttons to move the cursor and use the or button to select the character In addition to the alphabet and numbers the following characters can be used _ 11 Settings and I...

Page 208: ... Before choosing the DIVIDE function connect the unit to a computer and edit the file name File Not Found The file added to the playlist cannot be found or a file could be damaged Please check the file in question Non Supported The audio file is not a supported format Please see 10 Connecting with a Computer for file formats that this unit can use Battery Empty The battery is almost out of power R...

Page 209: ... FAT format CAUTION Execution of FAT formatting erases all data currently on the card File Not Found Make Sys File The system file is missing This unit requires a system file for operation When this message appears press the Á button to automatically create a system file Invalid SysFile Make Sys File The system file required to operate this unit is invalid When this message appears press the Á but...

Page 210: ...r move them to your computer Card Error The card could not be handled properly Replace the card Current File MP3 MP3 files cannot be divided File Protected The file is read only and cannot be erased No Card No card is in the unit so recording is not possible No PB File There is no file that can be played back The file might be damaged No MUSIC File There is no playback file so DIVIDE cannot be exe...

Page 211: ...C adaptor TASCAM PS P515U and or disconnect the USB cable for bus power supply If the error message continues to appear frequently please contact a TEAC Repair Center File Error Can t Save Data Player Error Device Error Writing Failed Sys Rom Err Remote Cmd Remote Rx System Err 50 System Error 1 System Error 2 System Error 3 System Error 4 System Error 5 System Error 6 System Error 7 System Error ...

Page 212: ...is not connected via a USB hub Confirm that the HOLD switch is not set in the direction of the arrow ª ª The unit turns off automatically Is the automatic power saving function enabled See Setting the automatic power saving function on page 95 This product is compliant with the European ErP standby power regulations For this reason the automatic power saving function will operate whether it is run...

Page 213: ...t minimized ª ª Recording does not work If you are using an external device check the connection again Check the input settings again Confirm that the recording level is not too low Confirm that the microSD card is not full Confirm that the number of files has not reached the maximum that the unit can handle ª ª The recording level is low Confirm that the input level setting is not too low Confirm...

Page 214: ...d Do the built in effects work ª ª I cannot erase a file Confirm that you are not trying to erase a file that has been copied from a computer after being write protected ª ª This unit s files do not appear on the computer Confirm that the unit is connected to the computer using its USB port Confirm that USB hubs are not used Confirm that the unit is not recording or in recording standby mode 13 Tr...

Page 215: ...gs MIC EXT IN jack supporting plug in power Connector 1 8 3 5 mm stereo mini Input impedance 25 kΩ Nominal input level 20 dBV Maximum input level 4 dBV LINE OUT Connector 1 8 3 5 mm stereo mini Output impedance 12Ω Nominal output level 14 dBV 10 kΩ load Maximum output level 2 dBV 10 kΩ load Maximum output 20 mW 20 mW 32Ω load Built in speaker 0 3 W monaural Control input output ratings USB jack Co...

Page 216: ... 44 1 48 96kHz JEITA S N ratio 92dB or higher EXT IN to LINE OUT Fs 44 1 48 96kHz JEITA Note JEITA Conforming to JEITA CP 2150 Computer compatibility Windows Pentium 300 MHz or faster 128 MB or more memory USB port USB 2 0 recommended Macintosh Power PC iMac G3 G4 266 MHz or faster 64 MB or more memory USB port USB 2 0 recommended Recommended USB host controller Intel chipset Supported OS Windows ...

Page 217: ...out 17 5 hours Built in microphone Recording MP3 44 1kHz 128Kbps About 16 hours Built in microphone Recording MP3 48 kHz 320Kbps About 11 hours Built in microphone Playback WAV 96kHz 24bit About 17 hours Headphones Playback WAV 96kHz 24bit About 17 hours Built in Speaker Playback WAV 44 1kHz 16bit About 19 5 hours Headphones Playback WAV 44 1kHz 16bit About 19 5 hours Built in Speaker Playback MP3...

Page 218: ...rs Headphones Playback WAV 96kHz 24bit About 14 hours Built in Speaker Playback WAV 44 1kHz 16bit About 16 5 hours Headphones Playback WAV 44 1kHz 16bit About 16 5 hours Built in Speaker Playback MP3 44 1kHz 128Kbps About 16 hours Headphones Playback MP3 44 1kHz 128Kbps About 15 hours Built in Speaker Playback MP3 48 kHz 320Kbps About 16 hours Headphones Playback MP3 48 kHz 320Kbps About 15 hours ...

Page 219: ...ional drawings 61mm 26mm 141mm Illustrations and other depictions may differ in part from the actual product Specifications and external appearance may be changed without notification to improve the product 14 Specifications ...

Page 220: ...364 Colonia Del Carmen Delegación Coyoacán CP 04100 México DF México TEAC UK LIMITED Phone 44 8451 302511 http tascam eu Meridien House Ground Floor 69 71 Clarendon Road Watford Hertfordshire WD17 1DS UK TEAC EUROPE GmbH Phone 49 611 71580 http tascam eu Bahnstrasse 12 65205 Wiesbaden Erbenheim Germany TEAC SALES TRADING SHENZHEN CO LTD Phone 86 755 88311561 2 http tascam cn Room 817 Block A Hailr...

Reviews: