

TASCAM DM-3200 Quick Reference – Page 2
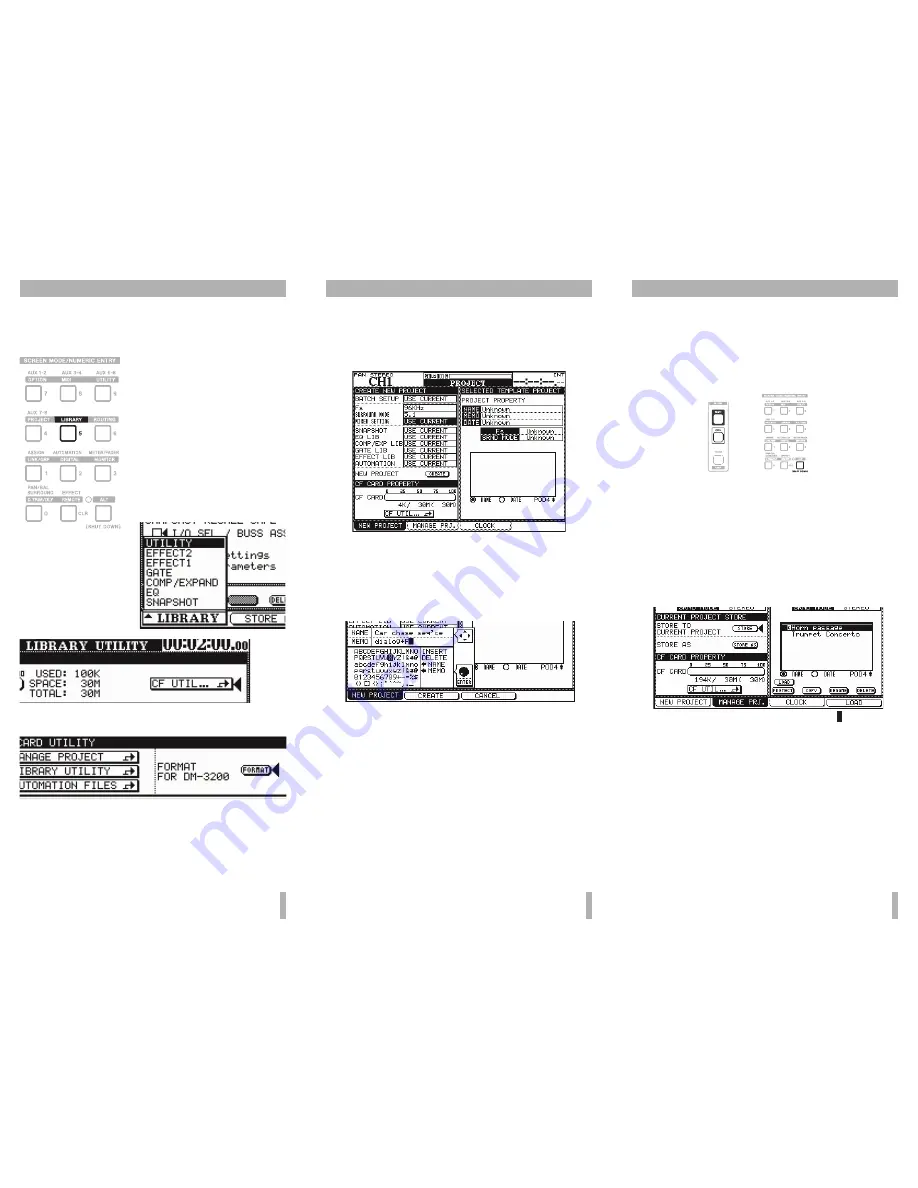
How to use CF cards and projects
The DM-3200 stores library settings, automation data, etc. to-
gether in projects, which are stored on a CF card, allowing
the mix data for recording sessions to be transported easily
between different locations.
Use any CF card (Type I or Type
II). A card of at least 32MB capac-
ity, such as the one supplied with the
DM-3200, is recommended.
The CF card must be formatted be-
fore use with the DM-3200 (note
that the supplied card is already
formatted):
Press the
LIBRARY
key, and then
press the POD 1 key, and turn the
POD 1 encoder below the display so
that the
UTILITY
option in the pop-up
menu is highlighted.
Press
ENTER
for the
UTIL-
ITY
screen.
Use the cursor keys to
move the cursor to the on-
scren
CF UTIL
button. Press
ENTER
.
Use the cursor keys to move the cursor to the on-screen
FORMAT
button, and press
ENTER
.
A popup message appears. Press
ENTER
to continue.
Another popup message appears, warning you that all data
will be erased. Press
ENTER
to format the card.
While the card is being formatted, a message briefly appears.
Do not remove the card or turn off power while formatting
is going on. The word
Completed
appears on the display when
formatting is complete on the display.
TASCAM DM-3200 Quick Reference – Page 3
Making a new project
When the card is formatted, move the cursor to the on-screen
MANAGE PROJECTS
button, and press
ENTER
.
Note here is already an “invisible” project in the DM-3200
memory which has not been saved.
Press the POD 1 switch (
NEW PROJECT
):
Use the cursor keys and wheel to set the sampling frequency
and surround mode. Use
ENTER
to confirm these entries as
you make them.
Move the cursor to the on-screen
NEW PROJECT CREATE
button
and press
ENTER
. The screen changes to show the project
naming utility:
Use the cursor keys to move around the
NAME
and
MEMO
fields.
Use the wheel to select a character from the list, and the
ENTER
key to enter the selected character at the cursor.
Use the special
INSERT
and
DELETE
labels as if they are characters
(highlight and
ENTER
).
If there are projects already on the card, use the POD 4 en-
coder to select a project . The
d
NAME
and
d
MEMO
labels copy
over the selected project name and note as templates.
When the name and note are complete, press the POD 2
switch (
CREATE
) to create the new project.
✒
See Section 2, “Basic operational concepts” of the
Own-
erʼs Manual.
TASCAM DM-3200 Quick Reference – Page 4
Important note about the CF card
The DM-3200 does not automatically write to the CF card
every time a change is made to the project. This is to avoid
unnecessary stressing of the card, which can cause premature
failure of the card.
Accordingly, when shutting down the DM-3200, to write the
data currently in memory to the current project, press and
hold the
SHIFT
and
CTRL
keys, and press the
ALT
key.
+
The display shows a popup, asking if you are sure you want to
turn off the DM-3200. Press
ENTER
to continue.
You then see a message showing that it is safe to turn off the
DM-3200 (or you can reboot it using the
ALT
+
STOP
+
PLAY
keys).
You can also write the current data to the currently loaded
project on the CF card at any time, from the
MANAGE PROJECT
screen (
ALT
+
PROJECT
key, followed by
MANAGE PRJ.
(POD
switch 2).
The current project is marked with an inverted
C
by its name.
Note that if the DM-3200 is started without the current data
having been saved to card, a popup message reminds you of
the fact. You then have the choice of loading the last project
with or without the unsaved data.
Changing projects, etc.
Use the POD 4 encoder to scroll through the list of projects
on a card. When a project is selected in the list at the right of
the screen, use the on-screen buttons under the list to load
(
LOAD
), protect (
PROTECT
), rename (
RENAME
) or delete (
DELETE
) the
highlighted project.
✒
See Section 2, “Basic operational concepts” of the
Ownerʼs
Manual.


