background image

4 • Recording—Advanced recording

 TASCAM CD-RW700 

21

and crackles which may come from an older vinyl 
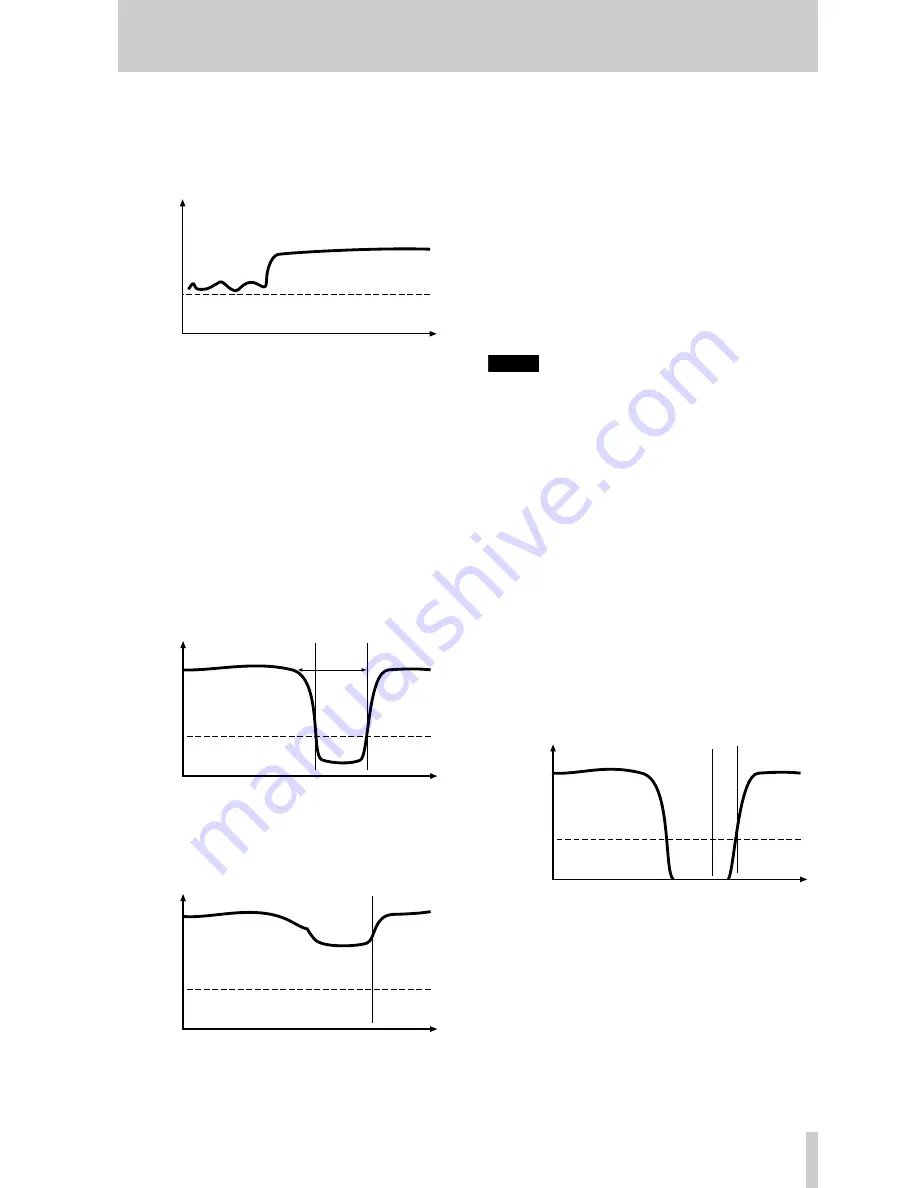
recording, for example). If the “noise floor” is higher 
than the threshold, synchronized recording will not 
take place (the rehearsal facility can be used here 
(4.4, “Rehearsal”) to help):

Because synchronized recording can be turned on 
and off while recording is taking place, it is therefore 
possible to record with a synchronized automatic 
start, and a manual end, or vice versa.

When the source material is being played back 
before synchronized recording is enabled, the condi-
tions under which synchronized recording will start 
(after synchronized recording has been enabled) are:

When the signal drops below the threshold for one 
second or more and then rises above the threshold 
again (this is the general condition, of which starting 
synchronized recording from a stopped or paused 
source is a special case):

Alternatively, when recording digitally from sources 
(MD, CD and DAT) which output track divisions, 
synchronized recording starts when a track division 
is received, regardless of the level:

To stop synchronized recording:

1

The unit must be in record mode, and the 

SYNC


indicator in the display must be lit.

2

Stop the source. After a few seconds, the unit 
enters record ready mode. The time between 
the stopping of the source and entering record 
ready mode is used to record a gap at the end 
of the track.

3

If no changes are made to the unit’s controls, 
restarting the source restarts recording, as the 
unit is still in sync mode and will start record-
ing again when the source is detected.

NOTE

When recording in sync mode, you may notice a 
slight delay between starting the source, and the CD-
RW700 responding. This is due to the way in which 
the unit works, storing the data in a memory buffer 
before writing it to the disc. The resulting delay is 
therefore not a cause for concern—all audio data 
received between the start and end points will be 
recorded.

4.3.2

Automatic track division

The trigger level, as set above (4.3.1, “Synchronized 
recording” can also be used to divide tracks if the A-
TRACK (auto track) function is enabled.

When this function is enabled, the unit automatically 
inserts a track division in the recorded material 
when:

• recording digitally from MD, CD or DAT, an incre-

ment signal is detected and the sound level rises 
above the threshold:

or

• increment signals are unavailable (e.g. analog 

recording or digital sources other than MD. CD or 
DAT) and the sound level has dropped below the 

time

level

S_LVL

Start of track is not registered

Noise is higher 
than threshold

time

level

S_LVL

At least 1

second

Recording 
starts

time

level

S_LVL

Track signal from source 
starts recording

time

level

S_LVL

CD-RW 
increments 
track

Track increment 
from source

Summary of Contents for CD-RW700

Page 1: ...erature accompanying the appliance The lightning flash with arrowhead symbol within an equilateral triangle is intended to alert the user to the presence of uninsulated dangerous voltage within the pr...

Page 2: ...the limits for a Class B digital device pursuant to Part 15 of the FCC Rules These limits are designed to provide reasonable protection against interference in a residential area This device generates...

Page 3: ...ng structure grounding of the lead in wire to an antenna discharge unit size of grounding conductors location of antenna discharge unit con nection to grounding electrodes and requirements for the gro...

Page 4: ...E HOUSING USING A SCREWDRIVER USE OF CONTROLS OR ADJUSTMENTS OR PERFORMANCE OF PROCEDURES OTHER THAN THOSE SPECIFIED HEREIN MAY RESULT IN HAZARDOUS RADIATION EXPOSURE IF THIS PRODUCT DEVELOPS TROUBLE...

Page 5: ...AY key 12 7 MENU key 12 8 ENTER key 12 9 FADER key 12 A MONITOR key 12 B PLAY MODE key 12 C FINALIZE key 12 D ERASE key 12 E RECORD key 12 F SYNC REC key 13 G REC MUTE key 13 H SEARCH keys 13 I SKIP k...

Page 6: ...meter settings A wireless remote control unit allows control of the CD RW700 from remote locations NOTE This product is designed to help you record and reproduce sound works to which you own the copy...

Page 7: ...panel control or feature the following typeface is used to show the number of the feature as given in the diagram in this manual and the corresponding explanation 5 When referring to a remote control...

Page 8: ...discs can only be played on one side To remove a disc from its storage case press down on the center of the case and lift the disc out hold ing it carefully by the edges Finger marks and dust should b...

Page 9: ...ecautions supplied with the disc or contact the disc manufacturer directly 1 4 5 Recommended media An up to date list of manufacturers who produce media suitable for use in the CD RW700 can be obtaine...

Page 10: ...10 TASCAM CD RW700 2 Features of the CD RW700...

Page 11: ...u items used to set parameters A DISPLAY key Repeated presses of this key cycle through the differ ent time display modes These modes differ accord ing to whether the unit is playing back or recording...

Page 12: ...ndby modes equivalent to 1 2 OPEN CLOSE key Opens and closes the disc tray equivalent to 3 3 Number keys 0 through 10 and 10 Use these keys for direct entry of track numbers when playing back or makin...

Page 13: ...ide the battery compartment and the negative termi nals should match the markings If you are not going to use the remote control unit for an extended period of time remove the batter ies Old batteries...

Page 14: ...ough 7 above to set the hours and minutes value If the TIMER switch C is set to REC or PLAY the display shows a small clock icon to show that the unit is in timer mode 2 5 3 Using the timer When the s...

Page 15: ...tal remaining time refer to the programmed mate rial not the whole disc 3 1 2 Track search Use the MULTI JOG control B or the SKIP keys on the remote control unit I to jump forward or back ward by one...

Page 16: ...umber the total time of the program so far and the step number e g 2Tr14 56 03 4 The next program step can then be entered NOTE Steps 3 and 4 above can be carried out from the main unit by turning and...

Page 17: ...the MENU key 9 or 7 until the display shows VOLUME XXXdB where XXX is the current setting 3 Use the MULTI JOG control B or the SKIP keys I to adjust the input volume between 60dB and 18db relative to...

Page 18: ...rcially produced CD the volume set in the menu should be 0dB This will maintain all the dynamic range of the source CD without clipping Only boost the signal if the source is exceptionally quiet An an...

Page 19: ...recorded In other words if 8 tracks have already been recorded on the disc the maximum value that can be set here is 91 91 8 99 If 49 tracks have already been recorded on the disc the maximum value th...

Page 20: ...use mode 1 The unit must be in record ready mode and the SYNC indicator in the display must be lit as explained above 2 Start playing the source The pause indicator disappears from the display and the...

Page 21: ...time between the stopping of the source and entering record ready mode is used to record a gap at the end of the track 3 If no changes are made to the unit s controls restarting the source restarts re...

Page 22: ...me A fall and subsequent rise in volume alone when recording digitally from CD MD or DAT is not sufficient to trigger an automatic track increment You may find it helpful to use the track restriction...

Page 23: ...the MULTI JOG control or use the SKIP keys to change the value of the fade out time It is possible to set the fade in time only per form step 5 after step 2 or the fade out time only in step 1 press...

Page 24: ...the track forwards or backwards 1 Load a recordable disc into the unit and make sure the unit is in stop mode 2 Cue the source material to the start of the source track to be recorded i e in the examp...

Page 25: ...the true track division point press the RHSL key once again to re arm the trigger 7 After nine seconds the message changes from Inc RHSL and the sampled data loops in a four second loop The display sh...

Page 26: ...D play ers 5 1 1 Unfinalizing CD RW discs If a CD RW disc has been finalized it is possible to erase the Table of Contents in the following way 1 With the finalized disc loaded and the unit in stop mo...

Page 27: ...ss the MULTI JOG control or press the ENTER key 8 NOTE This operation cannot be undone If you are going to erase a disc make sure that it contains only record ings that you really want to erase 5 If t...

Page 28: ...c Error General recording error This may be caused by vibration or a shock during recording for example or may be the result of a bad disc Try recording again with the same disc If the message appears...

Reviews: