


4 – Recording—Advanced recording
24
TASCAM CD-RW2000
automatic track increment.
You may find it helpful to use the track restriction
facility (see 4.2.4, “Restricting the number of
tracks”) together with the automatic track division.
For instance, if you have recorded two albums on one
DAT tape, and you wish to make two separate CDs
from this tape, you can use the
MULTI DIAL
control
to set the number of tracks to the number of tracks
comprising the first album.
When the final track of the first album has been
recorded, the unit automatically performs the PMA
writing procedure and enters stop mode.
4.3.3
Digital direct
As mentioned earlier, the digital direct mode
bypasses some of the input circuitry of the CD-
RW2000 (the frequency convertor and the digital
level control) to write directly to the disc.
To enable or disable digital direct recording:
1
Ensure that the input source is set to
DIGITAL
(either
AES/EBU
,
COAXIAL
or
OPTICAL
).
2
Press the
MENU
key (
9
or
6
) repeatedly until
the display shows
D_DIRECT>XXX
,
where
XXX
is the current setting, either
ON
or
OFF
.
3
Turn the
MULTI DIAL
control
B
or use the
SKIP
keys
H
to change setting to
ON
or
OFF
.
When digital direct recording is enabled, the
DIGITAL
indicator in the display flashes slowly
when the unit is in record ready mode, or is
recording.
NOTE
As mentioned earlier, the digital direct feature
bypasses the frequency convertor. Recording is
therefore only possible from sources recorded with
44.1 kHz sampling frequency.
If digital direct is selected, the digital volume is
bypassed and the menu item disappears. Once the
digital direct mode is turned off, the level settings pre-
viously made will take effect, and the input volume
may suddenly change.
4.3.4
Rec mute function
The rec mute function allows instant cut-off of the
input signal, and records four seconds of silence on
the disc.
1
While recording is in progress, press the
REC
MUTE
key
F
.
The display shows
REC MUTE
, the meters
stop displaying the current level and the moni-
tored sound is cut.
2
After about four seconds, the unit enters
record ready mode.
NOTE
This function is only available from the remote control
unit. It is not possible to use this function with the
main unit only.
4.3.5
Fade-in and fade-out
To provide smooth beginnings and endings to
recorded tracks, the unit provides fade facilities.
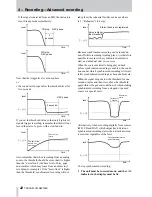
Fade-ins are from –
∞
(silence) to the set input level
(4.1.1, “Signal volume”) and fade-outs go from the
current input volume to silence.
The fade-in and fade-out times can be set indepen-
dently in increments of one second, from 1 second to
24 seconds.
To set the fade times:
1
Press the
MENU
key (
9
or
6
) repeatedly until
the display shows
FADE IN > XXS
,
where
XX
is the current fade-in time, in
seconds.
2
Turn the
MULTI DIAL
control
B
or use the
SKIP
keys
H
to change the value of the fade-in
time.
3
Press the
MENU
key again so that the display
shows
FADE OUT> XXS
, where
XX
is
the current fade-out time, in seconds.
4
Turn the
MULTI DIAL
control or use the
SKIP
keys to change the value of the fade-out time.
It is possible to set the fade-in time only (per-
form step
5
after step
2
) or the fade-out time
only (in step
1
, press the
MENU
key until the
fade-out time menu item is shown).
To perform the fade-in:
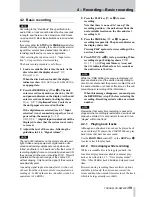
time
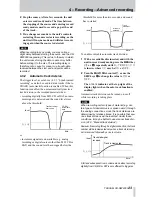
level
S_LVL
Long "pause"
in signal, but
track is not
incremented
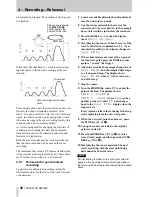
Digital recording from CD, MD and DAT


