background image

TASCAM CD-A550/CD-A750


11

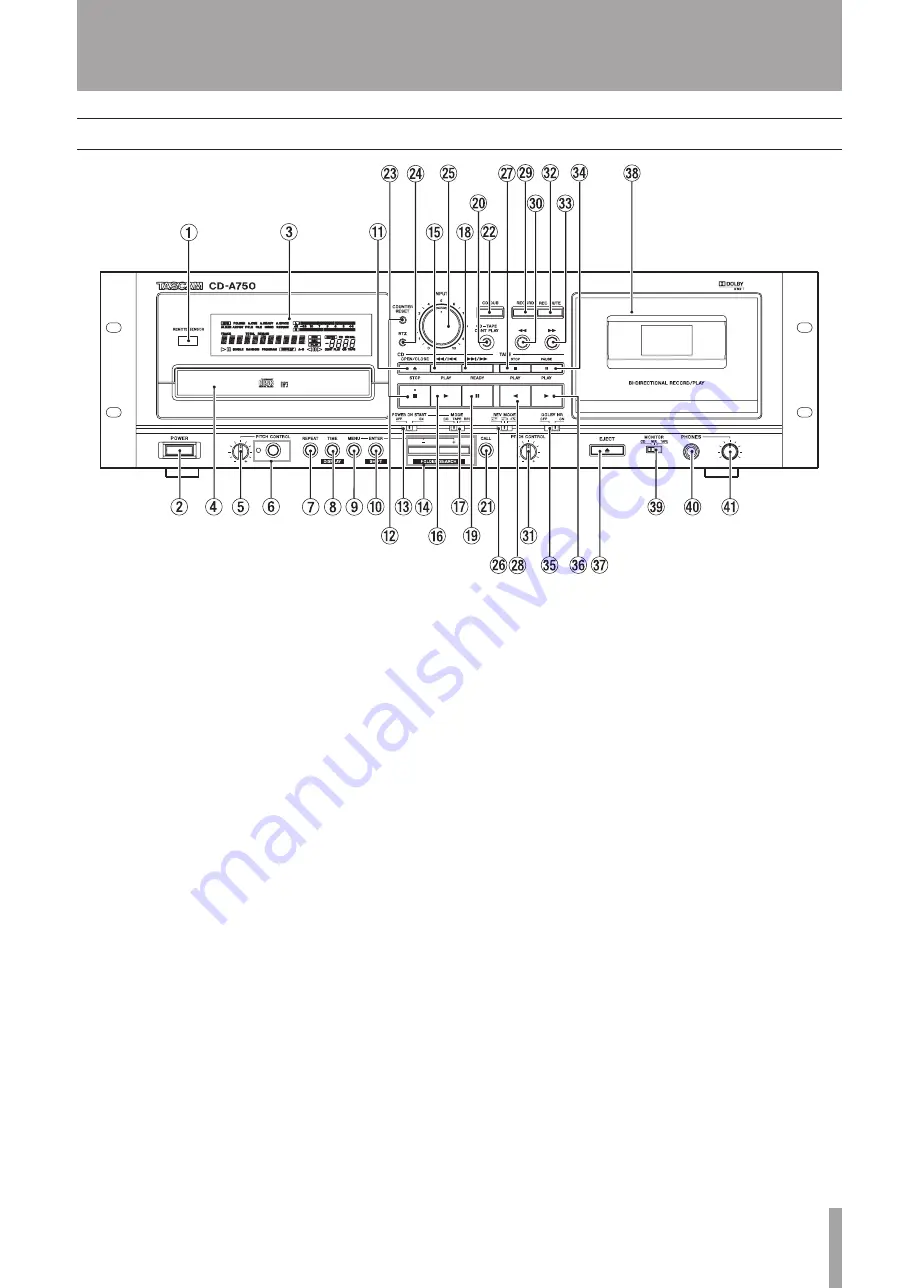
2 – Names and Functions of Parts


11

Remote sensor 

Signals from the included wireless remote control 
(RC-A550) are received here. When using the remote 
control, point it towards this sensor. 


21

POWER button 

Use to turn the unit’s power ON and OFF. 


31

Display 

Shows the transport status, currently selected input 
source, record and playback signal levels, menus, etc. 

CD section 

 Disc tray

41


Press the 

OPEN/CLOSE

 key to open the disc tray and 

insert and remove discs. Press the 

OPEN/CLOSE

 key 

again to close the disc tray. 

 PITCH CONTROL knob

51


Use to adjust the playback pitch of a CD. (See “Pitch 
control” on page 31.) 


61

PITCH CONTROL key/indicator 

Use this key to turn the CD pitch control function ON 
and OFF. (See “Pitch control” on page 31.) The indicator 
lights when ON. 


71

REPEAT key 

Press to turn the repeat playback function ON and OFF. 
(See “Repeat playback” on page 30.) 


81

TIME/DISPLAY key 

When the playback time is displayed, press this key 
to cycle the playback time display mode through track 
elapsed time, track remaining time and total remaining 
time. When text information is displayed, press this key 

to switch to playback time display. (See “Playback time 
display mode” on page 29.)

When the playback time is displayed, press this key 
while holding down the 

SHIFT

 key to switch to text 

information display, which includes album name, song 
name, artist name and file name. 

During text information display, press this key while 
holding down the 

SHIFT

 key to switch between text 

information contents (album name, song name, artist 
name and file name). 

Press and hold this key during text information 
display to scroll through the display items. (See “Text 
information display mode” on page 29.) 

 MENU key

91


When in standard display mode, press this key to switch 
to menu mode, which allows menu items to be selected. 
When in menu item selection mode, press this to return 
to the standard display mode. When editing a menu 
item, press this key to return to menu item selection 
display. (See “Menu” on page 17.) 

0

  ENTER/SHIFT key 

When in menu mode, press this to make a selection 
or confirm a setting. When not in menu mode, this 
functions as the 

SHIFT

 key. 

q

  OPEN/CLOSE key 

Press to open and close the disc tray. 

w

  STOP key 

Press to stop CD playback. 

Front panel

Summary of Contents for CD-A550

Page 1: ...D01057520B CD A550 CD A750 Compact Disc Player Reverse Cassette Deck OWNER S MANUAL...

Page 2: ...tique cet appareil peut provoquer des interf rences radio dans ce cas l utilisateur peut tre amen prendre des mesures appropri es F r Kunden in Europa WARNUNG Dies ist eine Einrichtung welche die Funk...

Page 3: ...over 13 Unplug this apparatus during lightning storms or when unused for long periods of time 14 Refer all servicing to qualified service personnel Servicing is required when the apparatus has been da...

Page 4: ...The batteries could rupture or leak causing fire injury or stains around them Do not carry or store batteries together with small metal objects The batteries could short causing leak rupture or other...

Page 5: ...MOVE THE PROTECTIVE HOUSING USING A SCREWDRIVER USE OF CONTROLS OR ADJUSTMENTS OR PERFORMANCE OF PROCEDURES OTHER THAN THOSE SPECIFIED HEREIN MAY RESULT IN HAZARDOUS RADIATION EXPOSURE IF THIS PRODUCT...

Page 6: ...to the next or previous track 24 Selecting by track number 24 Selecting a folder data CDs only 24 Search forward and backward 25 Folder playback data CDs only 25 Setting the folder playback mode with...

Page 7: ...back of both the CD and the tape 42 Power on start 43 Restoring default settings 43 Mono playback 44 Viewing information about this unit 44 Checking versions 44 Checking the motor operation time 44 9...

Page 8: ...t track after playing a track When playback is stopped in the middle of a track the incremental play function automatically pauses at the beginning of the next track Auto space function can automatica...

Page 9: ...uld damage the surface or cause fading Cleaning the cassette recorder head section If the cassette recorder head becomes dirty the quality of playback and recording could be degraded and the sound cou...

Page 10: ...slack Automatic tape type detection holes Cassettes have automatic tape detection holes that allow this unit to automatically determine the type of tape inserted Types of cassette tapes that are not...

Page 11: ...rack remaining time and total remaining time When text information is displayed press this key to switch to playback time display See Playback time display mode on page 29 When the playback time is di...

Page 12: ...set to continuous See Selecting the reverse mode on page 38 j STOP key Press to stop the cassette tape k PLAY key Press to play a cassette tape in the reverse direction When the unit is record ready...

Page 13: ...A750 only These are balanced outputs 4 dBu for the cassette tape playback signal During recording or when in record ready mode the signal being recorded is output However depending on the setting of...

Page 14: ...recording or playback when in record ready mode or when playback is paused However if you press this key when playback is paused in the reverse direction playback is paused in the forward direction e...

Page 15: ...et the start point and end point for A B repeat playback See A B repeat playback on page 30 d FOLDER PLAY key Press to turn the folder playback function ON and OFF See Folder playback data CDs only on...

Page 16: ...icator appears When a CD is paused the indicator appears 0 Playback mode indicators Indicators appear according to the CD playback mode None of the indicators appear during ordinary playback continuou...

Page 17: ...232C baud rate CD A750 only 17 RS232C DATA LENGTH Set the RS232C data length CD A750 only 18 RS232C PARITY BIT Set the RS232C parity bit CD A750 only 19 RS232C STOP BIT Set RS232C stop bit length CD 7...

Page 18: ...currently set value are shown Use the following steps to change the settings ENTER key ENTER key 4 Use the keys on the main unit or the remote con trol to select the desired value The selection takes...

Page 19: ...del has both BALANCED XLR and UNBALANCED RCA pin jacks while the CD A550 model has only UNBALANCED jacks In addition the CD playback signal can be output digitally from the CD DIGITAL OUTPUT jack in S...

Page 20: ...en they are playing simultaneously 4 Press the ENTER key to return to the standard dis play If you want to output the CD and tape signals to different devices or different channels of a mixer for exam...

Page 21: ...isplay brightness DIMMER You can adjust the display brightness to suit the operating environment of the unit 1 When in standard display mode press the MENU key on the main unit or the remote control t...

Page 22: ...uters do In addition multiple folders can be stored inside another folder creating a multilevel structure This unit assigns a folder number to each folder to manage them Folder numbers are assigned se...

Page 23: ...lowing procedures 1 When in standard display mode press the MENU key on the main unit or the remote control to enter menu mode 2 Use the keys on the main unit or the remote con trol to show TRAY LOCK...

Page 24: ...the track number Input the track number starting with the first digit as in the example below Numeric keys 0 9 To select track 1 Press the 1 key one time To select track 12 Press the 1 key followed b...

Page 25: ...ng folder playback mode ON when playing a data CD you can set the playback area to the selected current folder Setting the folder playback mode with the remote control Press the FOLDER PLAY key to tur...

Page 26: ...play for two seconds You cannot skip through folders during playback or when paused if the current playback mode is program mode CAUTION The following settings are lost when the current folder is chan...

Page 27: ...out how to use the menu 1 When in standard display mode press the MENU key to enter menu mode 2 Use the keys to show PLAY MODE in the main display area and press the ENTER key 3 Use the keys to select...

Page 28: ...ontrol CLEAR key to remove the last added track from the program Press the CD STOP key to remove all tracks from the program The program can have a maximum of 99 tracks If you try to add more than 99...

Page 29: ...s are shown When a data CD is loaded the remaining time and total remaining time during playback and the total time when playback is stopped are not shown Only the number of tracks or the track number...

Page 30: ...single playback mode is active the currently selected track is played back repeatedly When the auto ready function is ON playback pauses at the start of each track regardless of whether the repeat fun...

Page 31: ...playback with a data CD MP3 WAV sometimes causes the playback sound to skip Auto cue function audio CDs only If the auto cue function is ON when a track is selected the silence at the beginning of the...

Page 32: ...y function can be turned ON and OFF from the main unit using the menu See Using the menu on page 17 for details about how to use the menu 1 When in standard display mode press the MENU key on the main...

Page 33: ...If the CD PLAY key is pressed when the incremental play function is ON playback resumes from the paused posi tion and if the CD STOP key is pressed when paused playback stops Moreover if the CD PLAY...

Page 34: ...layback time display when the audio CD reaches the remaining playback time set in advance In addition the CD A750 model can send an EOM tally signal with this information from its CONTROL I O PARALLEL...

Page 35: ...sides once each and then stop playback Play either the A or the B side once and then stop playback Turning Dolby NR ON and OFF during playback To play a tape recorded using Dolby B noise reduction tu...

Page 36: ...Press the TAPE STOP key to stop fast forwarding or rewinding TAPE key TAPE key Tape counter The tape counter value increases as the tape runs from left to right and it decreases as it runs from right...

Page 37: ...the TAPE PITCH CONTROL knob on the main unit to the right to increase the playback speed and raise the playback pitch Turn it to the left to slow the playback speed and lower the playback pitch The k...

Page 38: ...T key can be used to select the input source Press the key repeatedly to cycle through the input sources The active input source appears on the main area of the display INPUT key INPUT CD the playback...

Page 39: ...the remote control to record about four seconds of silence and then pause recording Press the TAPE PLAY or PAUSE key on the main unit or the remote control to restart recording Press and hold the REC...

Page 40: ...recording source on page 38 2 When in standard display mode press the MENU key on the main unit or the remote control to enter menu mode 3 Use the keys on the main unit or the remote con trol to show...

Page 41: ...ain unit or the remote control If a program has not already been set this unit automatically creates a program to fit the length of the tape If a program has already been set OVERWRITE appears in the...

Page 42: ...and the indicator for the media currently being played TAPE or CD blinks CONT PLAY display If you press the TAPE STOP key to manually stop play back the other media automatically starts playing When p...

Page 43: ...e tape recording starts when the power is turned ON If using a timer use it to turn the power to this unit OFF With this setting ON the unit functions as set automatically as soon as power is supplied...

Page 44: ...ersion and build number 1 When in standard display mode press the MENU key on the main unit or the remote control to enter menu mode 2 Use the keys on the main unit or the remote control to show VERSI...

Page 45: ...TASCAM customer support for infor mation about this unit s RS 232C command protocol Using the parallel connector An external controller using parallel control can control this unit through its PARALL...

Page 46: ...no title data or no data that can be displayed Text information must be 7 bit ASCII compatible text to be displayed Open Lit The disc tray is open OVERWRITE Lit This is confirming that you want to ov...

Page 47: ...An error occurred during communication with the CD drive Please contact a TEAC repair center Decod Error Lit The file type is not supported or otherwise could not be played Change the disc Disc Error...

Page 48: ...in the menu set to ON Cannot record to the cassette tape Has the write protection tab been removed from the cas sette to prevent the unintentional erasure of recordings Is the cassette recorder stopp...

Page 49: ...el stereo Head structure Record playback x 1 rotary reverse erase x 1 Usable tape types C 46 C 90 type cassette tapes metal tapes can only be played back Tape speed 4 76 cm sec Pitch control range 10...

Page 50: ...CA pin jack Compatible signal format S PDIF IEC 60958 3 standard for consumer applications Output impedance 75 Control I O CD A750 only CONTROL I O PARALLEL connector CD 750 only Parallel control inpu...

Page 51: ...TASCAM CD A550 CD A750 51 Dimensional drawing 12 Specifications...

Page 52: ...llace Street Mississauga Ontario L4Z 1Z8 Canada TEAC MEXICO S A de C V www teacmexico net Phone 52 55 5010 6000 R o Churubusco 364 Colonia Del Carmen Delegaci n Coyoac n CP 04100 M xico DF M xico TEAC...

Reviews: