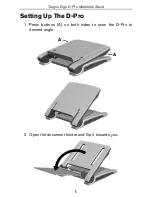
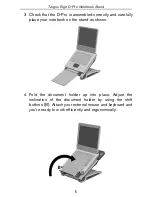
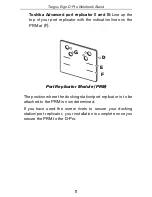
Targus Ergo D-ProNotebook Stand User Manual Download Page 14

14

Targus Ergo D-Pro Notebook Stand

Technical Support

For technical questions, please visit: 

US

Internet:

www.targus.com/support.asp

Australia

 Internet: 

www.targus.com/au

 Email: 

[email protected]

 Telephone: 

1800-641-645

New Zealand

 Telephone: 

0800-633-222

Product Registration

Targus recommends that you register your Targus accessory shortly
after purchasing it. Go to: http://www.targus.com/registration.asp

You will need to provide your full name, email address, phone number,
and company information (if applicable).

Warranty

Targus warrants this product to be free from defects in materials and
workmanship for one year. If your Targus accessory is found to be
defective within that time, we will promptly repair or replace it. This
warranty does not cover accidental damage, wear and tear, or
consequential or incidental loss. Under no conditions is Targus liable
for loss of, or damage to a computer; nor loss of, or damage to,
programs, records, or data; nor any consequential or incidental
damages, even if Targus has been informed of their possibility. This
warranty does not affect your statutory rights.

Features and specifications subject to change without notice. All trademarks and
registered trademarks are the property of their respective owners. © 2005, Targus
Group International, Inc. and Targus, Inc., Anaheim, CA 92806 USA.

Summary of Contents for Ergo D-ProNotebook Stand

Page 1: ...ONTO HONG KONG SYDNEY Ergo D Pro Notebook Stand USER S GUIDE Making Your Mobile Life Easier Making Your Mobile Life Easier Visit our Web site at www targus com Features and specifications are subject...

Page 2: ...Without Targus Port Replicator 6 With Targus Port Replicator 7 Connecting a Security Cable 8 Port Replicator Module 9 Attention IBM Toshiba Users 9 Outlining the Height 10 Using the Hook Loop Fastener...

Page 3: ...allows a notebook computer to be comfortably used as a desktop replacement The D Pro provides a compartment for storage of a Targus Port Replicator or hub and cable management for a clean workspace T...

Page 4: ...4 Targus Ergo D Pro Notebook Stand Setting Up The D Pro 1 Press buttons A on both sides to raise the D Pro to desired angle 2 Open the document holder and flip it towards you A A...

Page 5: ...rectly and carefully place your notebook on the stand as shown 4 Fold the document holder up into place Adjust the inclination of the document holder by using the shift buttons B Attach your external...

Page 6: ...6 Targus Ergo D Pro Notebook Stand Cable Management Without Targus Port Replicator 1 Remove compartment cover A 2 Guide cables through as indicated and reinstall compartment cover...

Page 7: ...nd With Targus Port Replicator 1 Remove compartment cover A 2 Place the replicator in the cavity 3 Guide cables through B and connect them to the replicator 4 Connect your notebook and power supply at...

Page 8: ...Stand Connecting a Security Cable The D Pro offers two options for securing your notebook and peripherials a slot lock or video port lock Follow the usage instructions included with your security cab...

Page 9: ...ioned and attached to the PRM with the screw rivets that are provided Attach your docking station port replicator to the PRM by screwing the two rivets into the PRM plate and docking station port repl...

Page 10: ...mining the proper position to attach the docking station port replicator according to the outlining instructions below Outlining the Height Refer to the instructions for your model of docking station...

Page 11: ...h the indication lines on the PRM at F Port Replicator Module PRM The position where the docking station port replicator is to be attached to the PRM is now determined If you have used the screw rivet...

Page 12: ...on port replicator onto the PRM and hold for at least 20 seconds 2 The docking station port replicator is now attached to the PRM and the notebook screen should be positioned at the center of the D Pr...

Page 13: ...of the table or keyboard In this position your shoulders should be relaxed 2 Adjust the screen distance usually between 20 35 inches 50 90 cm so that you can comfortably read the display 3 Angle the...

Page 14: ...ree from defects in materials and workmanship for one year If your Targus accessory is found to be defective within that time we will promptly repair or replace it This warranty does not cover acciden...

Reviews: