background image

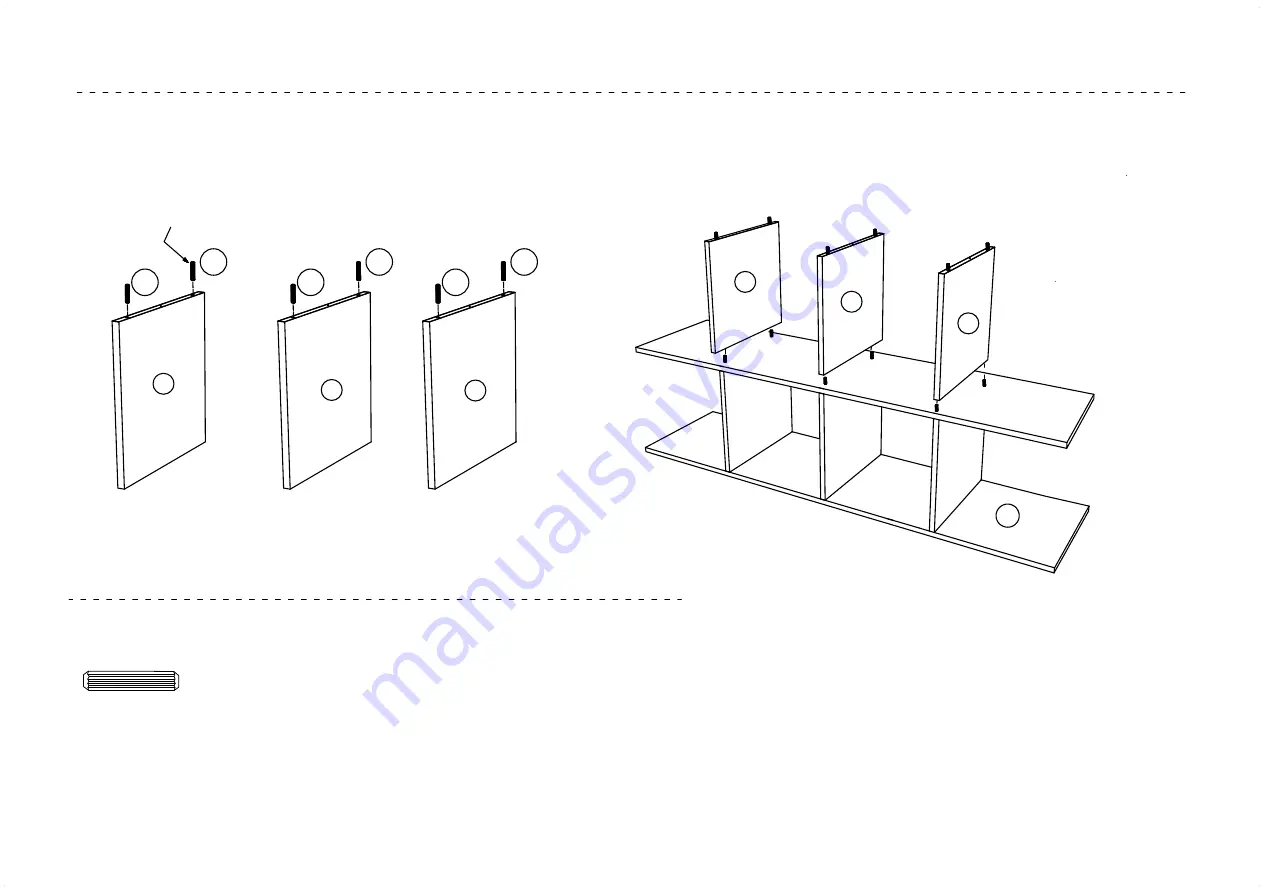
step 3.  Insert dowel into vertical dividers. (D)

D

(H2)  x 6

short dowel 6 x 30 mm.

H2

H2

H2

H2

H2

H2

1.

Insert  six shot dowels (H2)  into vertical dividers. (D)

2.

Place three vertical dividers (D) onto  horizontal divider  (C)

D

D

D

D

D

B

shot dowel 6 x 30 mm.

Summary of Contents for TGT-CU8-002

Page 1: ...nstructions 8 Cube organizer storage 2018 Target The Bullseye Design is a trademark of Target Brands Inc All rights reserved style TGT CU8 002 dpci 002 11 0589 WHITE style TGT CU8 001 dpci 002 11 0616...

Page 2: ...you won t need it before you begin 1 Check for damaged or missing parts Call 1 855 698 4846 Target 855 MYTGTHOME to order missing supplies 2 Use the carton as a working surface to prevent product dama...

Page 3: ...embly screw DIRECTRA NO 5 x 38 H3 x 18 screw cover H1 x 6 long dowel 6 x 60 mm H2 x 12 short dowel 6 x 30 mm H5 x 48 nail H7 x 1 L bracket screw 7 x1 2 F N H8 x 1 wall screw 6 x1 1 2 P N H6 x 1 L brac...

Page 4: ...Exploded diagram ITEM A B C D E DESCRIPTION back panel vertical divider horizontal divider top bottom panel side panel DESCRIPTION 2 2 1 6 4 B C B D D D D D D A A E E E E Optional Assembly...

Page 5: ...injury and or damage to personal belongings may occur Do not mount or attach anything to the sides rear or front of the unit as this can create a force which can cause the unit to tip Serious bodily...

Page 6: ...note the finished and unfinished raw wood edges Arrange pieces so all finished edges are facing the same way While assembling take care to note in each diagram which way finished edges are facing In...

Page 7: ...quires a gap of between 1 2 inch and 1 inch to install properly For more hidden hardware cut back panel before installing and secure L bracket under top panel See steps 4 and 5 for detailed installati...

Page 8: ...2 H2 D H1 H1 H2 H2 D H1 H1 H2 H2 H2 H2 1 Insert six long dowels H1 and short dowel H2 into vertical dividers D 2 Place three vertical dividers D onto top bottom shelf B facing short dowel H2 side 3 Se...

Page 9: ...Place horizontal divider C over vertical dividers D C C 1 Place horizontal divider C over vertical dividers D The long dowel should go through all the holes on horizontal dividers C B B long dowel 6 x...

Page 10: ...into vertical dividers D D H2 x 6 short dowel 6 x 30 mm H2 H2 H2 H2 H2 H2 1 Insert six shot dowels H2 into vertical dividers D 2 Place three vertical dividers D onto horizontal divider C D D D D D B s...

Page 11: ...om shelf H4 x 3 assembly screw DIRECTRA NO 5 x 38 1 Align dowels to holes in underside of top panel B and place into position 2 Secure top vertical dividers with three screws H4 through top bottom she...

Page 12: ...D D step 5 Assembly side panel 1 Attach other side panel A with 12 screws H4 as shown H4 x 12 assembly screw DIRECTRA NO 5 x 38 A B A C C C H4 H4 H4 H4...

Page 13: ...front edges face down unfinished edges will face up 2 Push screw covers H3 onto all screw heads 3 Position the back panels E in a staggered patten as shown 4 Nail H5 the back panels E into place bein...

Page 14: ...o wall stud 3 Use 1 2 in screw H7 to secure L bracket to top panel B H7 x 1 L bracket screw 7 x1 2 F N H8 x 1 wall screw 6 x1 1 2 P N H6 x 1 L bracket top panel top panel wall stud wall stud Optional...

Page 15: ...could result in excessive sagging of the top or shelves Extreme overloading can cause failure of the unit and possible injury Care Instructions Dust with a clean lint free dry cloth warning 15 lbs 15...

Page 16: ......

Reviews: