


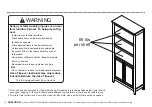


!
WARNIN
G
Seriou
s or f
atal
cru
shing
inj
uries
can occ
ur
from fu
rnitur
e tip-ove
r. T
o hel
p pr
eve
nt tip-
over
:
- In
stall t
ip-o
ver r
estra
int
pro
vide
d.
- Pl
ace he
avy i
tem
s on
lower
she
lves a
nd as
far ba
ck a
s po
ssib
le.
- Pl
ace
heav
ies
t item
s in the l
owes
t dra
wers
.
- Unl
ess s
pecifi
cally
des
igne
d to
acc
omm
odate
,
do n
ot set
TVs o
r oth
er h
eav
y obj
ects
on t
op of
this
pro
duct.
- Ne
ver a
llow
child
ren to
clim
b or ha
ng o
n dr
awers
,
door
s, o
r shel
ves.
- Ne
ver o
pen m
ore t
han
one d
rawer
at a
tim
e.
(OR
)
- Do
not d
efea
t or r
emo
ve th
e dra
wer i
nterl
ock s
yste
m.
Use
of ti
p-ove
r restr
aint
s m
ay onl
y red
uce,
but not
eli
mina
te, the
risk
of tip
-ove
r.
This
is a
perm
ane
nt la
bel.
Do n
ot rem
ove.
17
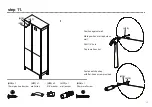
step 11.
(H13)
x 1
wall anchor
(H14)
x 1
38mm wall screw
(H11)
x 1
wall strap
(H12)
x 2
5/8” washer
(H10)
x 1
19mm pan head screw
Fasten anti-tip strap
with flat-head screw provided
(H14)
(H12)
Position against wall
Mark position of strap hole on
wall
Drill 1/4’’ hole
Tap in wall anchor
(H13)
(H10)
(H12)
(H11)


